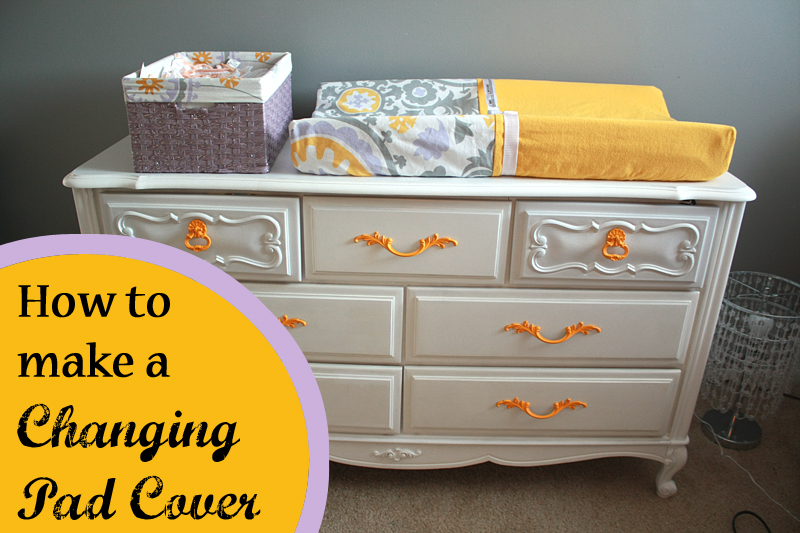
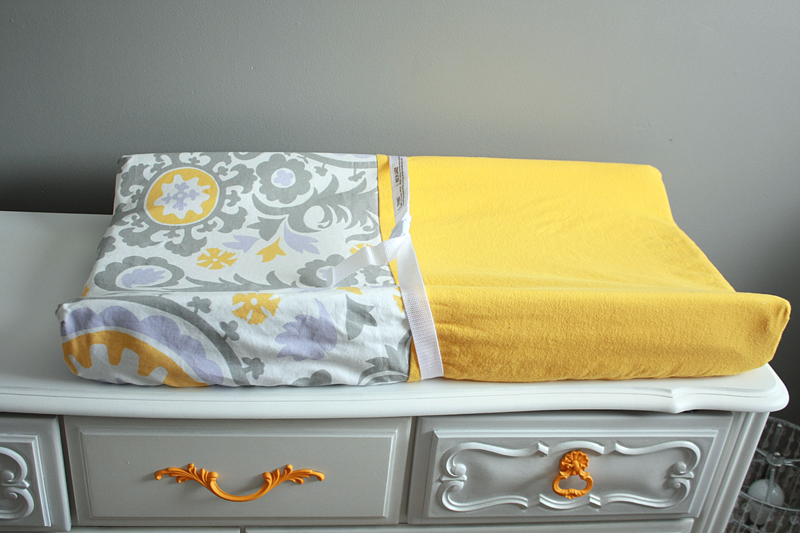
Oh the changing pad. Where all of life's little stinky problems get dealt with.
It may not seem like an item to waste time focusing on, but your little one will definitely spend some quality time getting to know that pad really well. At least his or her bum will.
Changing pad covers are mostly for show, and unless your actual pad is not waterproof, there is no reason to make your cover that way. If it gets dirty, just remove the cover, wipe off the pad, and continue on your merry way. Most people use the covers to add a bit of softness and warmth to the pad so their little one isn't always just lying on cold vinyl.
That said, when it comes to picking your fabrics, many people opt for materials such as minky or other super soft fabrics. Since I couldn't find any minky-type fabrics to match my nursery at the store (and not to mention it is SUPER expensive at $14.99/yd), I just opted for some nice snuggly flannel.
I originally wanted to use the same fabric as my curtains or crib skirt, but that was a heavy twill -- not exactly suitable for the occasion. Instead, I decided to use a portion of the twill as an accent piece -- just enough to tie the cover in with the rest of the room.
Things You'll Need
1 yard fabric for main body (washed and dried)
1/2 yard fabric for accent piece (washed and dried)
Newspaper or other tracing paper
Pencil
4 1/2 feet elastic, 1/4"-3/8" width
Spool of thread in matching color
Scissors
Tape measure
Pins
Before we get too far in the thick of things, be aware that changing pads do not come in the one-size fits all category. While they are all generally the same size, some are contoured, some are flat, some are wider and shorter, and some are skinnier and longer. I have the Summer Infant Contoured changing pad, so all the measurements you see below are for that specific pad. Just keep in mind that if you have a different pad, yours may not be the same.
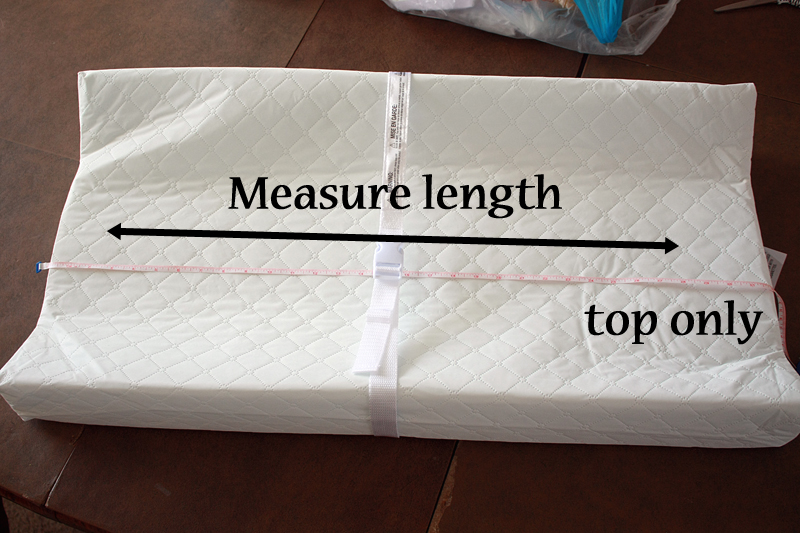
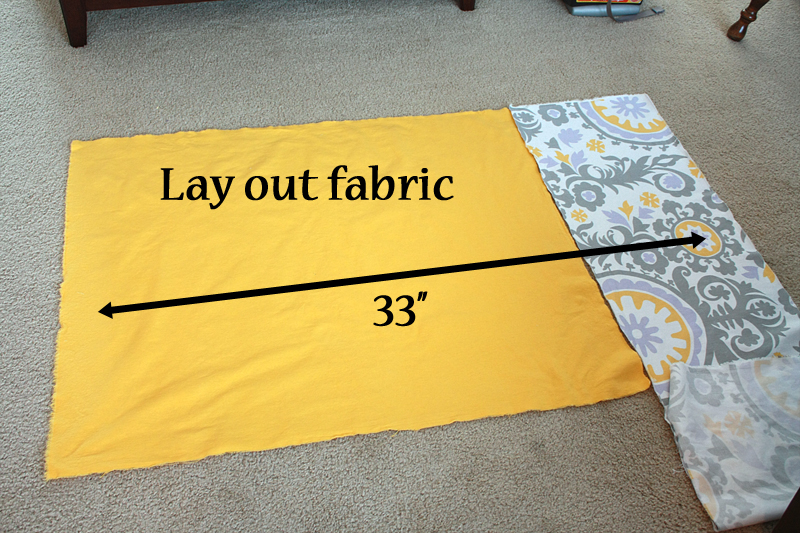
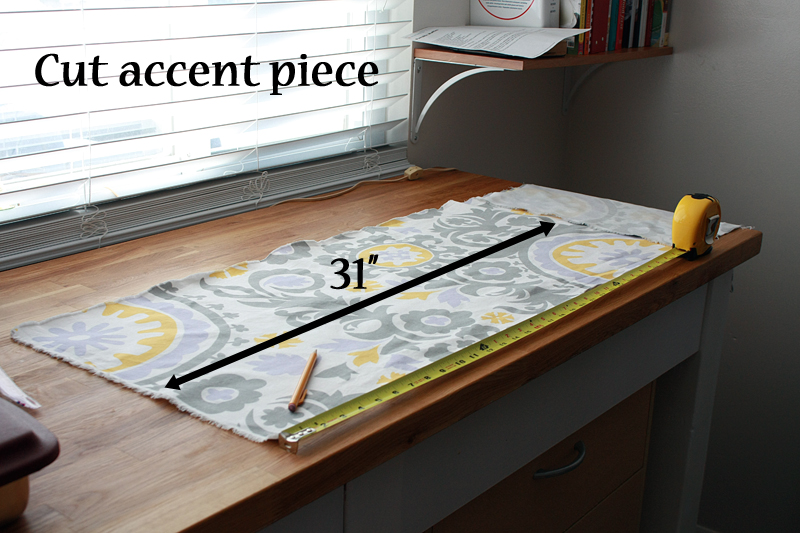
Let's start by measuring the length of the pad - top only. Mine was 32" end to end. Factoring in 1/2" seam allowances to attach end pieces, we need an additional 1", so our final length is 33".
Next, we need to measure the width and height of the sides together, including the contours of the pad. Start measuring from where the pad touches the table or floor, up over the contoured edge, back down the contour, across the pad, then back up over the second contour, and finally down to the floor/table again. In this case, pictures speak 1000 words:
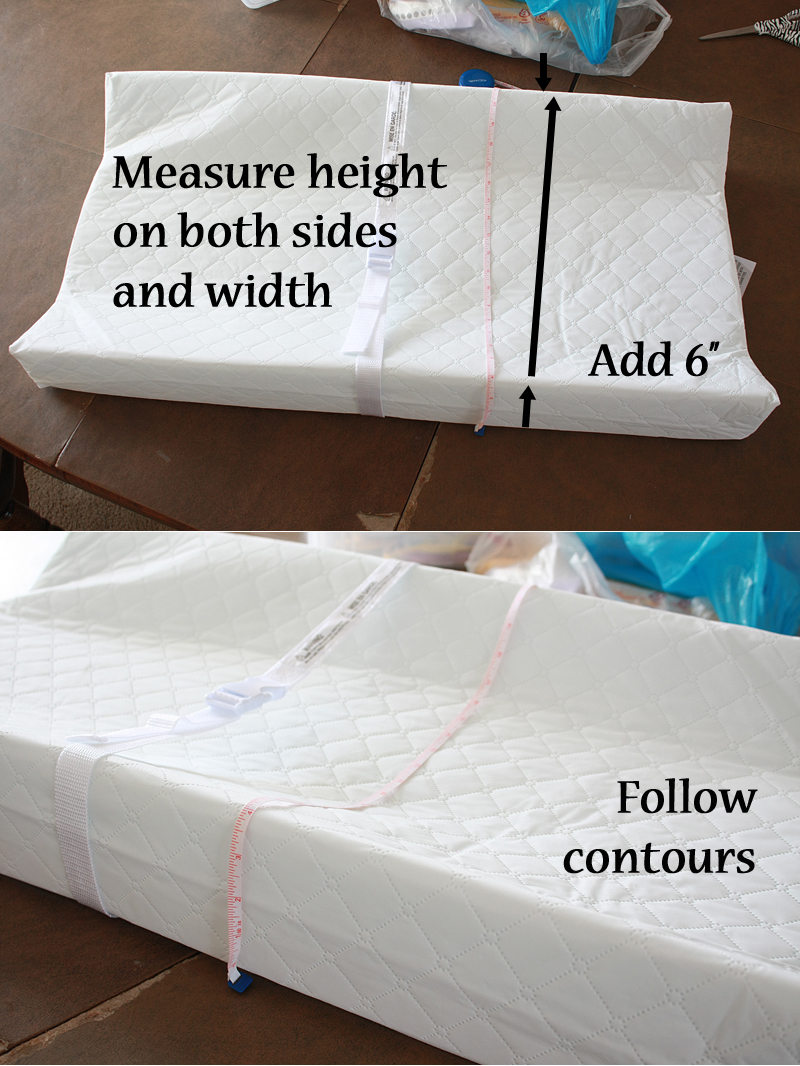
My pad measured 25". Add an additional 6" (3" for each side) for seam allowances and casing for the elastic. This gave me a final width of 31".
So, the final piece for our body needs to total 33" x 31".
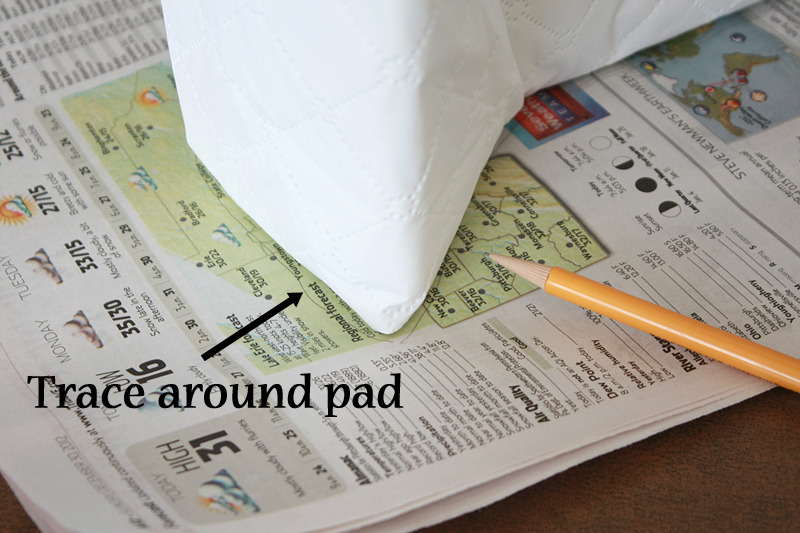
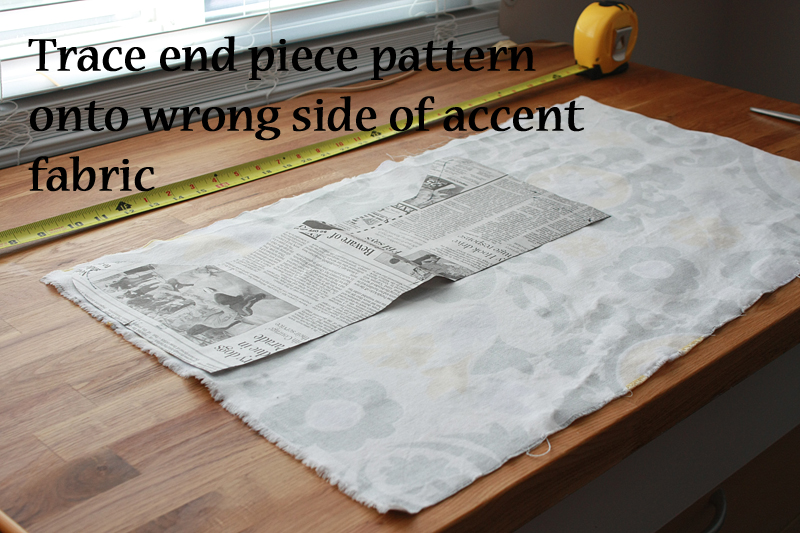
But what about those end pieces? Since every pad differs, you're going to need to create your own pattern to cut out. Simply stand the pad on it's end on a piece of tracing paper (I used newspaper).
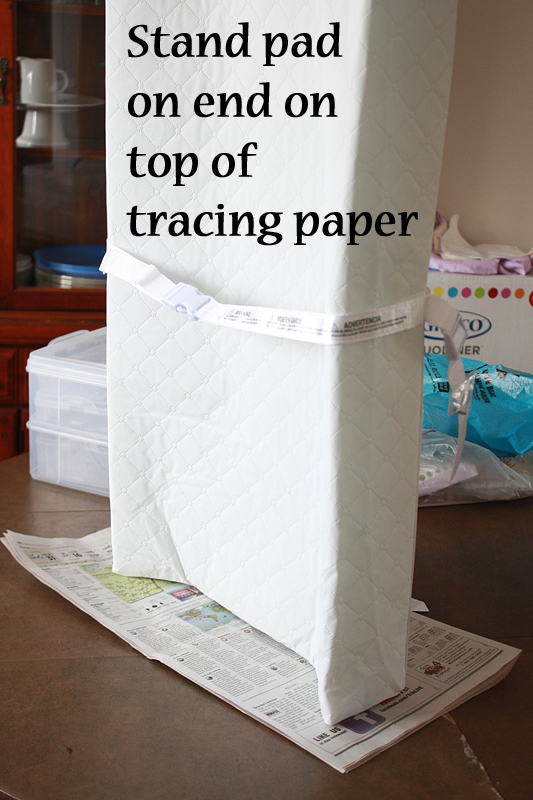
Then trace around the edges.
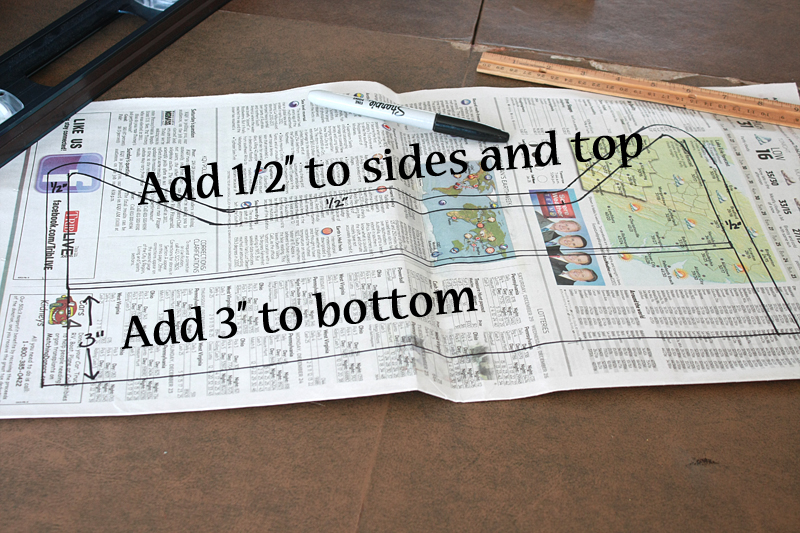
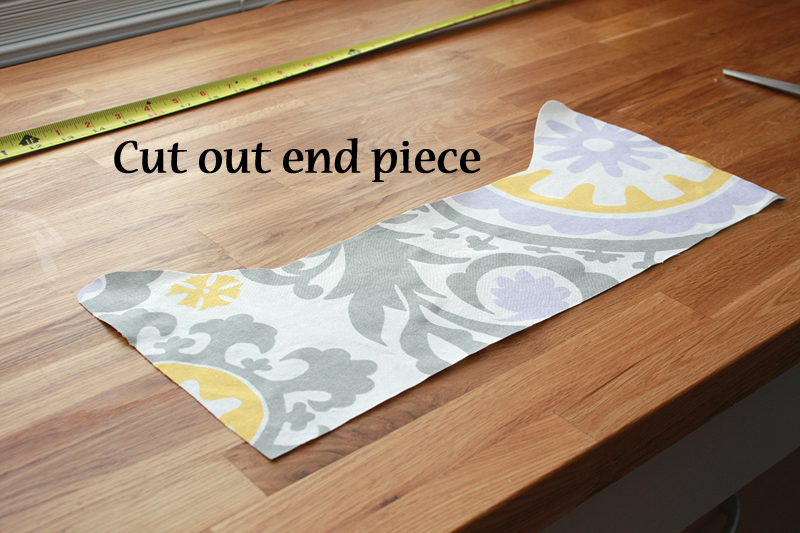
I cleaned my tracing up a bit using a ruler and a sharpie. Add an additional 3" to the bottom (straight side) of your pattern, and 1/2" to the sides and contoured top.
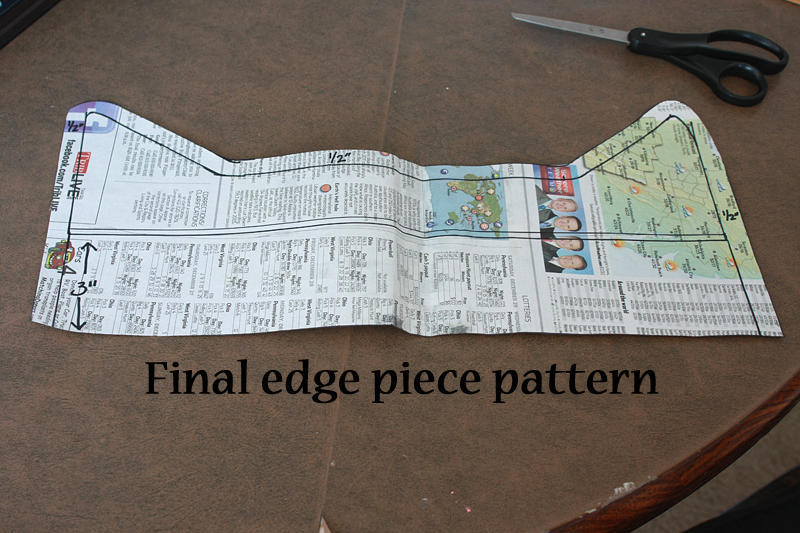
Cut out your pattern.
Now we're actually ready to begin making this thing. You can easily make this out of just one piece of fabric, but I can't take the easy route on anything, so we're also adding in an accent piece for where the head rests.
Since there's an accent piece being added, we need to figure out how much of each piece of fabric we need. The width of each piece will not change (so stays at 31"), only the length. The final length of the main body piece needs to be 32" (not accounting for seam allowances), so you just need to determine how much of the accent piece you want showing.
I was so focused on the fact that I might not have enough accent fabric, that I actually ended up making the accent piece longer than I originally intended. I ended up with a 14 1/2" accent piece and a 17 1/2" solid piece (seam allowances not included), but really wish the accent piece had been closer to 10-12". Either way, as long as the total length of your two pieces equals 32" (or your pad length), you are good to go. Make sure you add in your seam allowances (1" extra to both pieces).
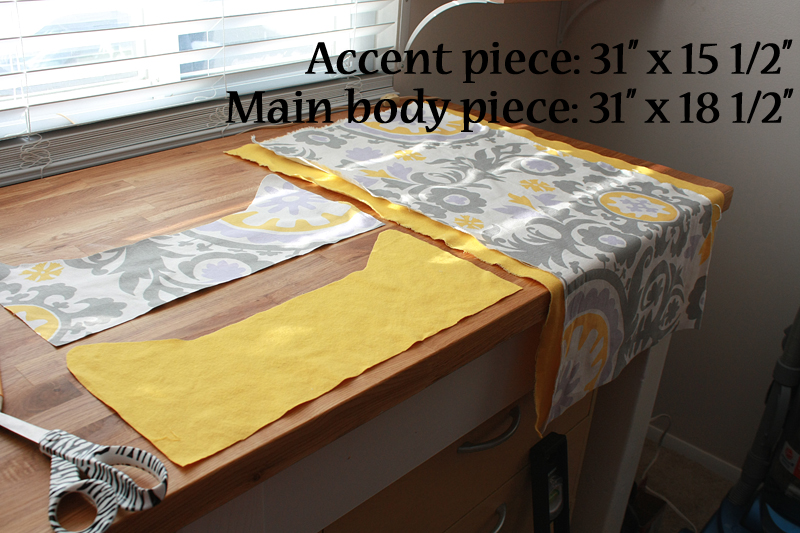
The final dimensions of each of my pieces were 15 1/2" x 31" for the accent, and 18 1/2" x 31" for the solid color.
Cut your fabric down to size, then set aside.
Place the remaining fabric from your accent piece right side down on your work surface. Lay your end piece pattern face down on top and trace around the edges.
Cut out your pattern.
Repeat with the main body fabric piece.

Quick pause for a recap. You should have (measurements may change based on your pad):
1 Accent body piece - 15 1/2" x 31"
1 Main color body piece - 18 1/2" x 31"
1 Accent end piece
1 Main color end piece
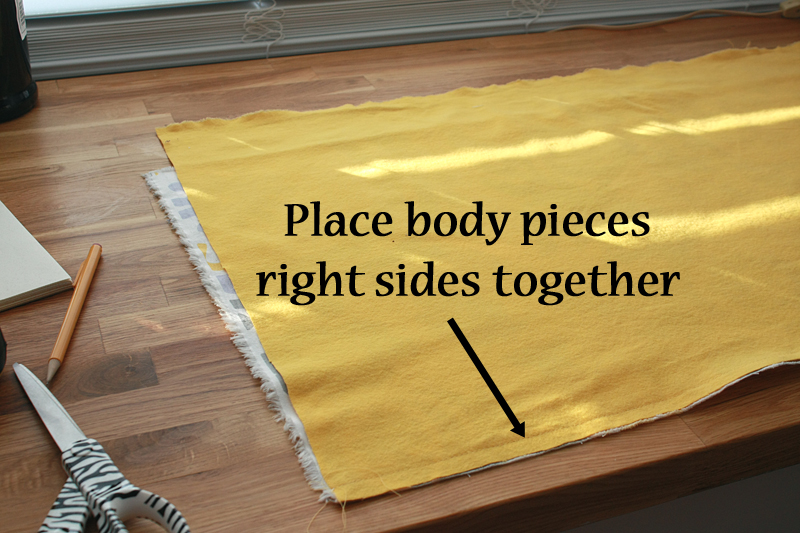
Now, place your main body piece right side up on your work table, and the accent body piece right side down on top. Line up the edges to sew together. Pin together if necessary.
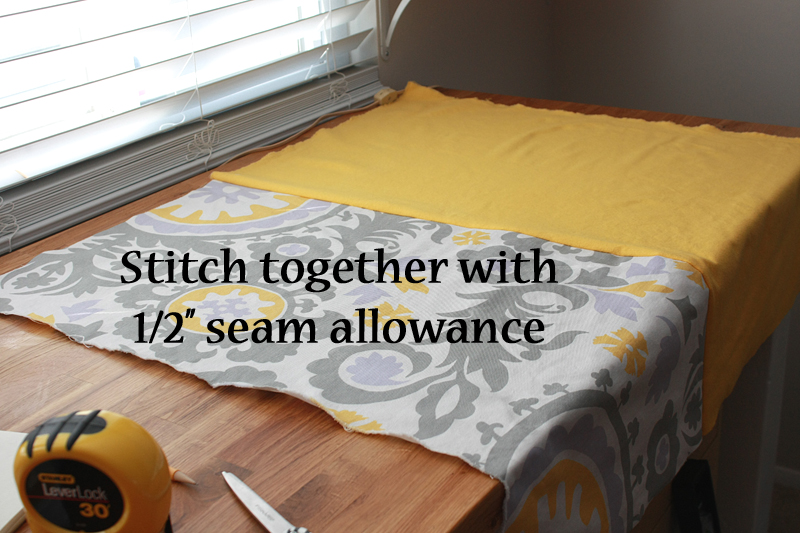
Sew pieces together with a 1/2" seam allowance. Your now final body piece should measure 33" x 31".
Now here comes what I think is the trickiest part of the whole project - attaching the end pieces.
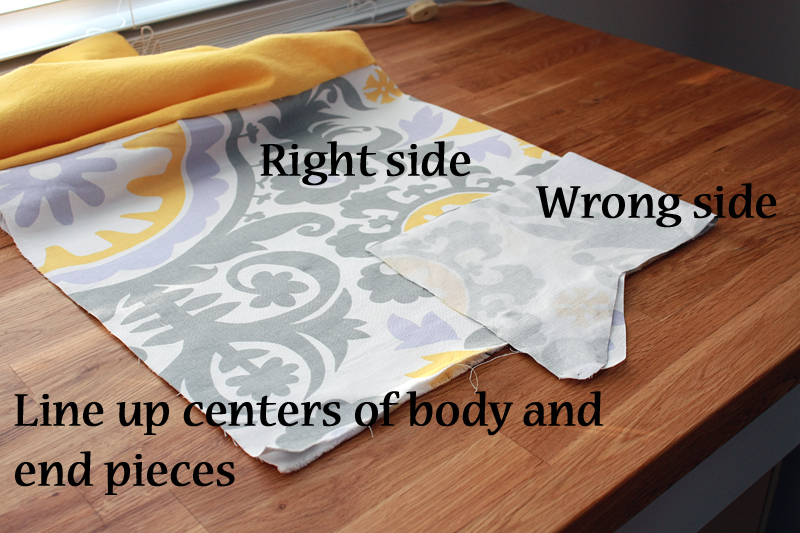
Line up the centers of the body and end piece. The body piece should be laying right side up, the end piece should be facing right side down. I simply folded each in half, then lined up the creases. Your end piece should be laying with the corners pointed away from the body piece and the straight portion between the contours even with the edge of the body piece.
Pin pieces together along the straight edges.

Pull contoured corner of end piece until it lays straight and even with the body piece. Pin.
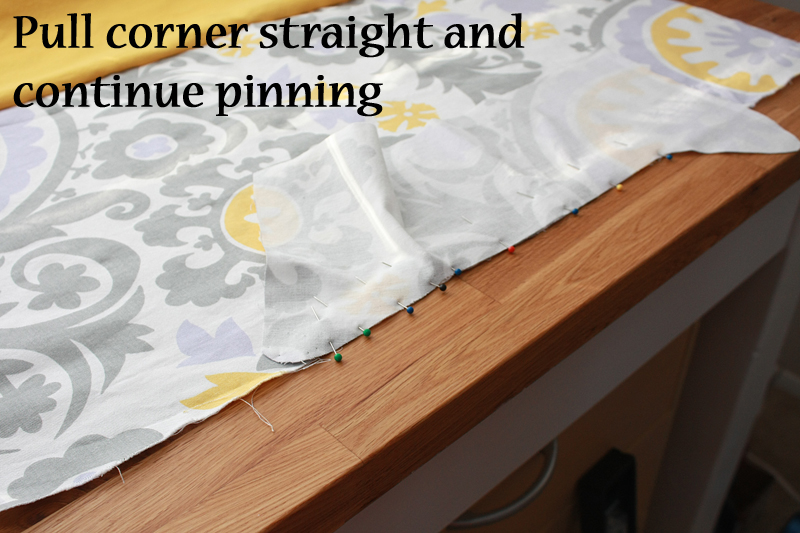
Continue to pin the edges of the corner to the edge of the main body piece as if it were all in a straight line. You will have to maneuver your fabric a bit.
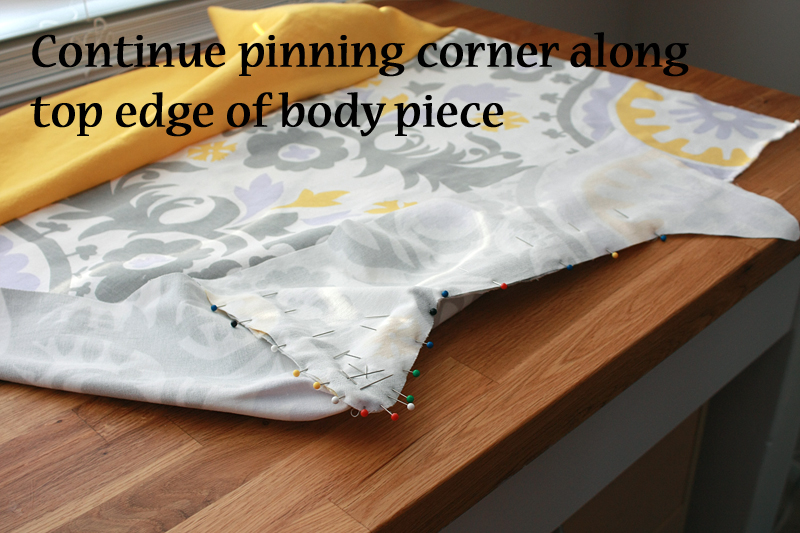
Repeat with the other contoured corner. Then stitch together with a 1/2" seam allowance.

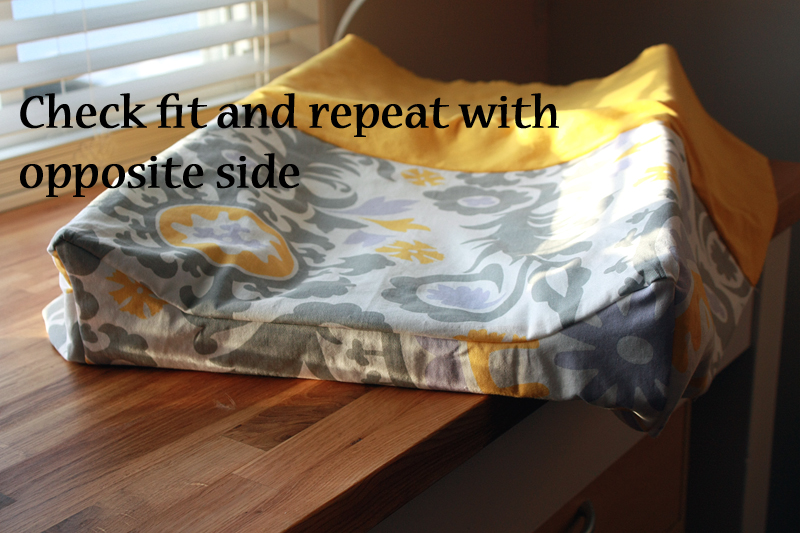
Flip your fabric so the end piece is now right side out and check to make things are fitting properly. (You should have an additional 3" overhang of end piece material, I just tucked it under the pad for the picture.) If everything looks right, repeat with the other end piece.
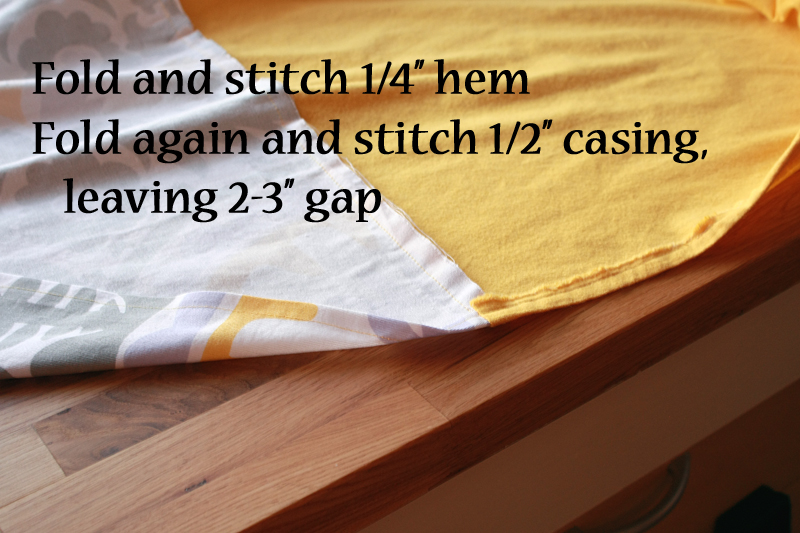
Once your end pieces are attached, it's time to make the casing for your elastic. Fold and press 1/4" of fabric around the entire pad cover. Sew the hem shut. Note: I like to make sure all the seams are facing the same way so the safety pin doesn't get stuck going through the casing. You should be able to do this with all the corner seams and one side of the seam between the accent body piece and main color body piece.
Fold and press the hem over 1/2". Leaving a 2-3" gap, sew the hem closed (make sure to back tack on both ends), stitching close to the inside finished edge (to leave room for your elastic to go through).
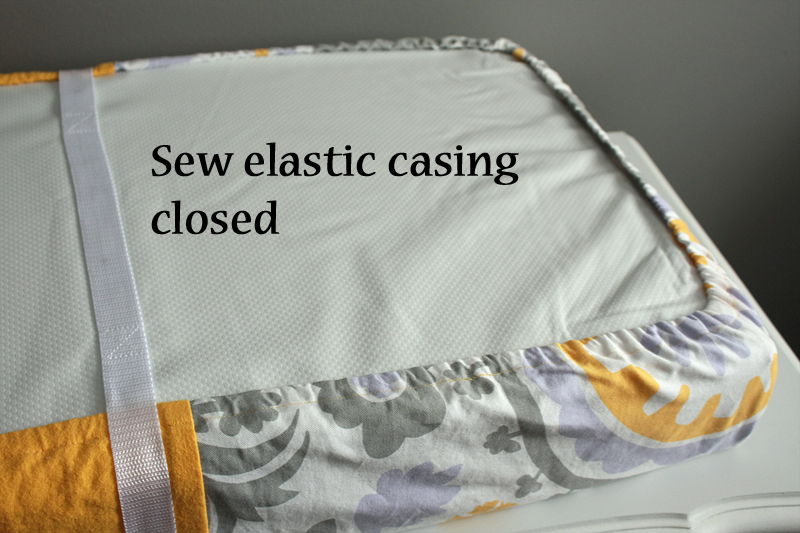
Attach a safety pin to one end of your piece of elastic. Attach the other end of your elastic to your fabric right outside the gap you left in the casing. Thread the elastic through the casing. (I often start with about 1 yard of elastic I thread through, then test it to see if it fits. If not, as in this case, I can "add" more elastic in 6" increments until my piece fits snugly without feeling like the elastic is being stretched almost to the point of breaking.)

Pin together the ends of your elastic with about 1" overlap. Check to see if your cover fits. If it does, stitch the elastic together, either by hand or machine. Slide the elastic into the gap in the casing, then sew the casing shut, taking care not to stitch over the elastic.
And voilà! You're done.
Do you have to do the whole accent piece for your changing pad cover? No.
Do you have to even have a changing pad cover? No. (You seriously can just use the pad since it's waterproof and wipe-able, but most people like to add a bit of color to the nursery this way. I've even seen pad liners to go over the covers so the covers don't get dirty, but that's where I draw the line. If the cover gets dirty, it gets dirty, it's not like you can't wash it and it's not like it's critical for the pad's function.)
Annnnyhoo. Final cost to make your own cover?
1 yard flannel @ $2.59/yd = $2.59
1/2 yard accent fabric @ $5.59/yd = $2.80
1 spool of thread @ $2.99/spool = $2.99
1/6 package 1/4" wide elastic @ $1.98 = $0.33
Final Price = $8.71
While some of the things I've made for the nursery don't cost less than a cheap version at Walmart or Target (like the ruffled curtains), the quality of those cheap items are usually not as good or there is no way I can find anything that matches exactly what I want. This changing pad cover, however, slides in right about the same price as the cheapest boring-est covers at Walmart. (In all actuality, I only spent $2.59 on flannel for the pad cover since I just used leftovers from my other projects.) Looking on Etsy for the customization? Get ready to spend well over $20 for one cover alone.
Obviously your price will vary by your measurements and what type of fabric you decide to use, but in general, this is one of those projects that's definitely worth the time to make.
I love all of these posts!! I wish you were my neighbor so that I could bring you over to sew for me LOL!
ReplyDeleteWhat a cute idea!
ReplyDeleteAny idea on why when I finish my contoured edges the end pieces aren't lining up? I've tried and repeated and for the life of me after I pin I can't get my edges to line up.
ReplyDeleteSorry for the delayed reply! Are you referring to the edges of the contoured piece with the main body piece? Which piece is ending up longer? You could also try starting to pin from one side and see if that gives you any different results. Or try cutting your contour piece either bigger or smaller depending on which piece is longer. (Did you remember to add a seam allowance to your contoured piece? I always seem to forget that!)
DeleteHi! I just want to thank you for the very nice tutorial. With it, I was able to do a changing pad cover that fits my changing pad perfectly. Here is a little link to what I did with the help of your instructions: https://premieregrossesseblog.wordpress.com/2016/04/11/les-amis-de-la-foret/ (sorry it is in french). I am very happy with it, so once again, thank you!
ReplyDeleteThis is a wonderful tutorial! Thank you!
ReplyDeleteDo you happen to have the measurements/dimensions of your two end pieces by any chance? I am making a changing pad cover for a gift and she has a summer infant pad.
Thank you!
I, too, am looking for a pattern or measurements for the end pieces as I am making this as a gift and don't have the actual changing pad.
ReplyDeleteThanks!
My changing pad has contoured ends as well. How would you adjust for this? I made one without the end pieces I just cut an 8 inch square out for the corners but it doesn't lay well in the pad.
ReplyDeleteHi Mary,
DeleteThe tutorial above is for a contour pad. Using a square at the ends will create a gap in the "valley" area in the center, as there is no pad to support the cover at the full height in this area. You need to trace the end of your pad as shown in the tutorial, add seam allowances, and use that piece as your pattern for the end. Hopefully the steps in the tutorial can walk you through!