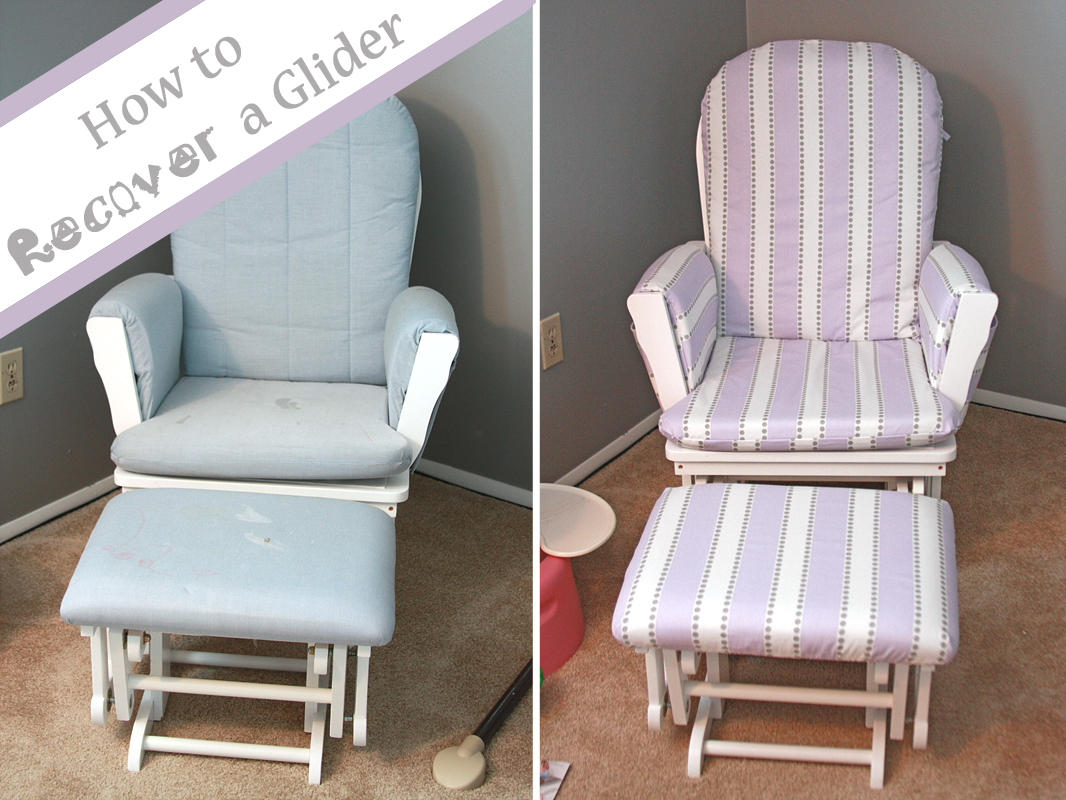
Here we are. The final big ticket item for the nursery. The one I was definitely the most nervous about tackling, but can save you so.much.money in the end.
The glider.
I searched and searched for a tutorial on how to do this, though none of them quite matched up for what I was looking for. There were a couple key things I really wanted when recovering the glider -- 1) Zippers: Velcro just doesn't hold up that great over time, and I don't have (and didn't want to invest) in a snap press. And 2) The slipcovers had to be removable and washable. No stapling or gluing these covers on any portion of the chair whatsoever. Who knows where all spit-up might end (or marker drawings), so it's crucial that I can actually wash them, not just spot clean.
So I pulled a little bit from one tutorial, and a bit from another, schooled myself on how to install a zipper, and all of a sudden, I had one awesome looking glider. I think it brings so much more to the room than your typical solid colored glider and.and.and. I just cannot say this enough -- it's washable. Every single last slipcover piece. (Just scroll down to the next picture to see why this is so important.)
All that said, let's get this show on the road. Warning: this is long and picture heavy.
Things You'll Need
1 glider + ottoman with removable pads you wish to recover
4 yards medium to heavy-weight fabric (I used a cotton twill from a 54" bolt, you may need more fabric if you use a 44" bolt)
Matching thread
1 22" matching zipper
1 20" matching zipper
2 14" matching zippers
Seam ripper
1 yard 1/4" elastic
Good scissors
Pins
Ruler
Pencil
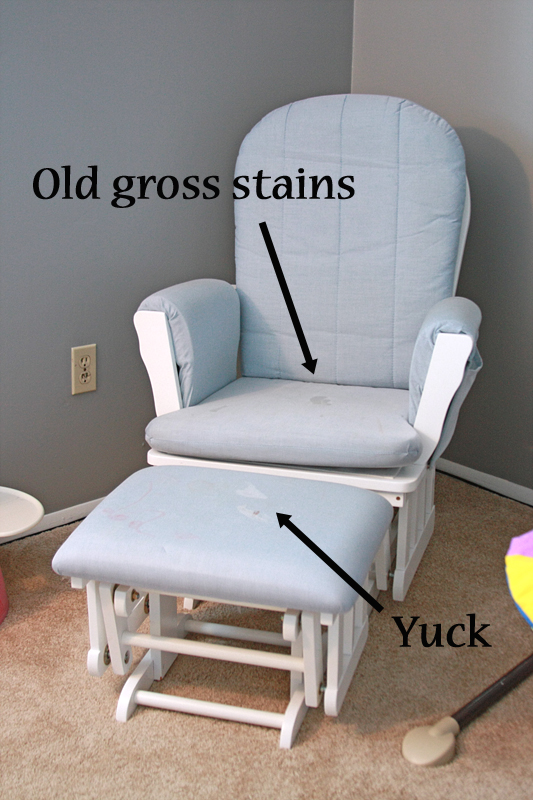
The first thing you're going to want to start with here is an old glider that has probably seen better days. Mine came from a home with 3 kids and had been well loved, especially by markers. What's key to look for here is that the cushions are still in decent condition (and it's comfortable for you to sit in!) and a frame that is still going strong. Mine? A whopping $25 off Craigslist.
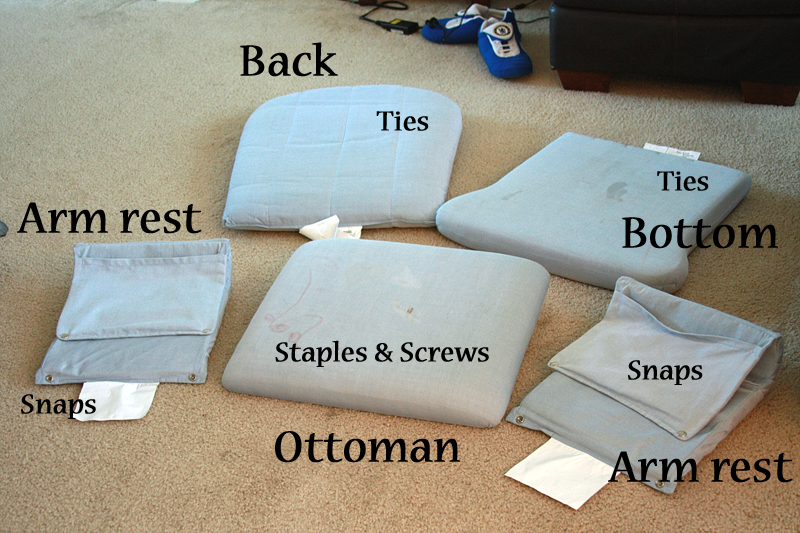
Once you get your crazy bargain deal home, it's time to fully inspect what you have. Pull all the pads off and note how they are attached. Is it by ties? By velcro? Snaps? Or maybe it's even stapled on (very common with ottomans).
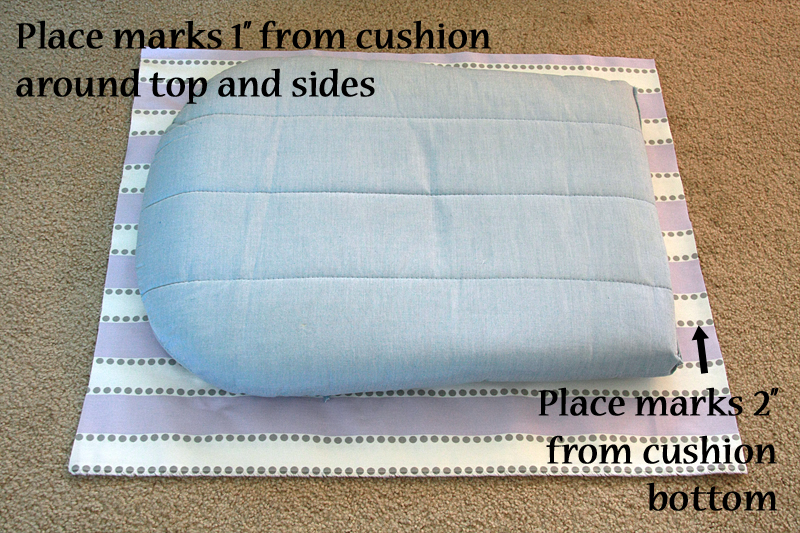
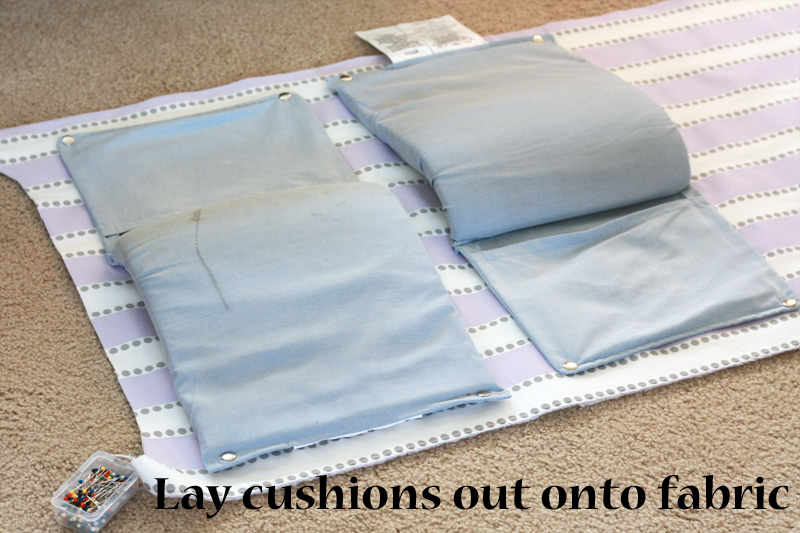
Let's start with the "easiest" piece, shall we? The back cushion. Most of these cushions look like a big tombstone, but don't worry if yours is a little different. Go ahead and lay out your fabric (ironed in half length-wise, so you should have a 4 yard piece of fabric the width of the bolt it was on), then place your cushion on top with any pattern running in the desired direction. Leaving about 1 1/2" margins around the top and sides, and about 2" along the bottom -- cut off the excess fabric. (And honestly, it doesn't have to be perfect here. I think I just ended up cutting off the remaining fabric 2" below the bottom of the cushion.)
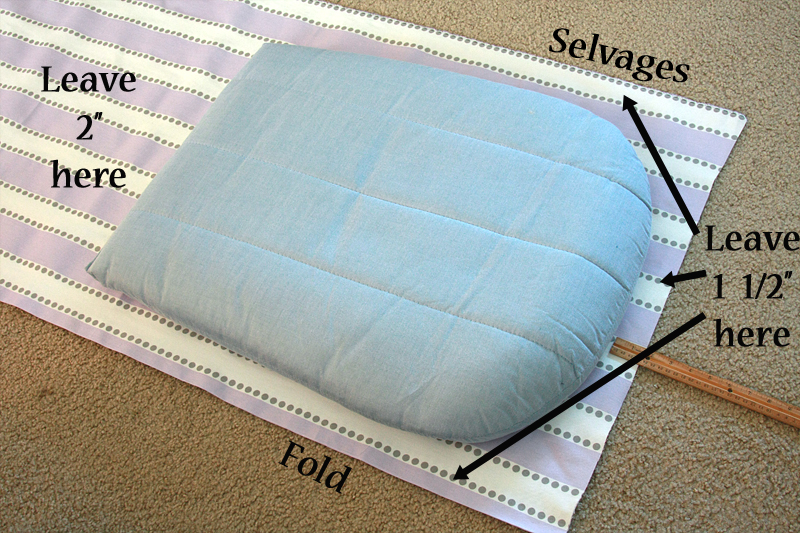
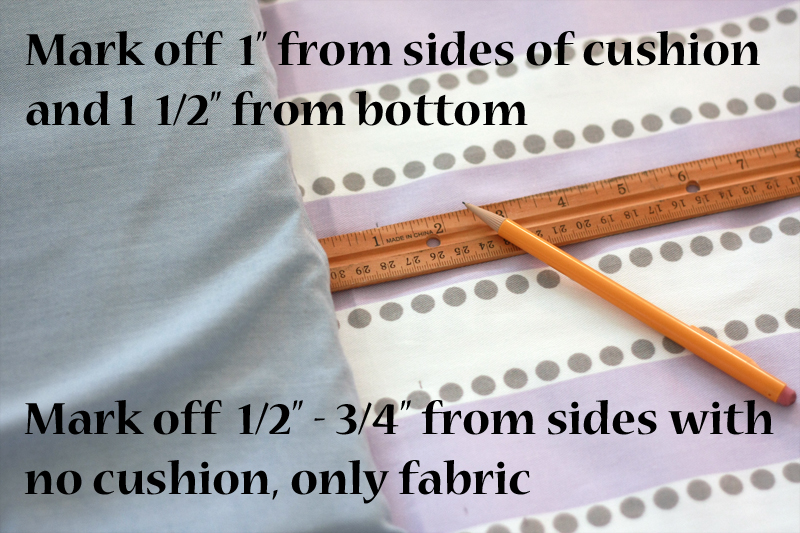
Ta-da. Now it's time to be more specific. Along the sides and top of your cushion, make marks 1" away from the cushion. Once you get to the bottom of your cushion, change the marks to 2" away.
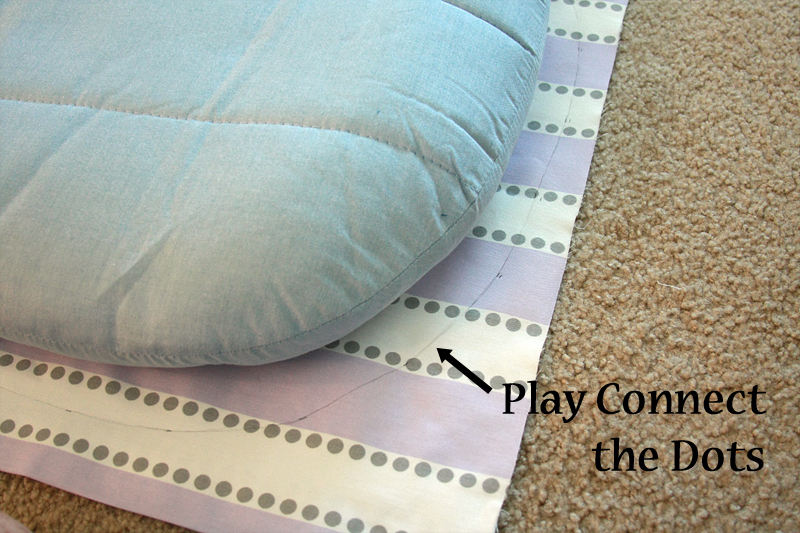
For all you people out there who must use a pattern, this part may get a bit nerve-wracking for you. We're going to play "connect the dots", and trace around the outside of our cushion. Your line should be 1" from the top and sides, and 2" from the bottom.
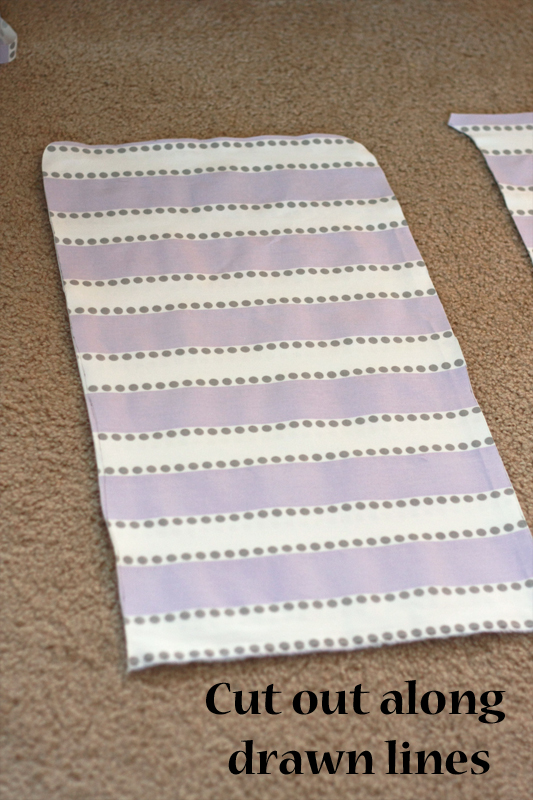
Cut along drawn lines.
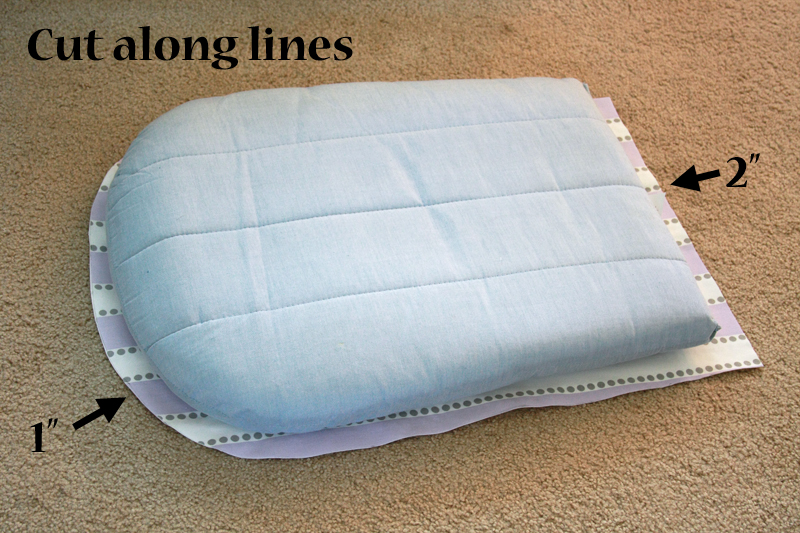
Since your fabric was folded, you should now have 2 pieces slightly bigger than your back cushion.
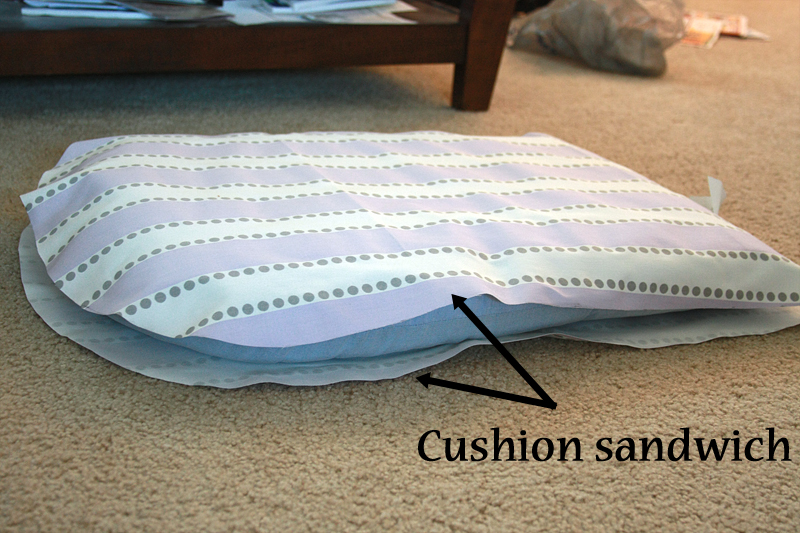
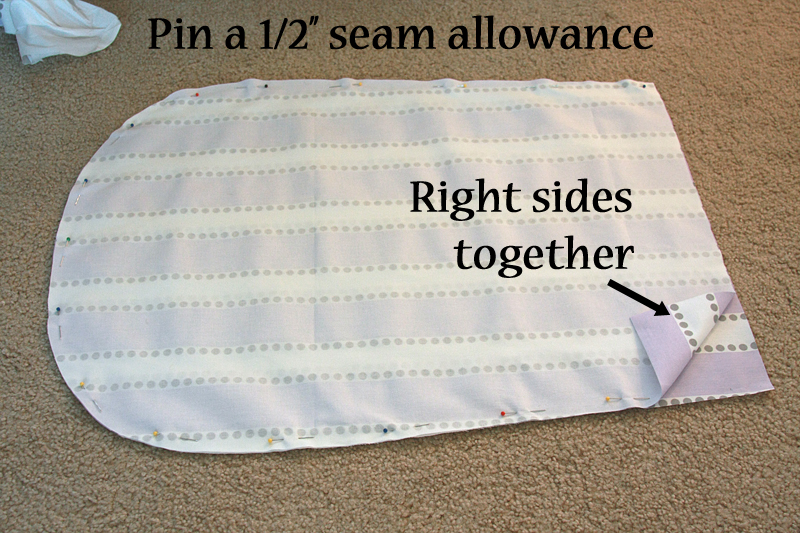
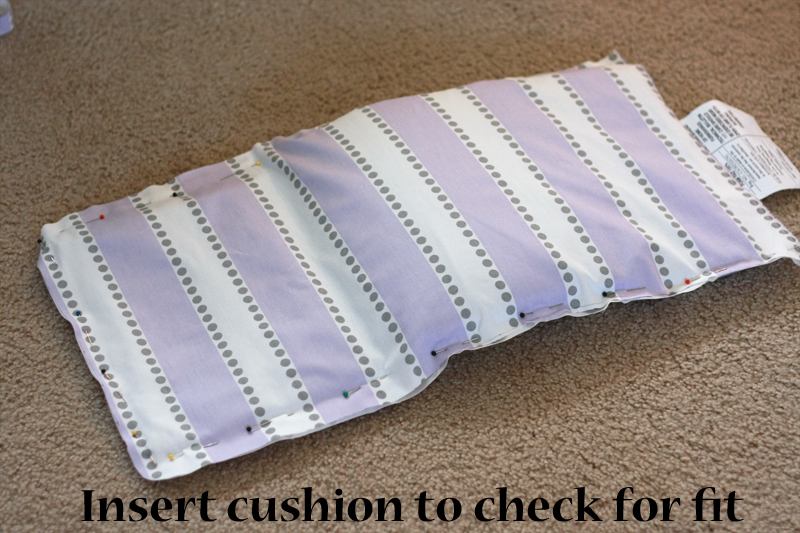
Let's make sure our slipcover is going to fit. Turn the two pieces so the right sides are facing each other. Pin a 1/2" seam allowance around the sides and top of the fabric. Leave the bottom unpinned.
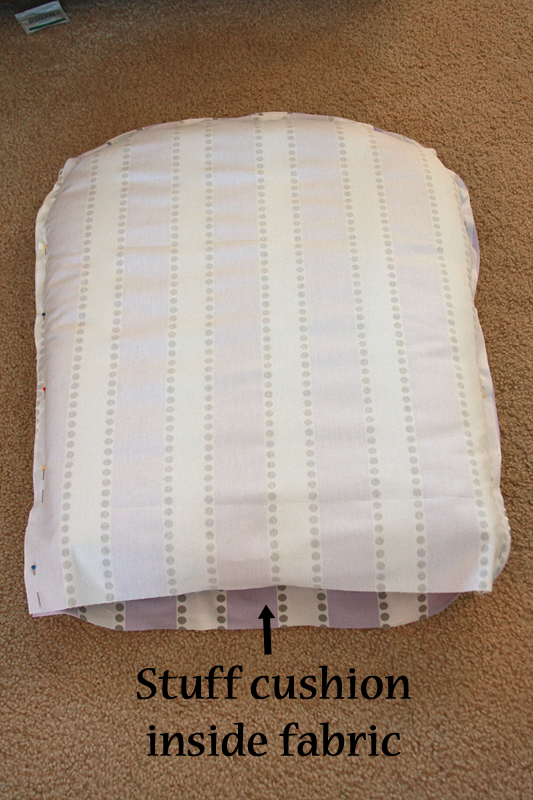
Stuff the cushion inside your pinned fabric. Push the cushion up as far as it will go against the pins. If there are any major gaps between one of the pins and the cushion, readjust the pin so they all follow tightly along the edge of the cushion.
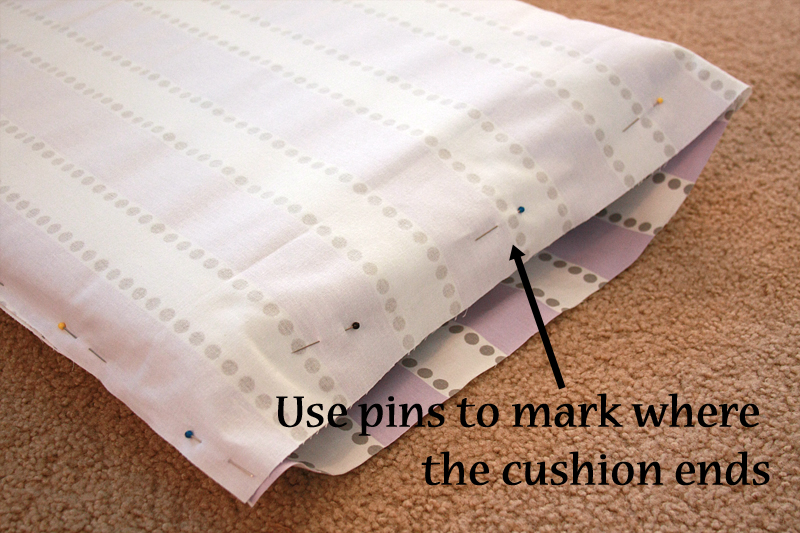
Next we need to figure out where our cushion ends so we can insert a zipper. Take your two pieces at the open end and pull them together until they are tight against the bottom of the cushion and meet at about the seam of the original cushion. Place pins along the point where the pieces meet, just in the top layer (so you are able to get the cushion back out).
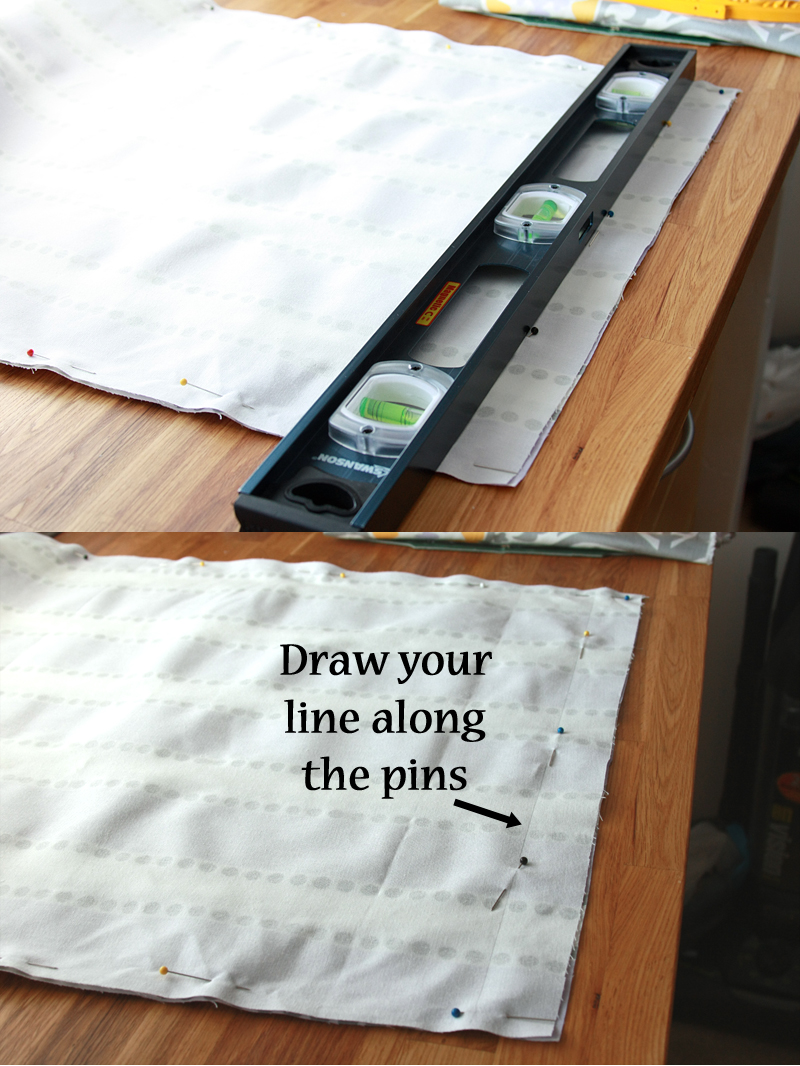
Pop that cushion back out and lay your pieces on a nice flat surface. If you had to readjust any pins, trim your fabric to reflect these changes. Using a long ruler, trace an even line along the pins at the bottom. If there's a lot of fabric between your drawn line and the end of the fabric, you can cut it down to about a 5/8"-1". I left my at 1".
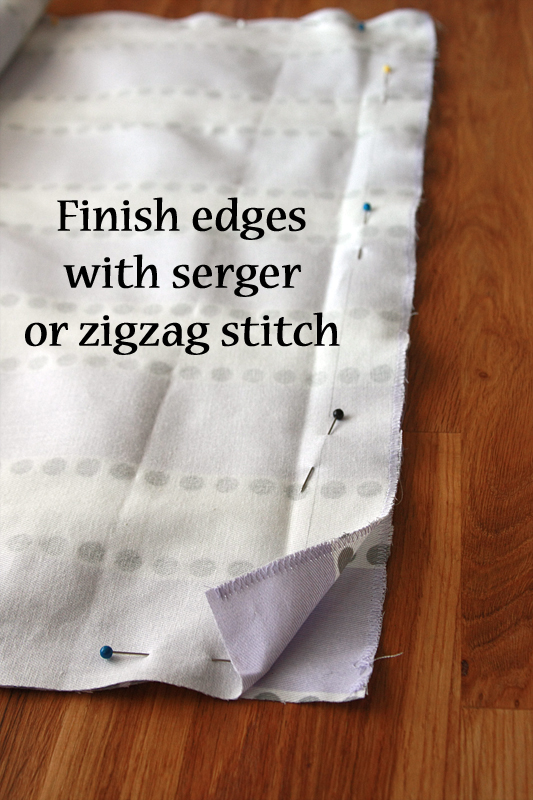
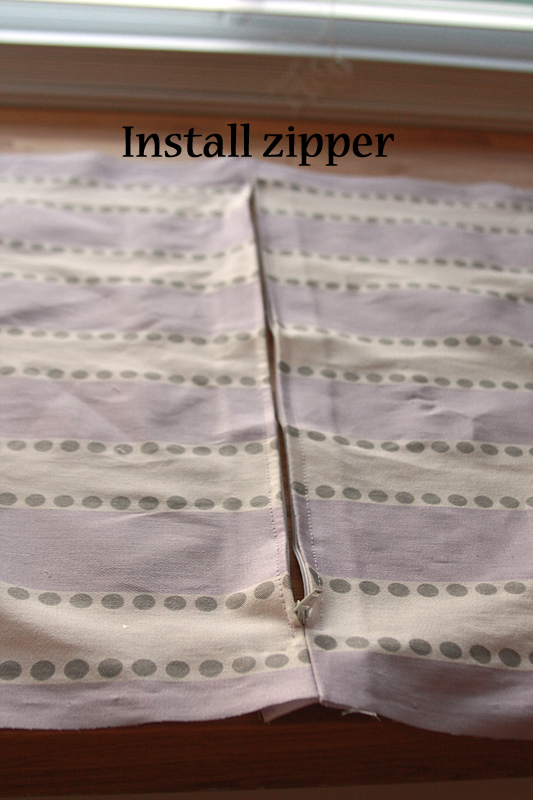
Alright, we're going to insert the zipper. Hold on to your britches. Trust me, it's way easier that it seems. First, we want to finish our edges along the bottom (where the zipper is going) so it doesn't come unraveled with some wear and tear. To do this, either serge along the edges or use a zigzag stitch with a short stitch length.
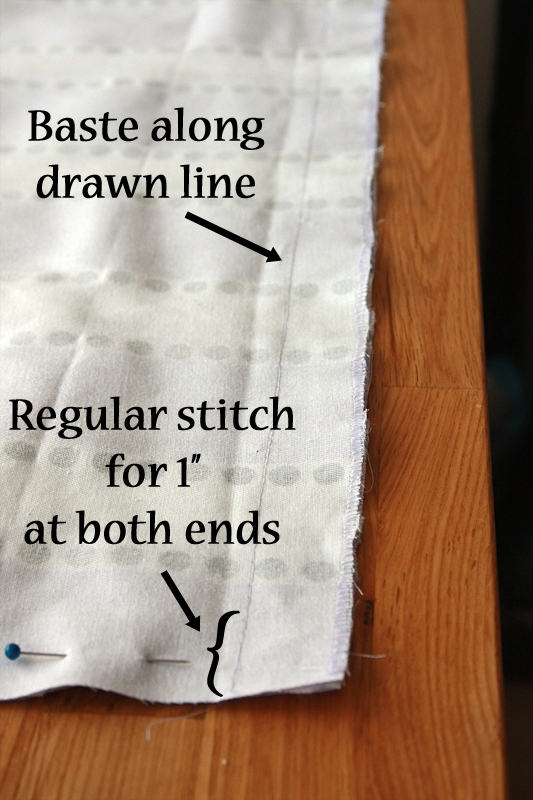
Now switch your stitch settings to a straight stitch and the longest stitch length. Baste along the line you have drawn. Reset your sewing machine to a normal stitch length. Stitch over the basting stitches for 1" at the start and end, back tacking at all starting and stopping points.
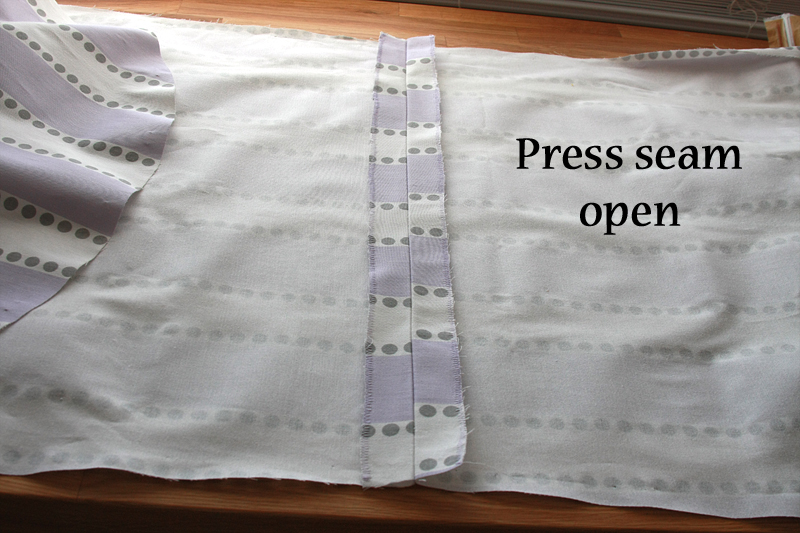
Unpin the remaining fabric (so only the basting stitches are holding the two pieces together). Press your seam open and flat.
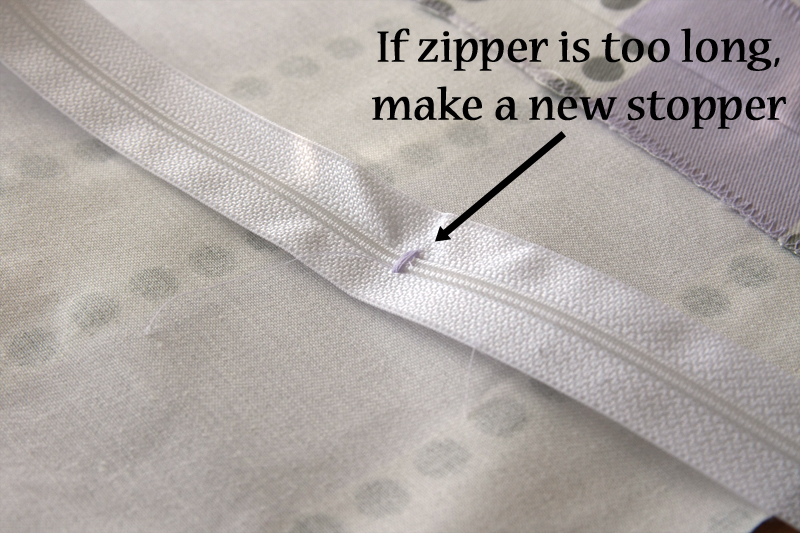
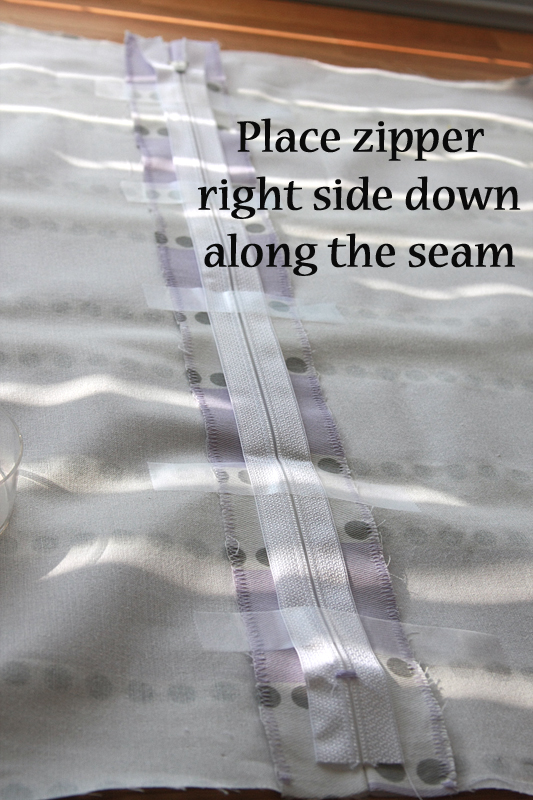
Place zipper right side down on top of your seam. If the zipper is too long (as mine was) you'll have to make a new stopping point. You want the start and stop points of the zipper to end roughly 1" from the edges of the fabric. If you need to make a new stopper, simply mark where you want it, then set your sewing machine to the widest zigzag setting with a "0" stitch length. Run the needle back and forth several times across the teeth of the zipper (it shouldn't be hitting them) until you have a thick band of thread.
Once your zipper is the proper length, line up the top and bottom of the zipper with the ends of your regular stitches. Make sure the center of the zipper lines up over the seam of your basting stitches. Pin or tape into place (leaving the top 2" or so at the top of the zipper free).
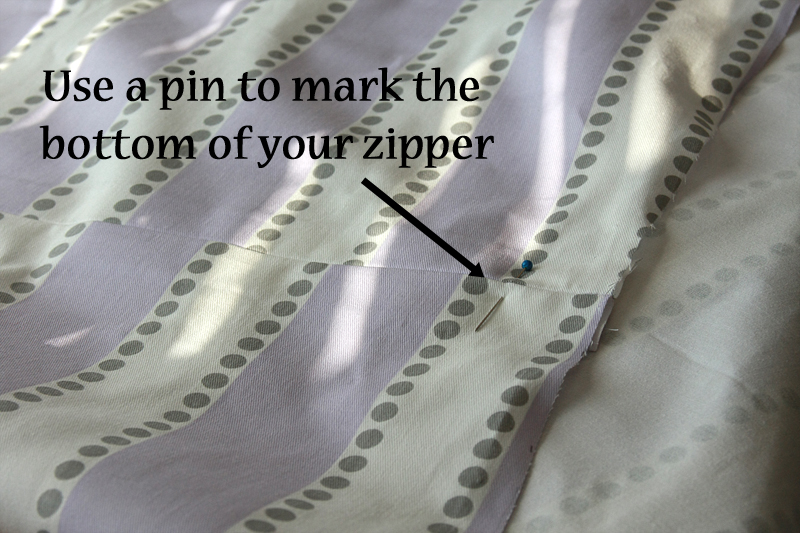
Flip your fabric over and use a pin to mark the location of the end of your zipper (you don't want to run over that metal piece or large wad of thread with your needle).
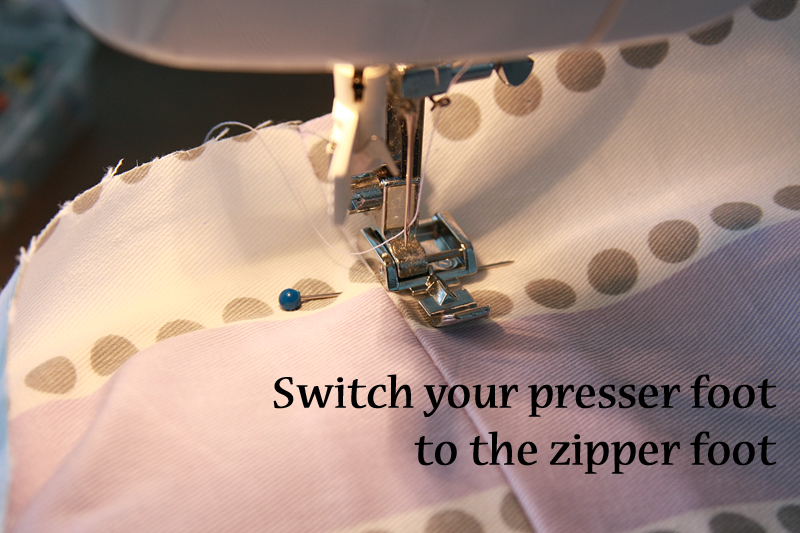
Switch out your normal presser foot for your zipper foot. This guy is designed to get your needle nice and close to the teeth without actually running over them. Position your needle all the way over to the left and line up your zipper underneath with the fabric facing right side up. You should be able to feel where the teeth of the zipper are through the fabric, so make sure you place your presser foot off to the right side of the teeth and keep it at this distance the entire time you're sewing. Go ahead and start stitching, making sure to back tack.
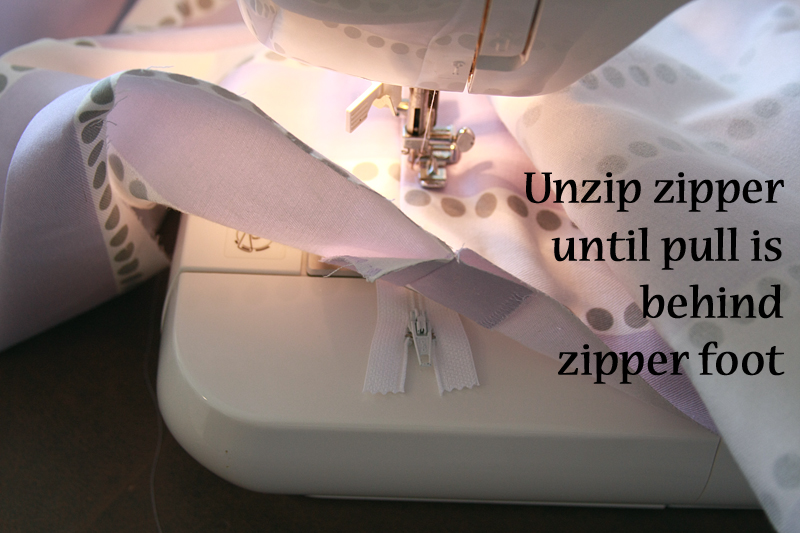
Sew the length of the zipper, stopping 2" before you reach the end. (Remember how we left that part tape/pin-free?) Make sure your needle is down, going through the fabric, rather than in the up position.
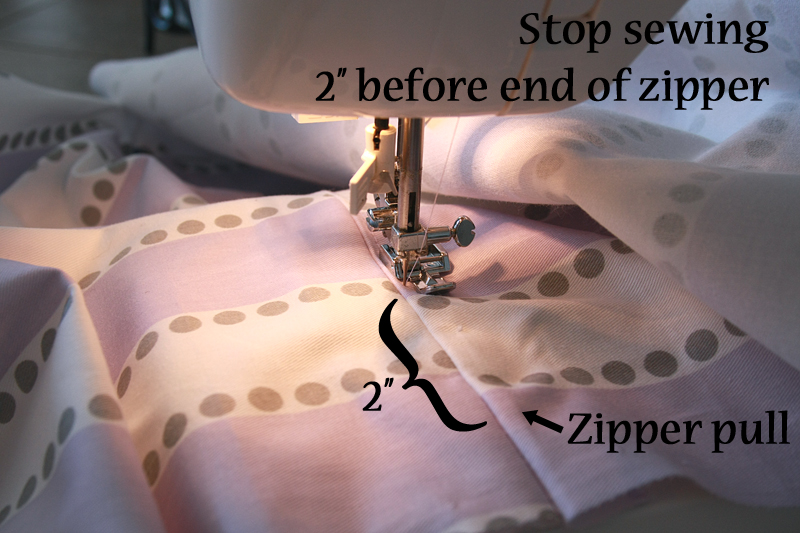
Raise up the presser foot. (Your fabric shouldn't go anywhere since your needle is holding it in place.) Lift up your fabric so you can see the zipper. Unzip the zipper until the pull has cleared the presser foot. You can always just sew around the pull, but this way is a little easier.
Put your fabric back down, realigning the teeth of the zipper with the seam. Sew to the end of the zipper, back stitch, and you're done with the first side!
Pull the zipper back to the top. Before you repeat on the other side, first change your zipper foot (scoot it over if need be) and swing your needle back to the right. Starting at the bottom of the zipper, align your needle and fabric perpendicularly to the last stitch you made when starting the other side. Stitch forwards and backwards a few times over the width of the zipper (don't forget to back tack) -- this helps to stop the zipper pull from sliding under the fabric and getting stuck. Back tack to finish.
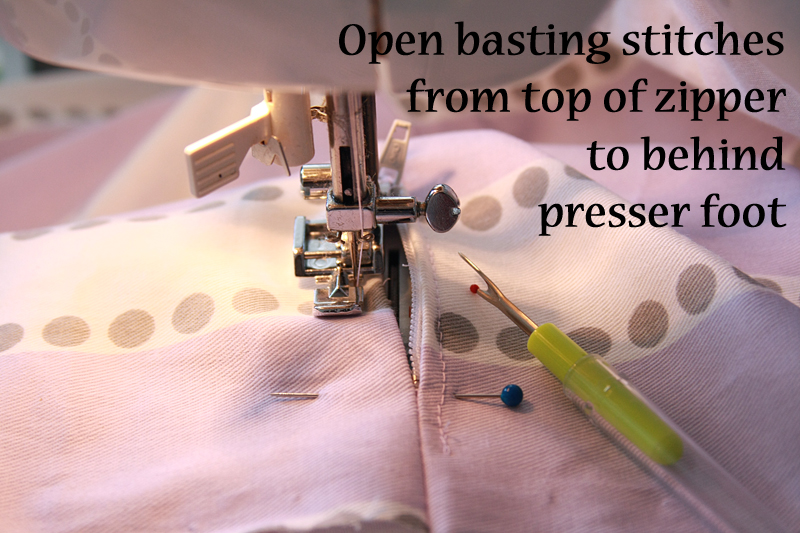
Now you can perform a repeat on the left side of the zipper. Once you've paused your stitching 2" from the end of the zipper pull, and bring out your seam ripper. Open the seam above the zipper starting from the end of your regular stitches (think back to that 1" of regular stitching we did over the basting stitches) to back behind the zipper foot. Move the zipper pull to back behind the zipper foot and finish sewing your zipper as before.
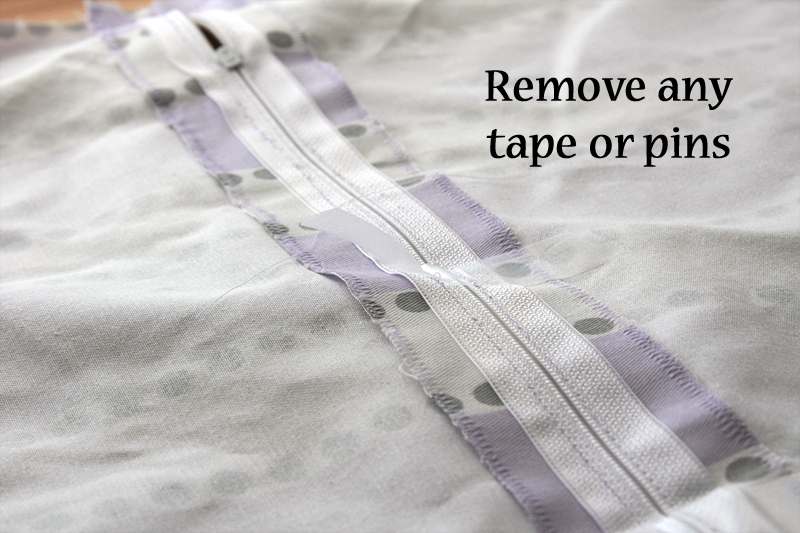
Remove any pins or tape from your zipper.
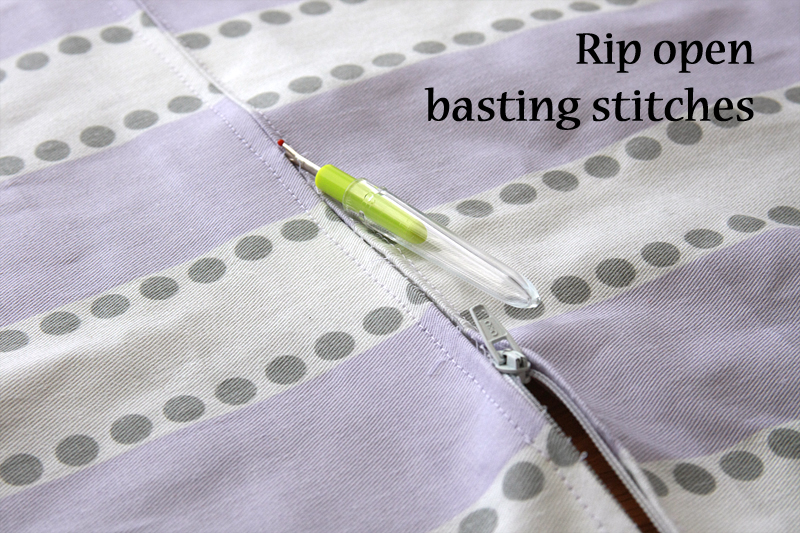
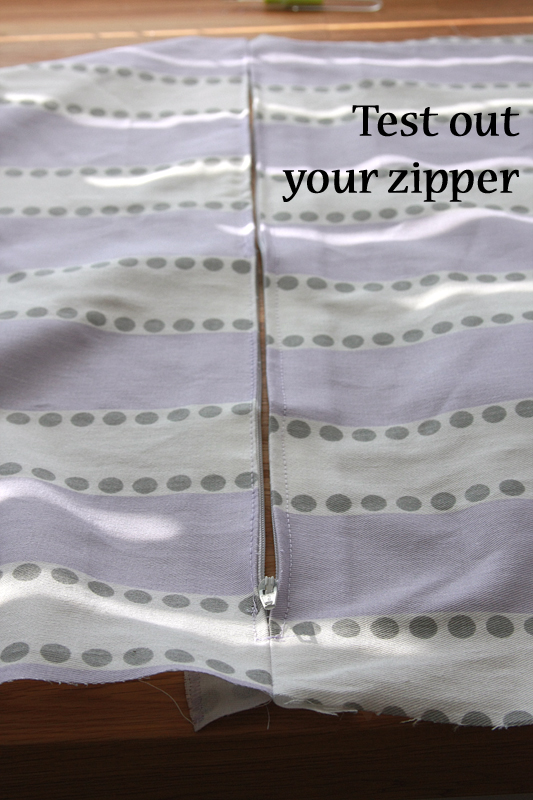
Open the basting stitches above your zipper using a seam ripper. Pick out any loose threads and discard. (Make sure you don't rip open those regular stitches at the top and bottom 1".)
Test that baby out to see if it works. (Still confused on how to do a zipper install? Check out this site for more info.)
Whew! Moving on... (Not that that was difficult...)
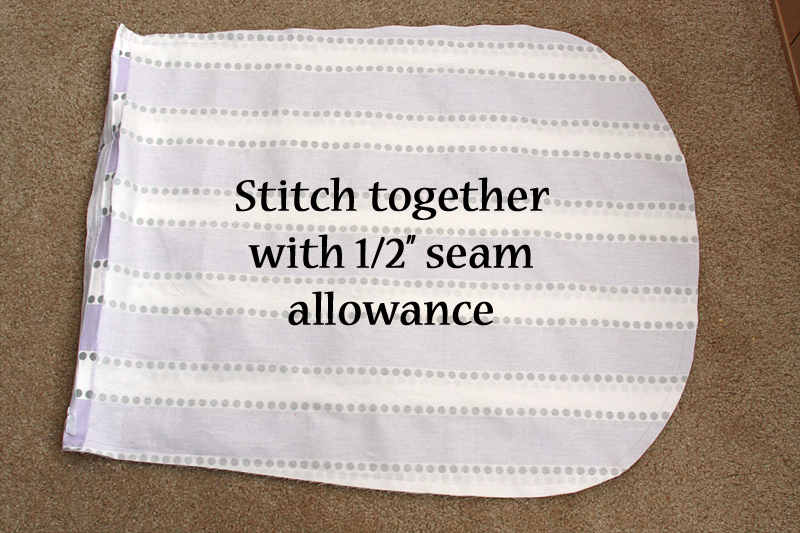
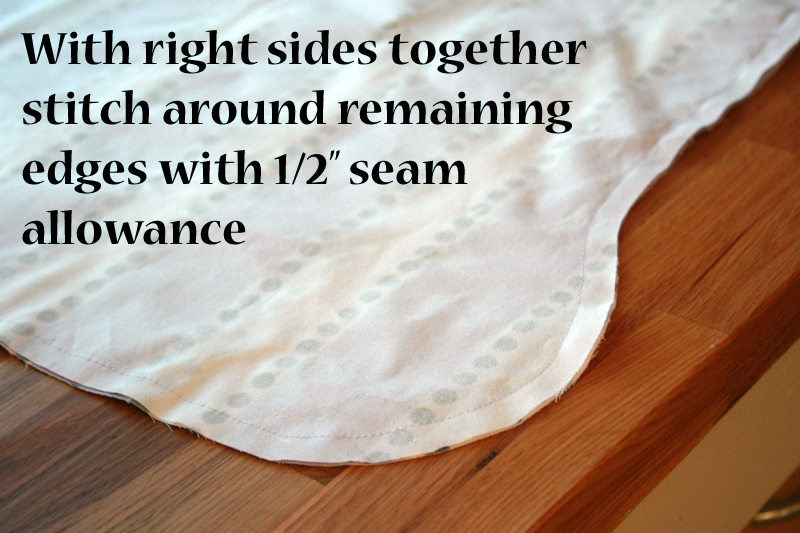
Place your two pieces with right sides together, with all the edges lined up as best possible (having the edges line up are more important than having the material completely flat and smooth in the middle). Pin together.
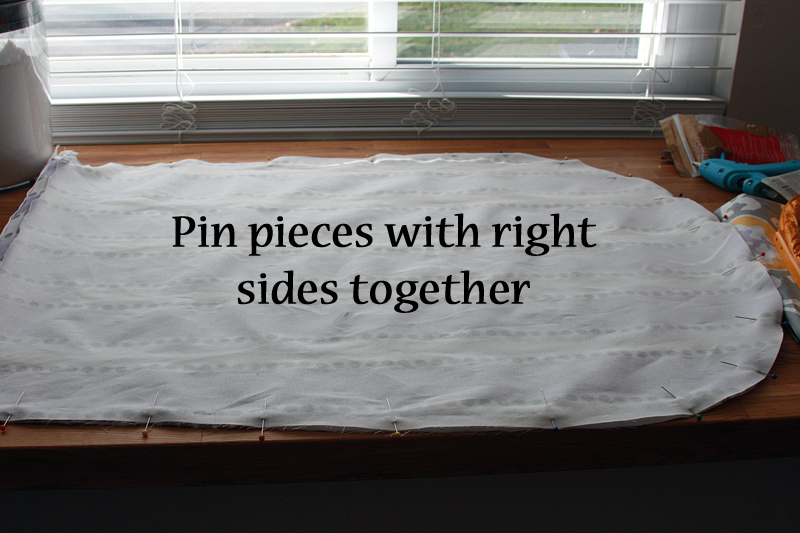
Stitch around the sides and top of the pieces with a 1/2" seam allowance, making sure to back tack at the start and end.
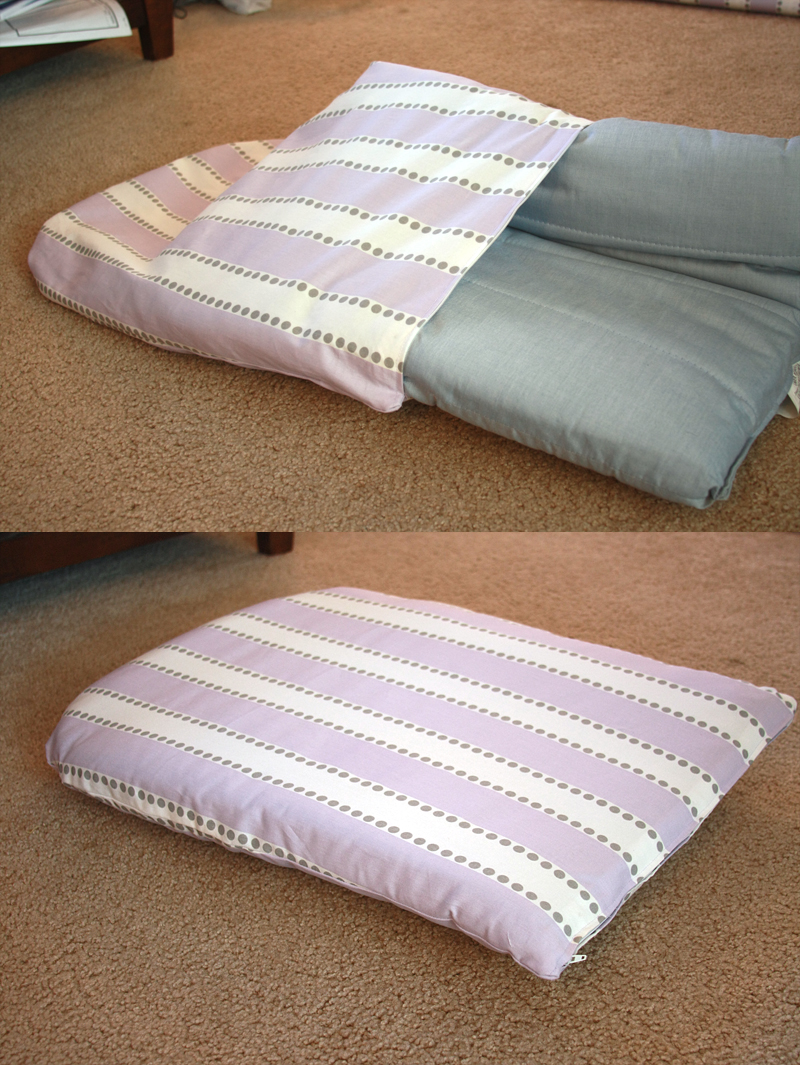
Turn your slip cover right side out. Stuff the cushion inside (I found it works well to fold them a bit) and zip up. Check out your handy work. If there's a lot of loose fabric, you may need to re-pin and re-sew the seam until the slip cover fits nice and snug. One more small step and we'll be done with this cushion (we do have to attach it to the chair after all).
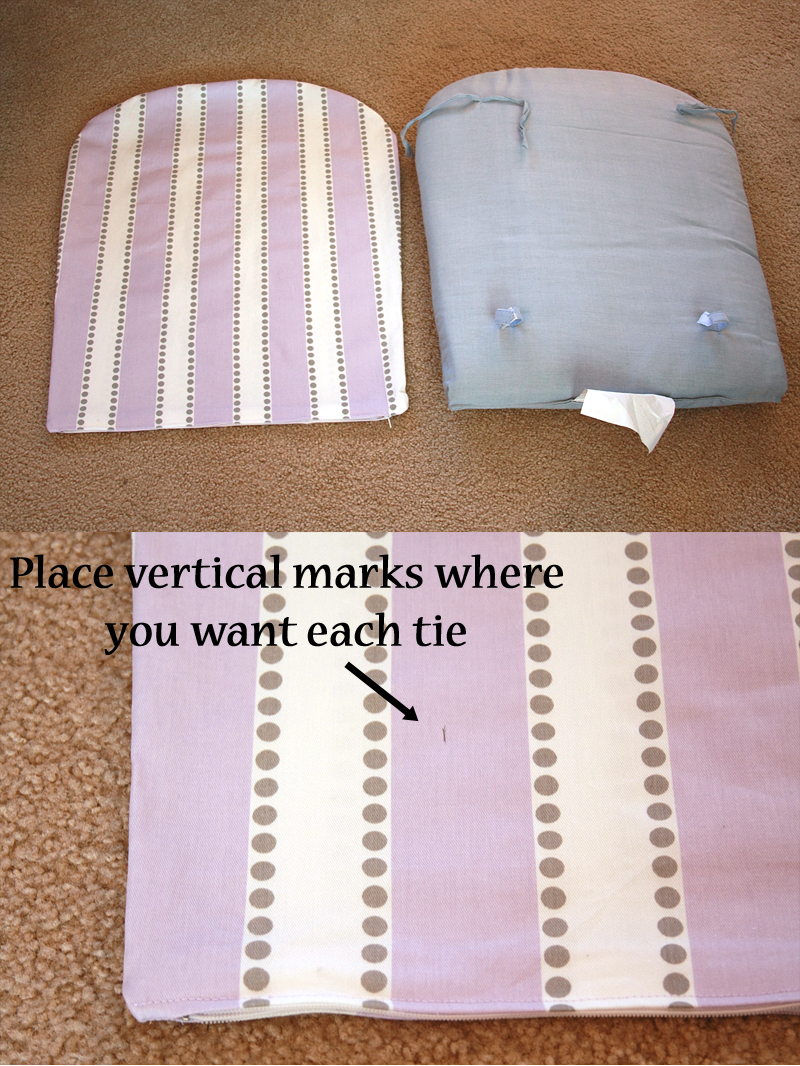
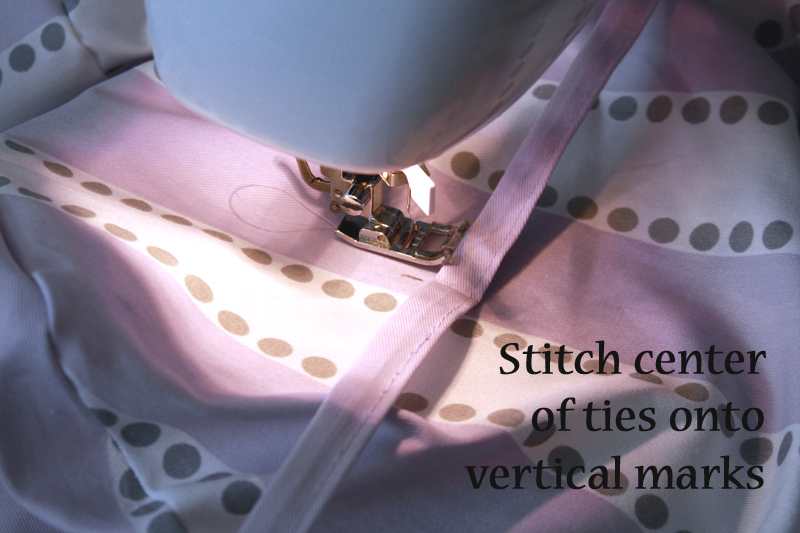
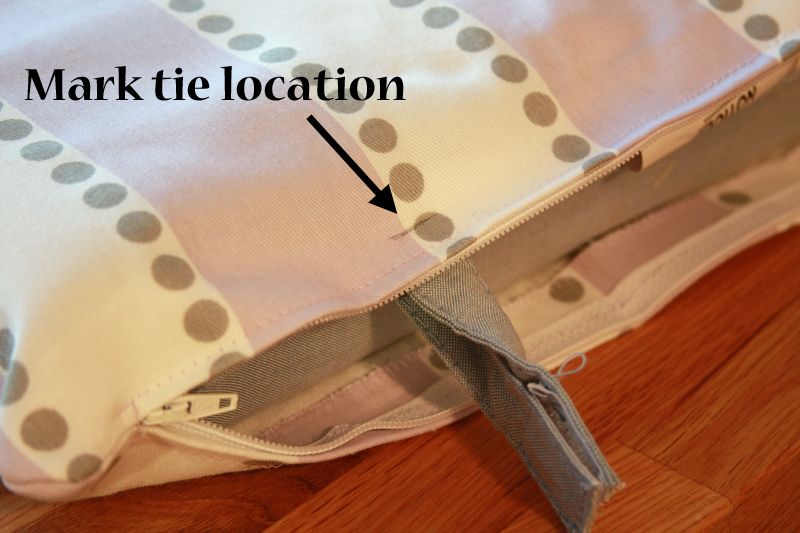
Pull the cushion back out. Now, you can either measure where your ties are or do what I did and just lay your cushion on top and kind of ball park where the ties go. Make vertical marks to match up with the tie location on which ever side you want to be the backside of the cushion.
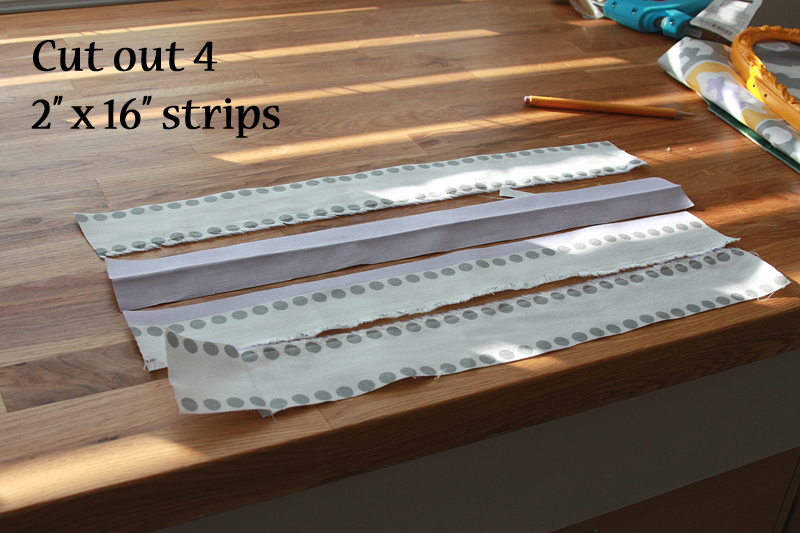
From your fabric, cut out 4 2" x 16" pieces (your scraps from cutting out the cushion pieces works great for this). If you're really wanting to tie bows on the back of the chair rather than just a knot, you might want to make these an inch or two longer. If you have to piece together a few scraps, that's fine, the seam isn't going to be a big deal, as long as your pieces are all the same size and straight.
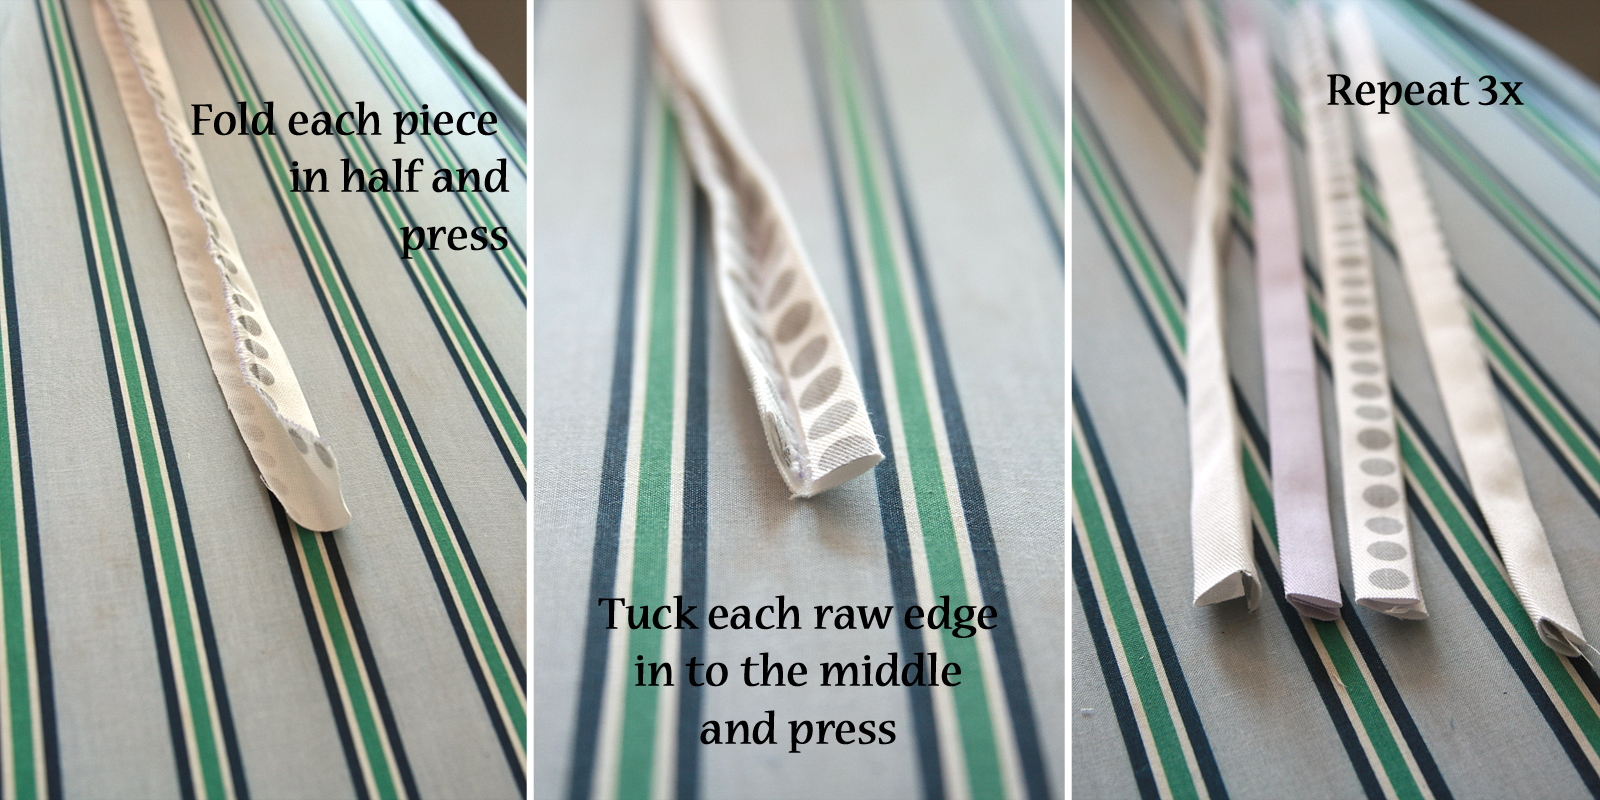
Fold each strip in half length-wise and press.
Tuck the raw ends underneath/inside and press again. Your strip should now be about 1/2" wide and 4 layers thick.
Repeat with the remaining strips.
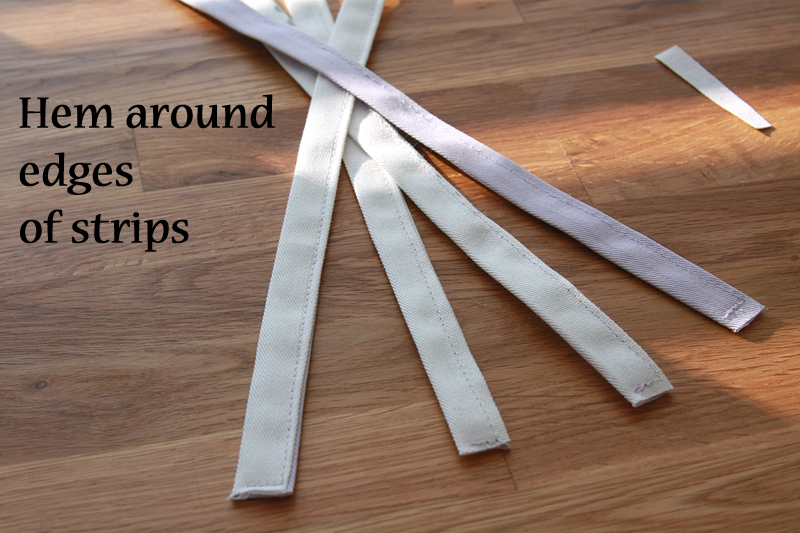
Hem closely around the edges of each strip.
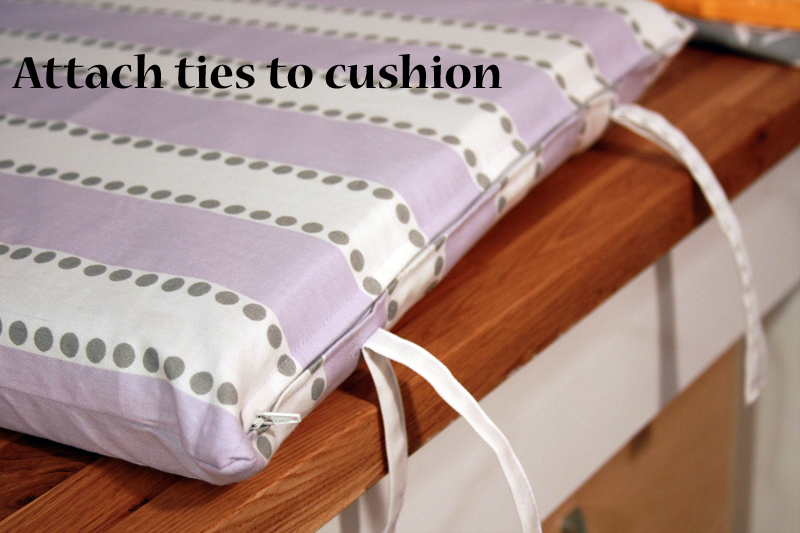
Fold strips in half to crease the center. Place the strip over one of the vertical marks you made on the back of the cushion. Starting from about 1/4" above the strip sew a straight line down the fabric (making sure to back tack) and finish about 1/4" below the strip, securing the strip to the fabric.
Repeat with remaining 3 strips.
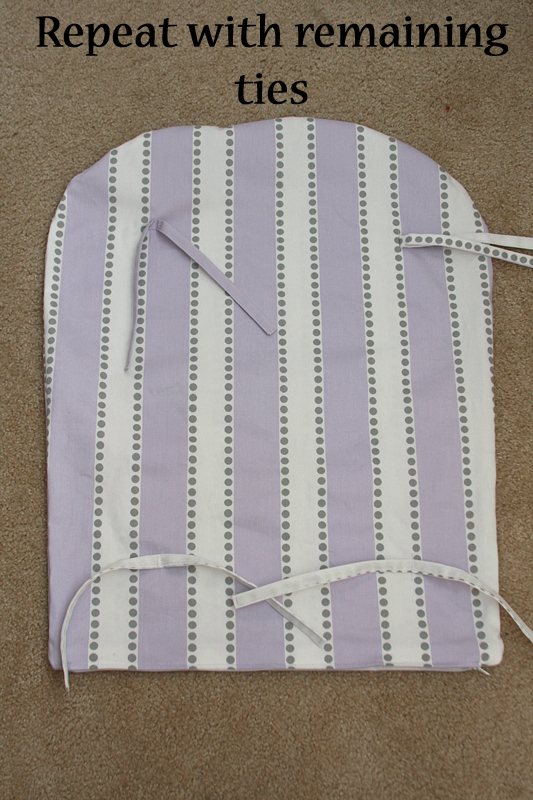
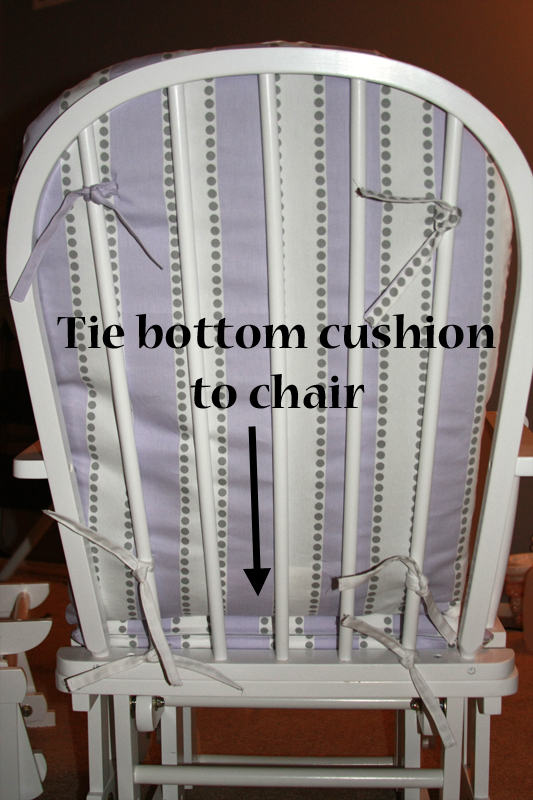
Go ahead and insert cushion, then tie to the chair!

Alrighty, after you stop admiring your awesomeness, it's time to get started on the bottom seat cushion. Which looks eerily similar to a piece of toast.
So basically, we're just going to repeat the steps above, just with a different shape. Trace 1 1/2" outside the front and side edges of the cushion, and 2" along the bottom. (Your fabric should still be folded length-wise, as before.)

Cut out the pieces along the traced lines.

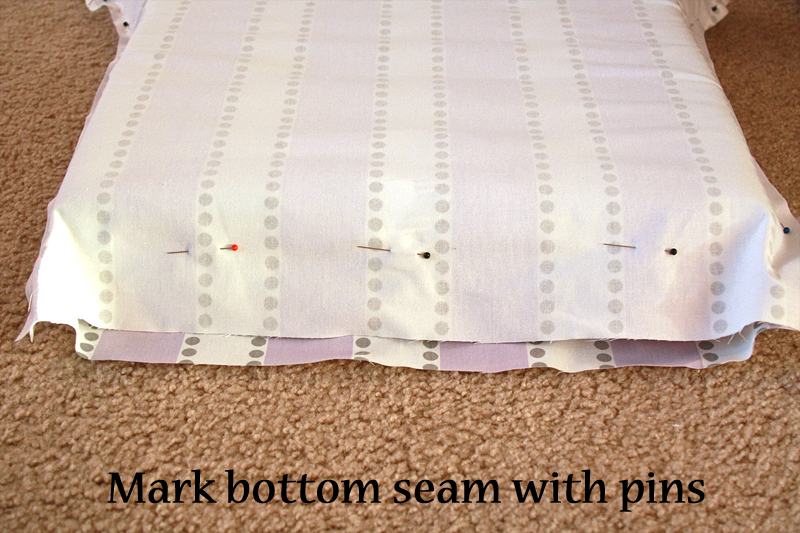
Flip pieces so the right sides are facing each other. Pin together with a 1/2" seam allowance. Stuff cushion inside to check and see if pins sit snugly against it.
Pull bottom of pieces snug together so they meet at the cushion's original seam. Place pins in the top piece to mark where the zipper will go.
Install a zipper as you did before.
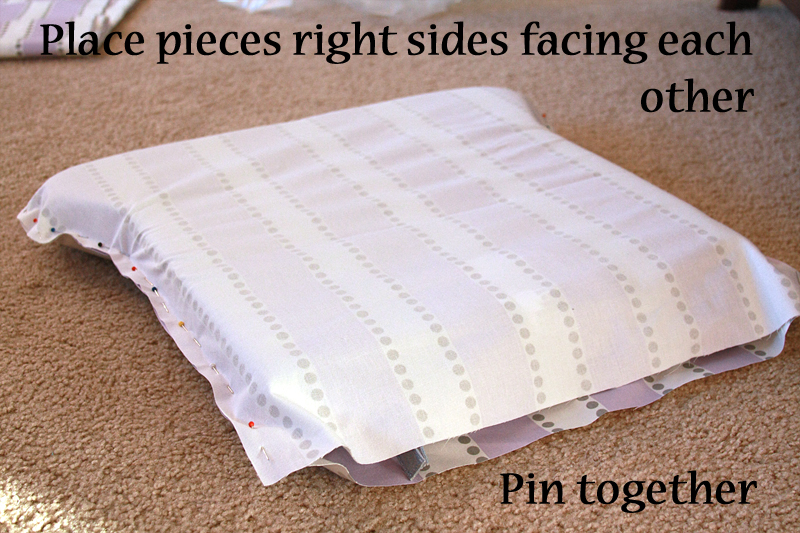
As before, flip your pieces so they lay with their right sides together. Sew around the edges with a 1/2" seam allowance.
Turn your cover right-side-out and insert your bottom cushion. Check to make sure there is a good fit all the way around (if not, remove cover and readjust your seam line so the fit is better).
Flip the cushion so the bottom is facing up. Pull the original ties so they hang out of the zipper opening. Use these as an estimate to make your marks for where you want your new ones to go. I placed my marks about 1/2-3/4" above the zipper.
Make 2 more ties with 2" x 16" fabric (just like with the upper cushion). Attach the ties by sewing over each back and forth a few times.
Insert your bottom cushion and tie to the chair.
Alrighty, 2 pieces down, 2 to go. It's time to take a gander at those arm rests of yours. My arm cushions go up and over the arm of the chair, with both ends snapping onto the seat portion. However, some cushions snap at the seat, then curl to snap underneath the arm of the chair. It's an easy adjustment for the latter (just ignore the part I ramble on about that extra side).
Essentially, this is just a repeat of what we've been doing with the other two cushions (with the exception that we're going to add pockets). Start by laying out your cushions.
Around any side or top part that has a cushion in it, place marks 1" from the cushion. Place marks 1 1/2" from the bottom. Now, I have a portion of my arm rest that is only two pieces of fabric plus a pocket - no cushion whatsoever. Seeing as we don't need to account for any bulk, only a seam allowance, I placed marks 1/2" from the edges. (This ended up being a little tight, so anywhere from 1/2" to 3/4" will work, just make sure you're consistent.)
Connect all your marks to form a pattern of your arm rest.

Then cut out along lines.
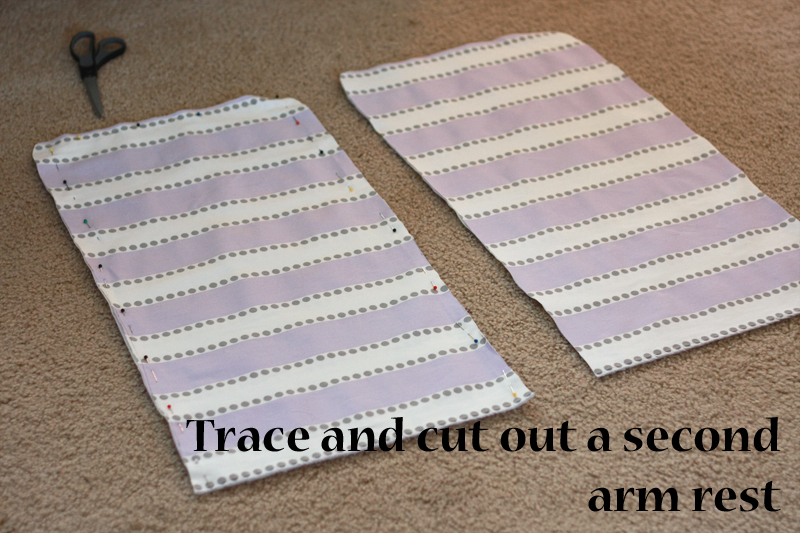
Pin your pieces together with a 1/2" seam allowance and check to make sure the arm rest fits inside properly.
Once you have the fabric trimmed how you want, trace out a second arm rest from your fabric using the first as a pattern.
So what about adding pockets to keep handy-dandy things well within reach? My pockets were on the side that had no cushioning - but this would work on the cushioned side as well.
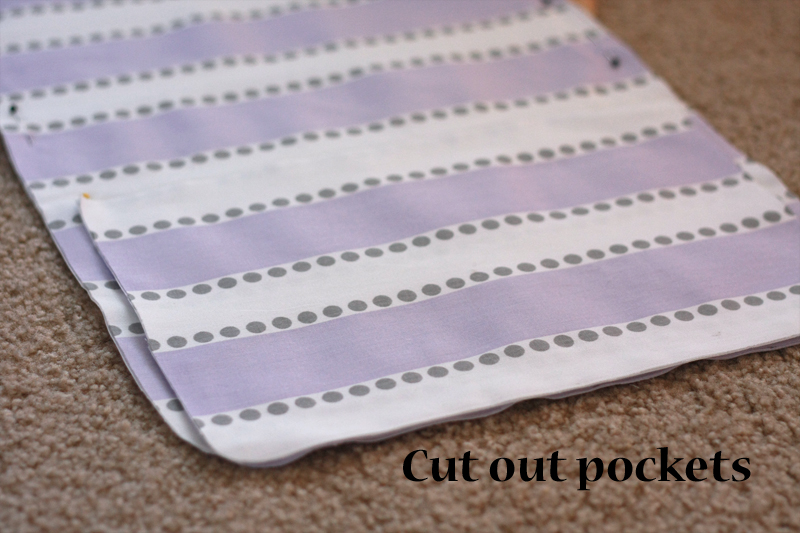
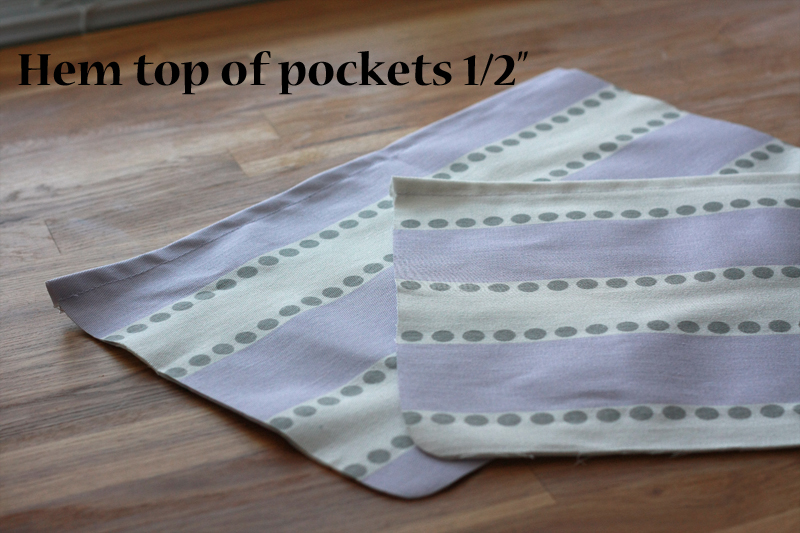
Measure the length of your original pocket (or determine how tall you want to make yours -- mine takes up a large portion of the side). Using your cut-out arm pieces, trace around the side you want the pocket, stopping when you reach 1" above the top of the pocket (I used the original arm piece to trace instead of the cut-out fabric and ended up forgetting my seam allowances -- hence my pocket width looks a little small in the picture).
Cut out. (Piece should look like a rectangle.) If you have left your fabric folded this entire time, you should have a piece for the pocket and a piece for the lining. If you're running low on your fabric, you can always use other fabric to line the pocket as well. Use this piece as a pattern to cut out the second pocket with lining.
With the wrong sides of your pocket and pocket liner facing each other, fold the top over toward the liner side 1/2" and press.
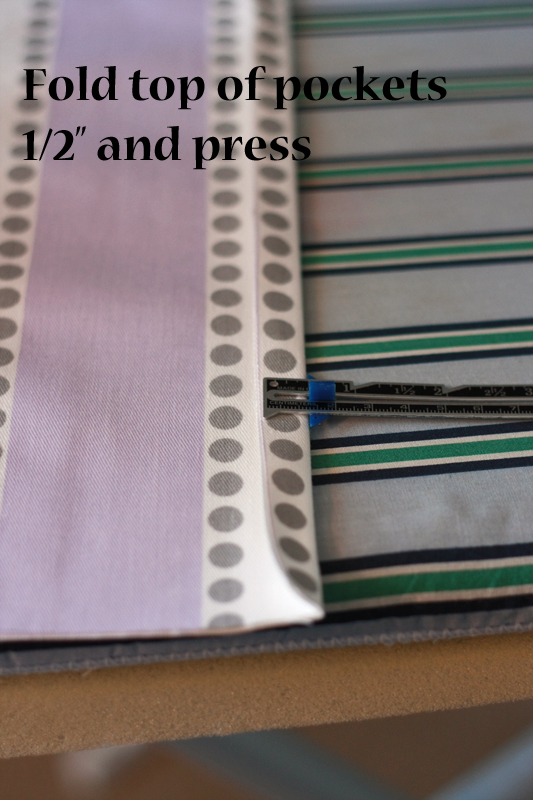
Hem with a 1/2" seam allowance. Set pockets aside.
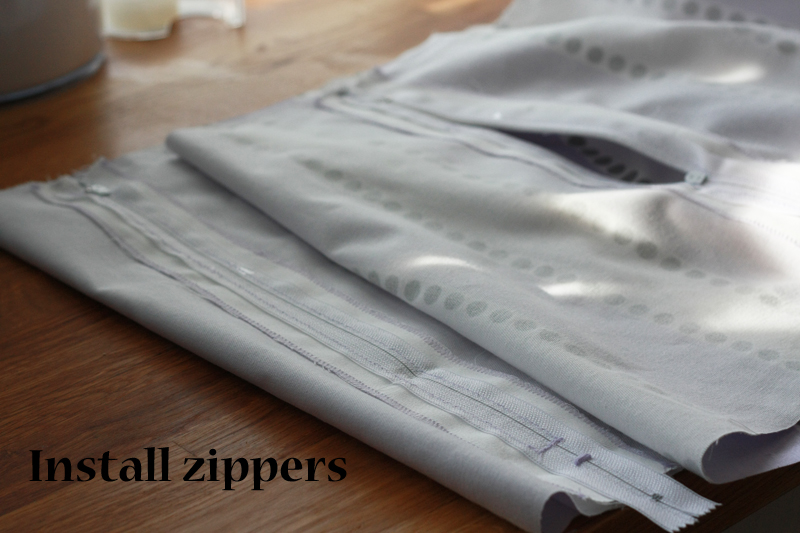
As with our previous two cushions, we need to add zippers. Insert the original arm rest cushion into your fabric and mark off where the zipper should go.

Install zippers.
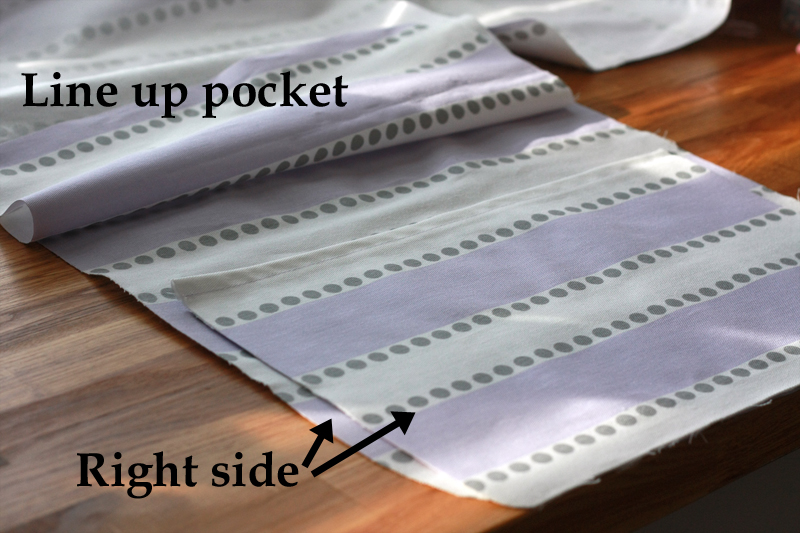
Now, just like our previous two cushions, we are going to place the right sides of our arm rests together and sew together with a 1/2" inseam. BUT, there's a bit of a kink this time. We need to add in our pockets.
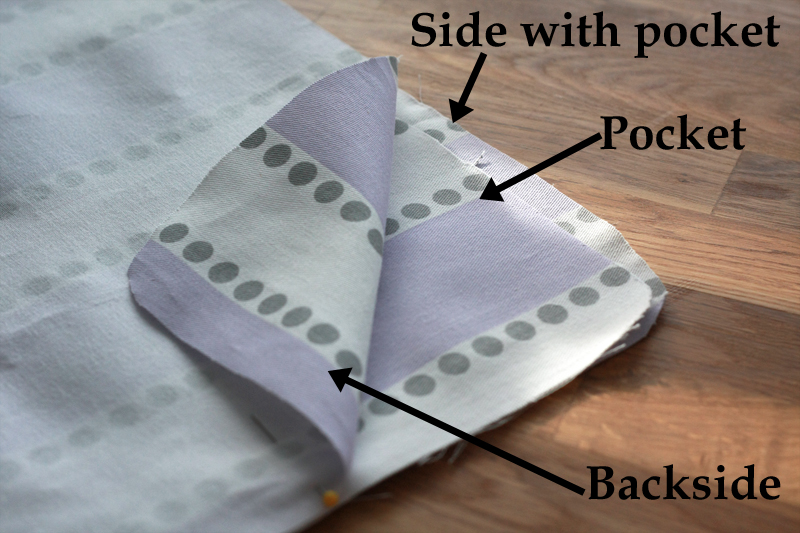
Decide which side of your two pieces is going to be the side facing out with the pocket. Lay that side on your work surface, right side up. Line up the bottom and sides of the pocket with the bottom and sides of the arm rest fabric. (Your sides should touch the sides of the fabric, unlike mine, if you cut them correctly.) I added a few pins connecting the top of the pocket and the fabric to help prevent any slipping around while I was pinning the remaining fabric.
Lay the second piece of fabric right side down on top of the first piece and pocket. Pin together, then stitch around all three open sides with a 1/2" seam allowance.
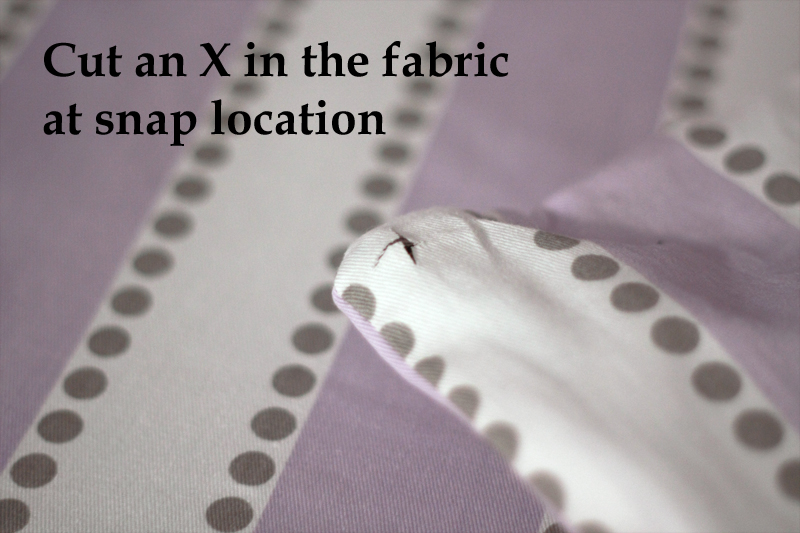
Turn your fabric right side out, insert your cushion, and make sure everything fits properly. Once the cushion fits correctly, turn your fabric with the wrong side out. Lay your cushion on top of your fabric and trace around the edge of each snap.
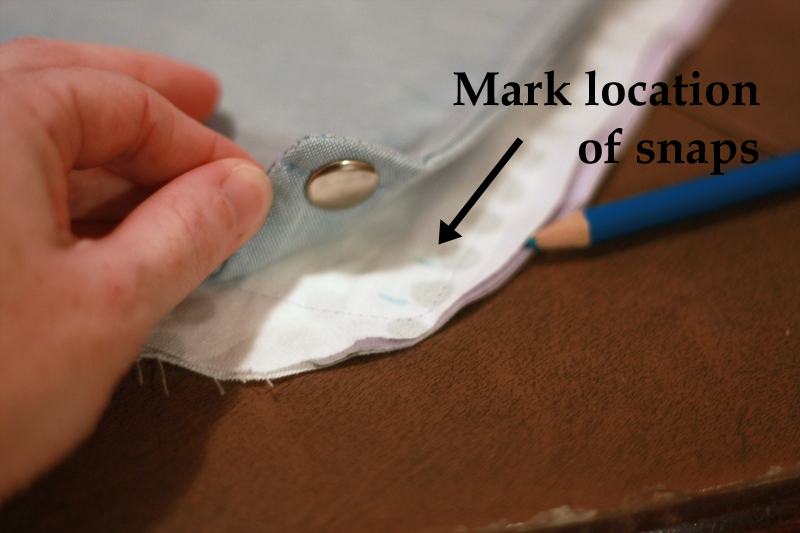
Cut a small X in your fabric at each snap location. Make sure you only cut through the back layer of fabric on the pocket-side, not the pocket.
Flip fabric right side out and insert your cushion. Wiggle your snaps through the holes you just cut. Attach snaps to chair.
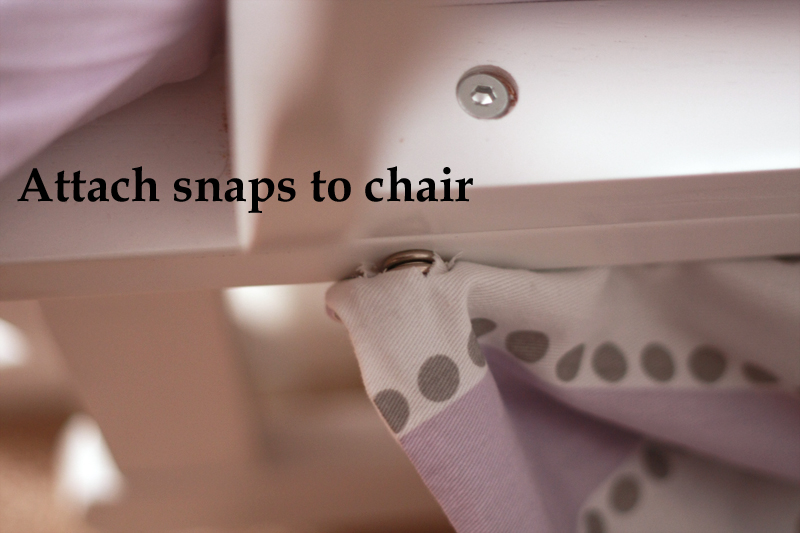
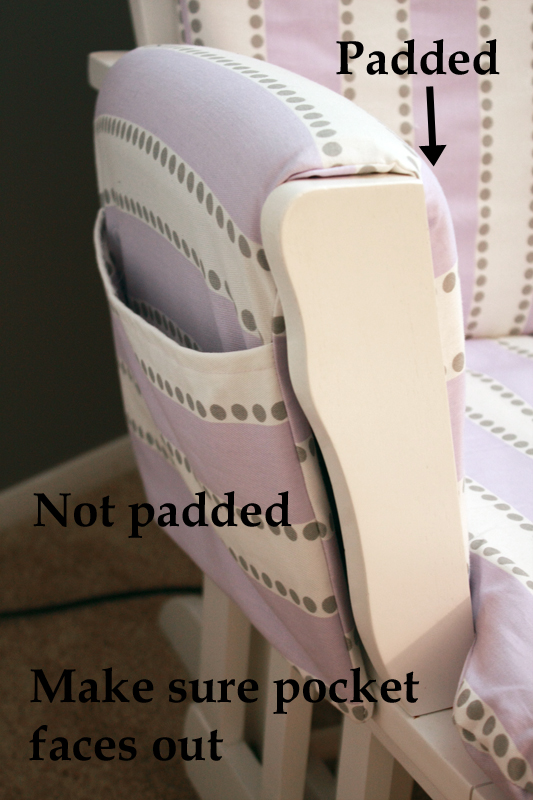
Your arm rests should now be attached to your chair with the pocket side facing out and the padded side facing in.
Alrighty. Only one more cushion to cover and then we'll be done. (And if you don't have an ottoman, well, you're done already!)
We're going to switch things up with this one -- no zippers involved. Promise.
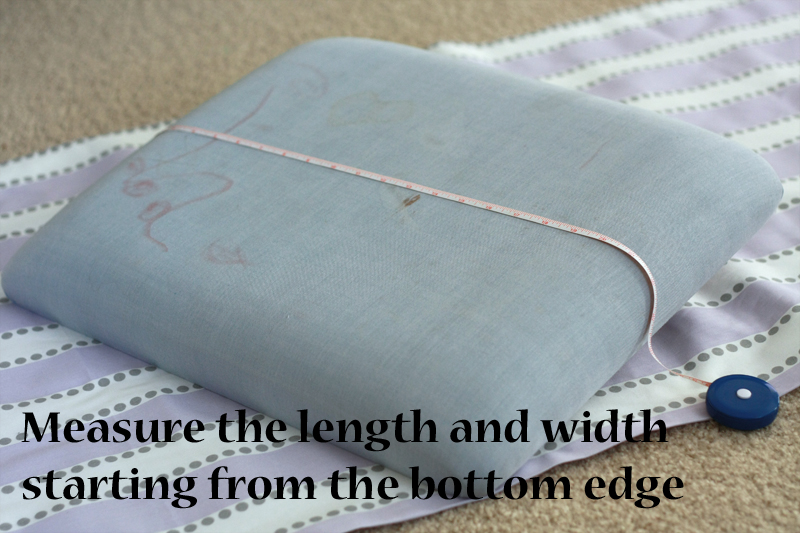
Begin by measuring the length and width of your ottoman. The measurements should run from the bottom edge of one side to the bottom edge of the other (so your sides are also included.)
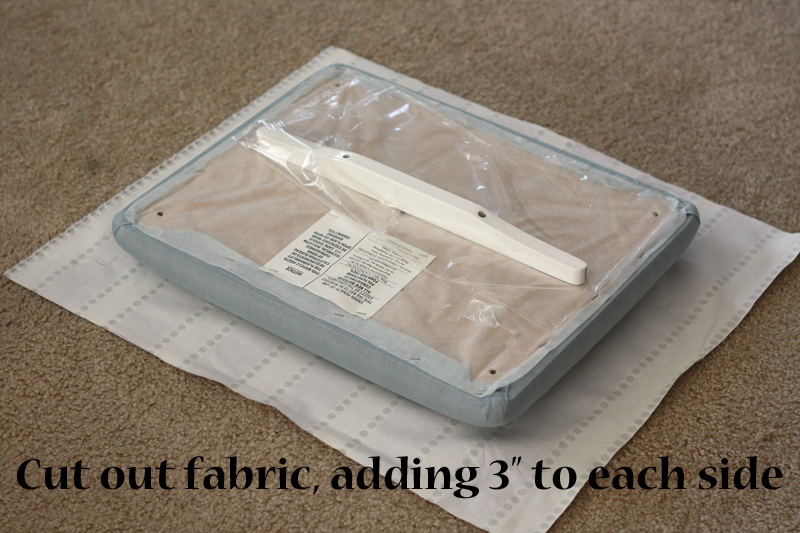
Add 3" to each side (so 6" total to your width and length). Draw out your square onto your fabric, then cut out.
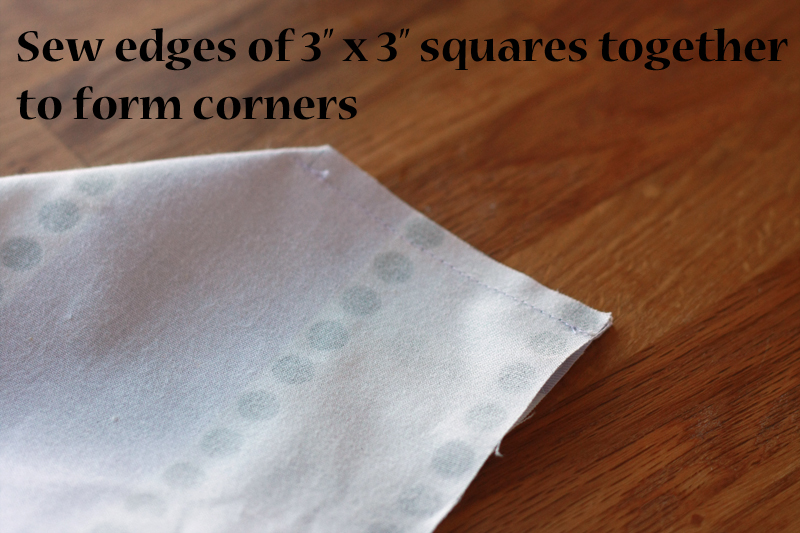
Measure out 3" x 3" squares from each corner of your ottoman fabric. (I was being conservative here, you could probably get away with cutting 4" x 4" squares.)
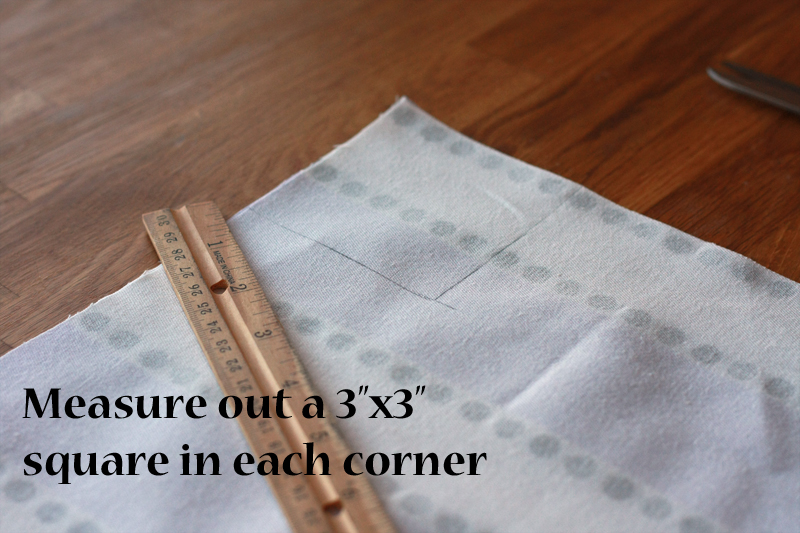
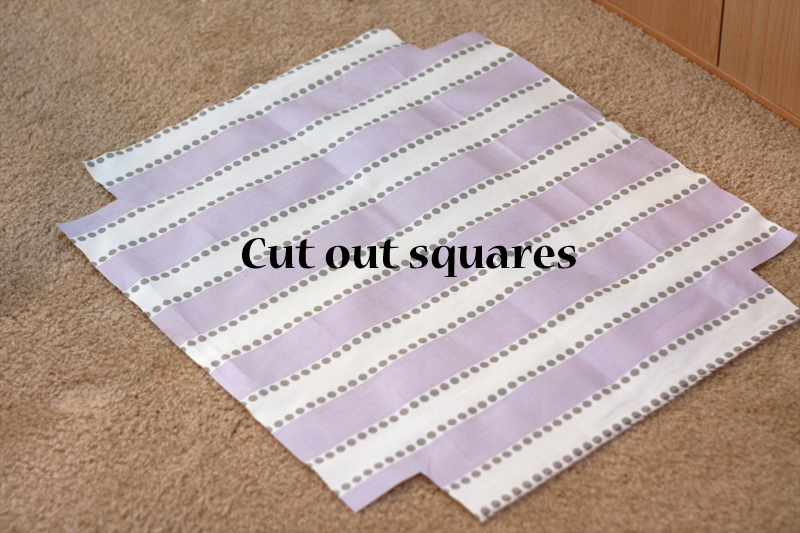
Cut the squares out.
Fold the edges of the squares you just cut out with their right sides together. Sew together with a 1/4" seam allowance.
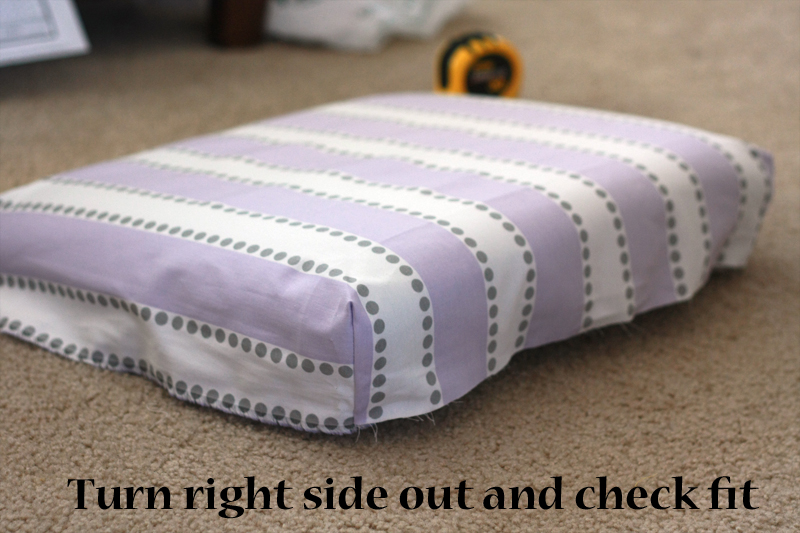
Check to make sure that your corners fit (don't have to be super snug at this point).
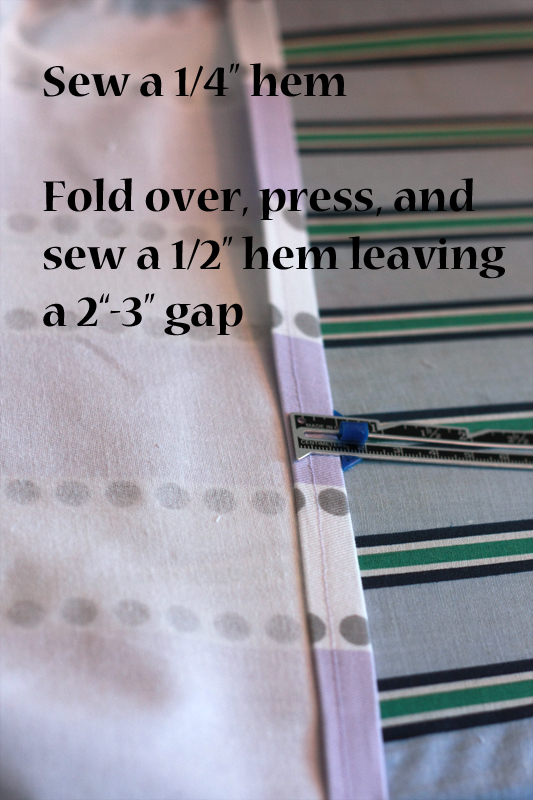
Now, fold the edges of your fabric 1/4" and press the entire way around. Hem.
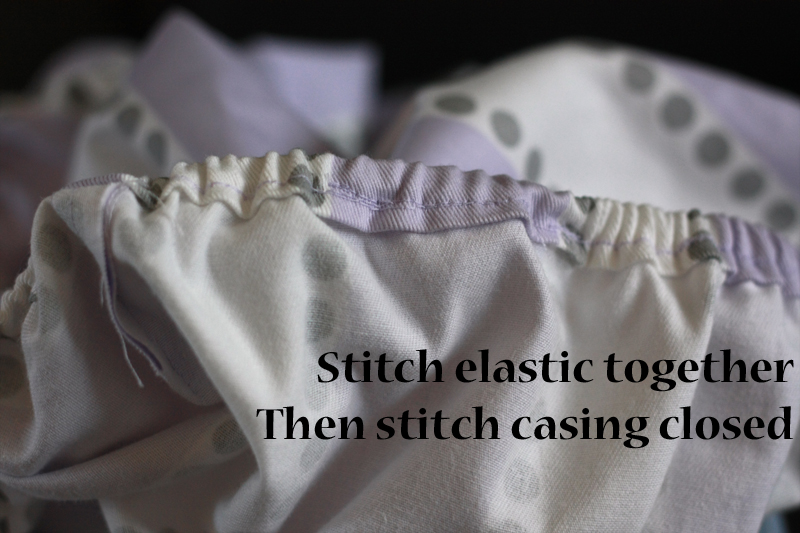
Fold this hem over 1/2" and press. Stitch the hem closed all the way around except for a 2-3" gap. This is where we're going to insert the elastic.
Measure out 1 yard of elastic, place a pin at 36" (don't cut the elastic yet if you have a longer piece), and a safety pin at the start. Pin the tail of the elastic to the fabric, then thread the safety pin through the casing (1/2" hem).
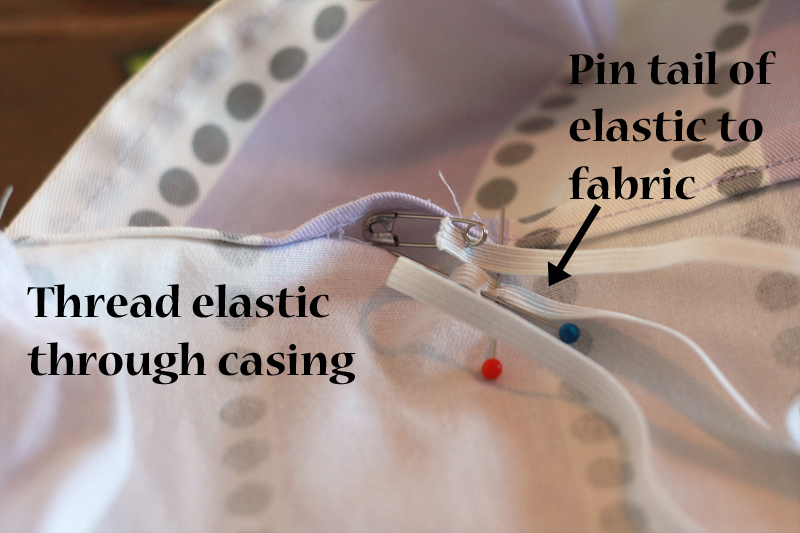
Once your safety pin comes back out the other side, overlap the ends of your elastic 1" and pin together. Test out the cover on your ottoman. If the elastic feels like it's going to snap any minute, add elastic in 6" increments. If the cover feels too loose, shorten the elastic.
When the cover feels like it has a nice snug fit, sew the ends of your elastic together. Slide the elastic up into the casing, and sew the 2-3" gap closed.
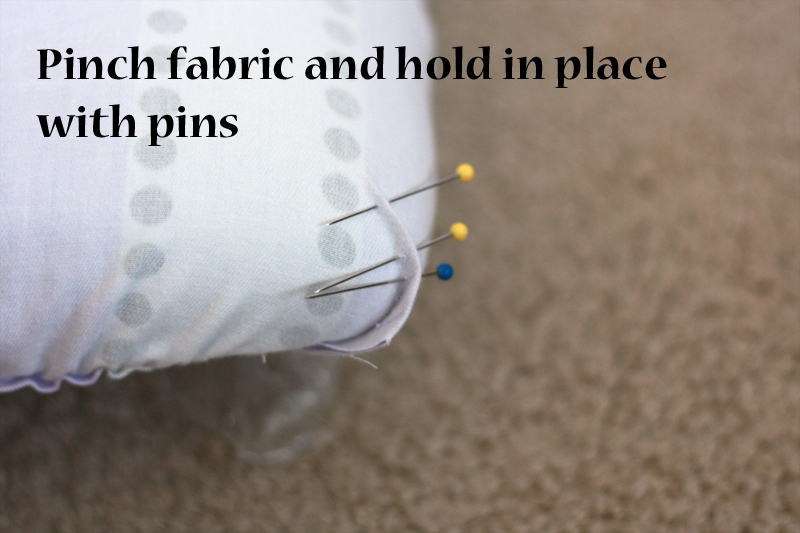
Now, you may notice that the corners of your ottoman don't fit quite perfectly -- there may be a little bit of bunching. This is actually a fairly quick little fix.
Flip your ottoman cover inside out and put it back on your ottoman. Pinch the excess fabric in the corners so it matches up with the original corner seam. Hold this gather in place with pins. Repeat with any corners that don't lay flat.
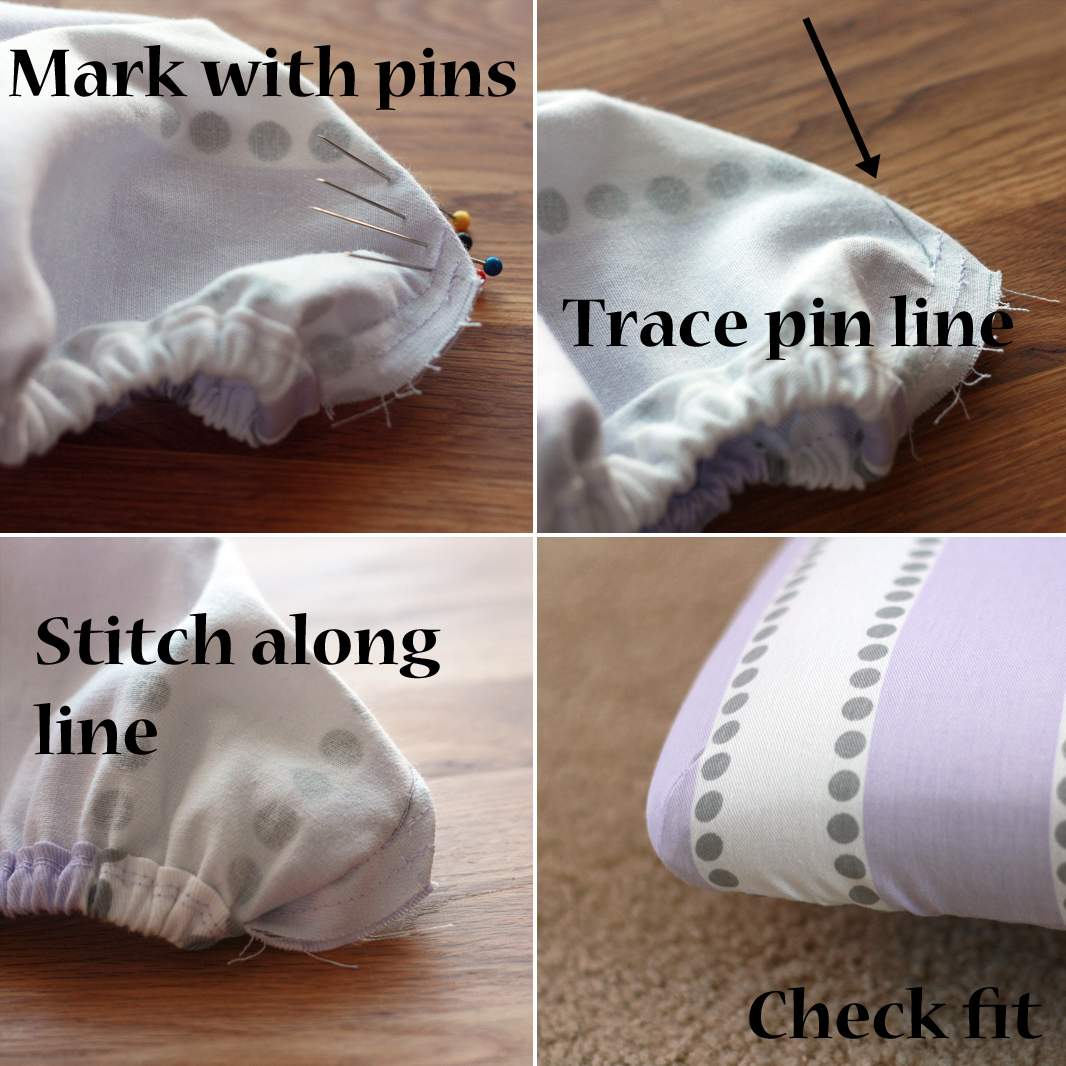
Remove the cover from the ottoman. Trace along the pin line with a pencil. Stitch along your traced line, making sure to back tack at the start and finish. Check to see if your new seam fits.
Once all your corners look pretty, reattach your ottoman cushion to the frame.
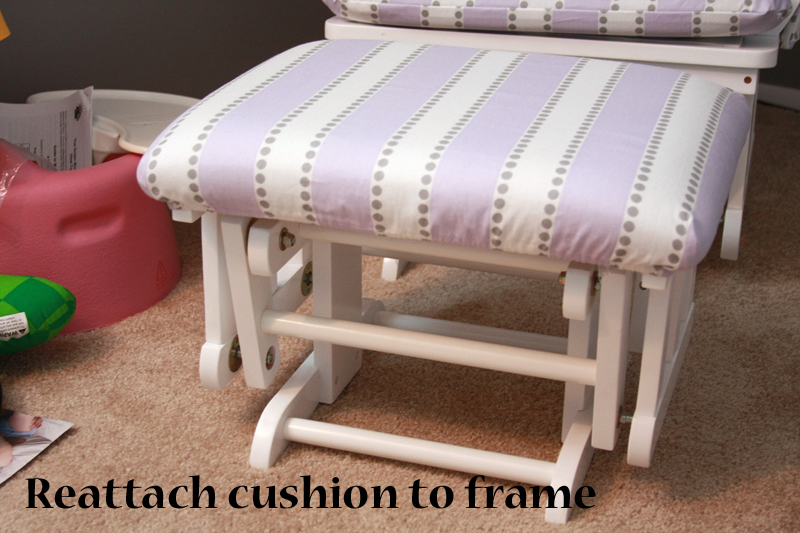
And finally... finally.... you're done! Have a seat and enjoy all you're hard work!

So, this project obviously takes a little bit of time to complete. Is it really worth it rather than just buying a new glider? Let's take a look:
4 yards cotton twill @ $5.59/yd = $22.36
1 spool of thread @ $2.99/spool = $2.99
1 yard of 1/4" elastic @ $1.98/pkg = $0.25
1 22" zipper @ $3.29/ea = $3.29
1 20" zipper @ $3.29/ea = $3.29
2 14" zippers @ $1.99/ea = $3.98
Final Price = $36.16
If I include the price of the glider, that brings my final glider total up to $61.16.
At Walmart, you can buy a brand new bottom-line glider for right at $100. Though don't think your color options are endless at this price point. You only have about 4 choices or so to pick from. Head up into the $160's+ and you get a tad more optimization with wood color and fabric color -- but for the most part you're still looking at limited colors and virtually no prints.
My point is... to get something this customized for your nursery you are easily looking at hundreds and hundreds of dollars. I think the time to hunt down a great deal off Craigslist and put together the slipcovers (in whatever fabric I choose) is totally worth it. Hands down.
I'm loving your posts - thank you!
ReplyDeleteI'm currently 30 weeks pregnant and looking at making some curtains, a bed skirt, an chair and ottoman cover (posibly) and I'm now about to look at your wet bag tutorial. I love the colour scheme and prints you've gone with too! We're having a little boy, so sticking more to grey, lime and red for his room, but what you've done is amazing.
Well done and thank you again!
I have a question. I'm going to attempt to recover my glider tomorrow using this tutorial. About how long did the whole project take you? Is it something I could get done in a day?
ReplyDeleteIf I remember correctly, I think the whole thing took me about 2 1/2 days to do. BUT, that involved taking pics and not working after I lost my good picture-taking light (and I didn't exactly start at the crack of dawn either). I think you could get it done much faster than that.
DeleteThanks for taking the time to put this tutorial together. The instructions are so clear and detailed. I found it when I was looking for instructions to cover my ottoman (I had already done the cushions but would have done them much better if I had seen this tutorial first).
ReplyDeleteThank you so much for your tutorial! I found your post via pinterest, and just finished recovering a glider using your instructions last night. Every single step is laid out perfectly, and by including all the pictures, you've really helped out visual learners such as myself. I am so pleased with the way my glider turned out...and the only sewing I normally do is squares and straight edges! This is just great! Thank you!
ReplyDeleteHi! I am buying an ugly glider for $20 but no ottoman. I'm going to try to re-upholster it and make matching curtains. I think I'm going to get a knitted pouf ottoman to match. I'm so excited. Baby number one! Thanks for the post!
ReplyDeleteHopefully it turns out! You should link a pic or two when you're finished! :)
DeleteThank you so much for these thorough instructions! I just bought the same exact chair on Craigslist for $25 and had no idea how to recover the cushions. This saved me!
ReplyDeleteIsn't it a great feeling to get such a great find? Glad to hear or worked or for you!
DeleteJust want to say this was an awesome Tutorial! I just completed mine today! You really gave me the courage to sew in a zipper, and my glider turned out Great! Thanks again!
ReplyDeleteI also want to say THANK YOU for sharing this tutorial and for your thorough instructions. I just finished recovering my mother-in-law's old glider with a fun pink print for my daughter's nursery. I am truly grateful.
ReplyDeleteI just got a glider at a consignment sale and it definitely needs to be recovered. Thanks for the step by step and all the pictures. I cant wait to get started. I'll try to get some good before and afters.
ReplyDeleteI would love to see how it turns out!
ReplyDeleteI would love to see how it turns out!
ReplyDeleteThank you for this tutorial it was exactly what I needed to recover a yucky old glider with limited sewing skills--I love how it turned out!
ReplyDelete(Posted a photo to my google account if you'd like to see!)
https://plus.google.com/108839063375115123273/posts
Thanks for an awesome step by step tutorial! I had a little sewing experience, but definitely not zippers or anything, and you helped me finish my whole project in two days! Thanks a million!!
ReplyDeleteYour tutorial is very interesting: how to make your glider attractive with a nice cover. If we could do with replacement cover, this would be a very efficient way. We can save a lot of money.
ReplyDeleteOf course, this requires skill. Without skill, we can not do the maximum. We must invite other who understand it. Or buy the new by spending more money.
Nice instructable. I have recovered many chairs in my day, it is usually very easy just time consuming. One additional note to those not experienced with sewing, if you have a patterned fabric that needs to match up, you would want to have the folded part of the fabric over the top/front of the cushion where you would see it. Otherwise you will have a seam there that you will need to match the pattern up which can be difficult.
ReplyDeleteI have a question, when you sew the zippers on you sew on the right side of the fabric, could I sew on the wrong side? I'm a beginner and I've never worked with zippers, I think it would be easier if I could see the zipper. Does it make a difference?
ReplyDeleteHonestly, I think sewing from the wrong side would be more difficult. The zipper foot is designed to use the zipper teeth as a guide to sew against, and it's pretty easy to feel through the fabric. Once you flip it over, you lose that guide and it's much harder to feel through the heavy zipper fabric while keeping the zipper laying flat. I know it seems intimidating, but if you get the zipper and seam lined up, it is really not that bad! Promise!
DeleteDid you wash the cushions at all first or spot treat them at all? Or did you just make the slipcovers?
ReplyDeleteI just made the slipcovers. The cushion covers weren't removable and I didn't feel like scrubbing stains no one was ever going to see. :)
DeleteI am so glad I found this tutorial! It was simple and easy to follow for a non-sewer like me. It took me the better part of a day to complete all but the armrests. But, I hand-stitched everything since I don't have a sewing machine. I've impressed myself, my husband, and my friends. This tutorial made me look as if I have real skill! LOL! I am hoping to finish the armrests today. Thank you!
ReplyDeleteI loved this tutorial!! Incredibly clear and detailed. I just finished covering my chair/ottoman, and they look great, if I do say so myself.
ReplyDeleteThe only recommendation I would give to anyone using this tutorial is to definitely go with the 4" ottoman corners rather than the 3". I did 3 and my cover just *barely* comes down low enough to cover the entire cushion. I do tend to be a little sloppy with my seam width, but I think 4" would have been perfect.
Thanks so much for this tutorial! This has been my first attempt and recovering something and so far it's been great. I have a question about the arm rest covers. Where is the zipper going? I can't tell from the pictures. I would think along the bottom seam that snaps to the bottom of the chair, but do the snaps get in the way? Thank you!
ReplyDeleteThe zippers do go at the bottom seam. The snaps actually sit right on the inside side, so they don't get in the way.
DeleteOh thank you for replying! Phew! :)
Deletehi my names is bill from argentina! i really like your work, could you help me to find plans or models to make here the cushions for my glider chair? thanks a lot guillermo
ReplyDeletehi my names is bill from argentina! i really like your work, could you help me to find plans or models to make here the cushions for my glider chair? thanks a lot guillermo
ReplyDeleteGetting ready to recover on ugly nursery glider - these instructions looks wonderful - thanks!
ReplyDeleteCheck out Gussied Up Gliders on Facebook and Etsy 😊
DeleteHi I was wondering if you had advice on making fitted Ottoman covers based on just measurements from someone?
ReplyDelete4 years on and this post is still so useful, thank you so much for posting! Here's mine completed!
ReplyDeletehttps://instagram.com/p/BPnkAlBDAkI/
Love it, you did a fantastic job! Thanks for sharing!
DeleteI am going to repeat the praises everyone else commented and say that this tutorial was fantastic! Ian a beginner sewer and I recovered my glider for my nursery using this! I even sewed my first zipper! I love that it is now one of a kind and matches perfectly! See it here: https://www.blessedmamalife.com/nursery-on-a-budget/
ReplyDeleteThanks again!!
THANK YOU for making such an amazingly detailed post on how to make these slipcovers. I never would have been able to do it otherwise! I'm so proud of how it turned out!
ReplyDeletehttps://m.facebook.com/story.php?story_fbid=10101041360823337&substory_index=0&id=197600404
I'm not able to see the link, but I'm sure it looks great! So glad this was able to help you!
DeleteCan i get 100% cotton fabric. I want to find some on sale at walmart hopefully under $3 or $4/yd.? Is there specific kind(s) of fabric i need for recovering glider cushions? My church needs 2 new cushion covers for both rocking chairs.
ReplyDeleteHi Ellie, I'm sure you have probably done your cushions by now, but yes, 100% cotton is fine. I used a twill for these as it's a little heavier and stands up to use a little better than quilting cotton. I would highly recommend looking in the home decor or upholstery section of a fabric store (though sometimes you can luck out at Walmart) for a heavier weight fabric. I would assume the rockers get a lot of use at church, and I'd be worried about regular quilting cotton wearing through fairly fast.
Delete