One of the favorite things for people to pick out for their nursery is the crib bedding. The crib is usually one of the main focal points of the room, therefore it is one of the places you really want to emphasize the character or theme.
There are a lot of tutorials out there for very simple crib skirts -- some as basic as taping a piece of fabric to the mattress frame. Of course, I had to fall in love with the pleated kind, so above and beyond the no-sew tutorial we go. I actually had a pattern for a crib skirt from something else I was doing a few years ago and I finally had a reason to pull it back out. Now, pattern directions usually end up confusing me at some point, make no sense at others, and never give me nice straight cut pieces.
So I measured my own pieces and figured out all the directions for you. Aren't I so nice?
First things first:
Things You Need
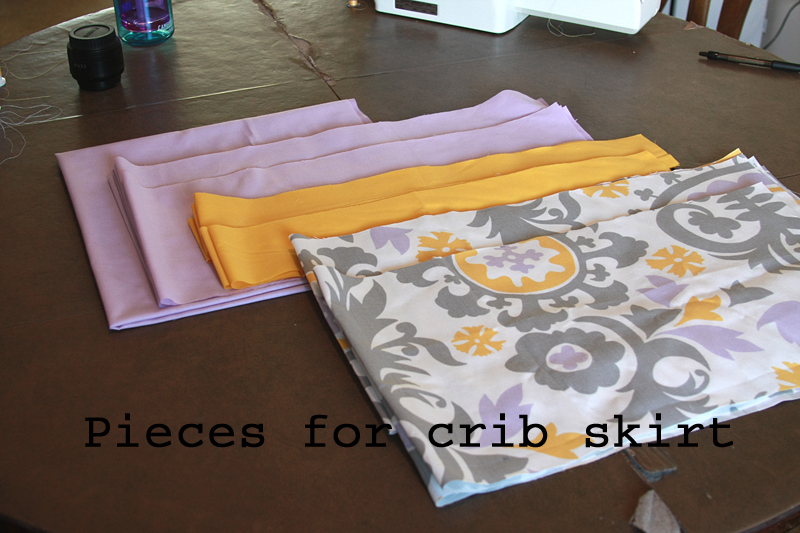
3 yards for the base and "upper skirt"
3/4 yard for the "middle skirt"
2 yards for the "lower skirt"
3 spools of thread (1 each that matches the upper, middle, and lower fabrics)
Good scissors
Pins
Measuring tape (preferably the long heavy duty kind)
Yardstick or other long straight edge
Dressmaker's pencil
Next, let's talk terminology, just so we don't get confused with what's what.

Alright, are we good? Let's get started.
Begin by making sure the very top of your fabric is straight (use your yardstick or other long straight edge lined up with another straight edge to form a "T" to make a nice straight cut across the top).
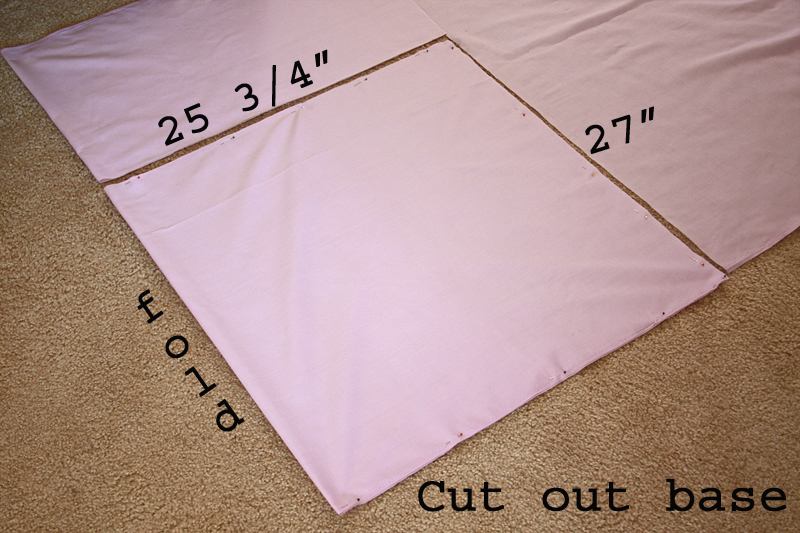
Spread out the fabric for the base and upper skirt portions so it's open from selvage to selvage. Fold the fabric crosswise at least 26".

Starting in the bottom corner (one side is the fold the other is the selvage), measure 27" down the fold. Place a mark on the fabric. Continue doing this every couple of inches working your way down the selvage until you reach the end of the piece of fabric you have folded over. Connect your marks to form a straight line parallel to the selvages.
Repeat this only measuring 25 3/4" from the fold to the end of the piece of fabric. The drawn line should be parallel to the fold. Pin every few inches along the inside of your square, except on the folded edge. This will keep your fabric from shifting while you cut. Cut along the lines. Unpin and open up the fabric. You now have the base of your skirt.
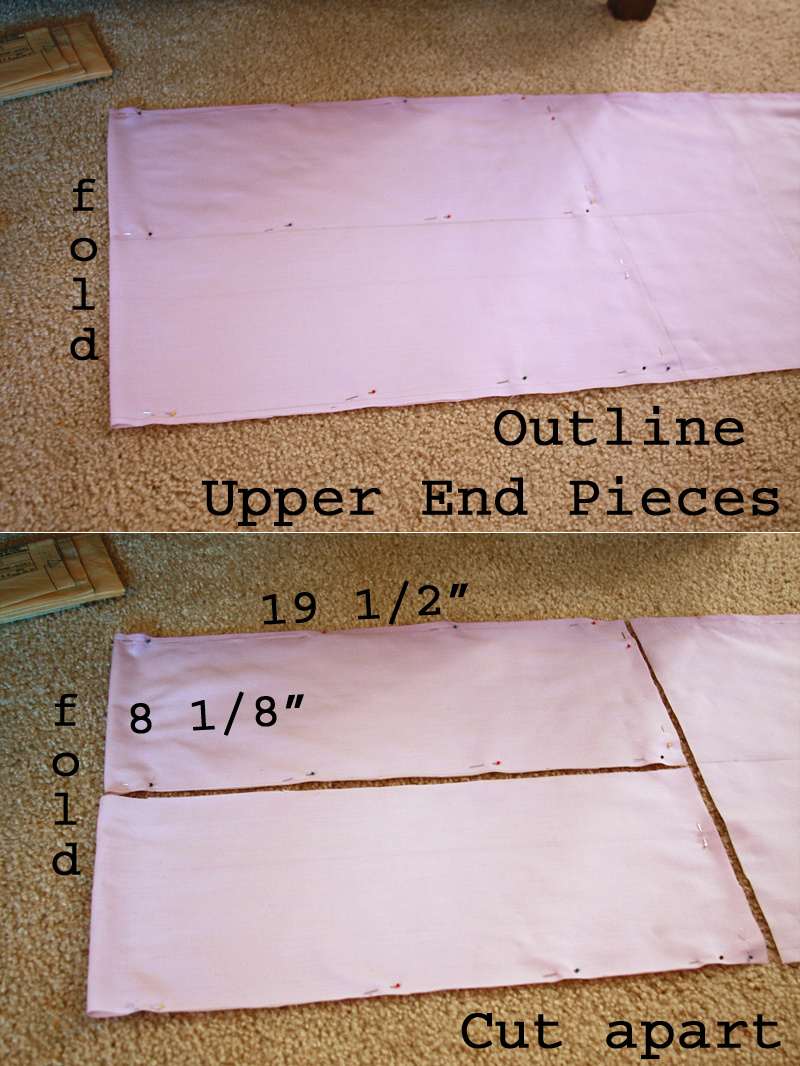
Using the remaining piece of fabric still folded over, measure out your two Upper End Skirts in a similar fashion. Each piece should be 8 1/8" wide along the fold and 19 1/2" long. After you line, pin, and cut, remove the pins and you should have two 8 1/8" x 39" rectangles.
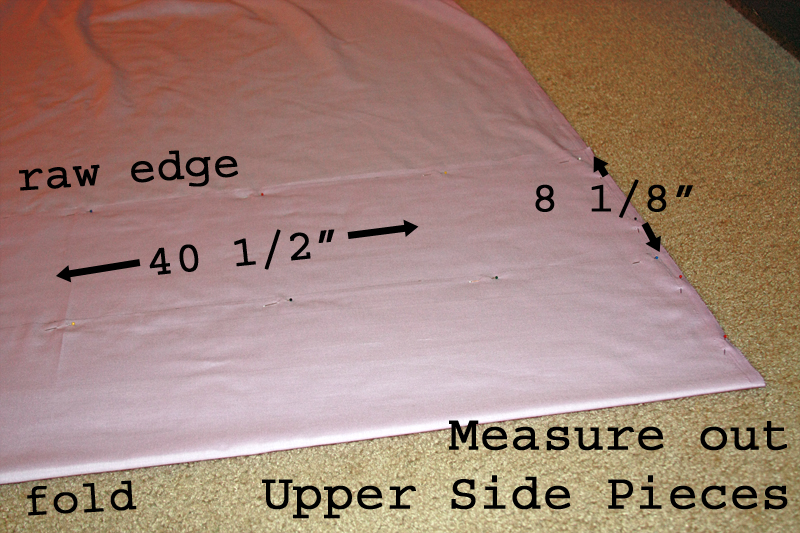
As you folded your fabric over for the base and Upper End Skirt pieces, fold your fabric crosswise again, about 16 1/2 - 17" wide. Measure out two 40 1/2" by 8 1/8" rectangles (the bottom rectangle will have one side on the fold). Pin around the edges of both rectangles.
Cut along drawn lines. This will give you two rectangles plus one rectangle with a fold. Cut along the fold to make 4 equal 8 1/8" x 40 1/2" rectangles. Unpin.

Set any remaining fabric aside for another project. Lay out the fabric for the middle skirt pieces. Fold fabric crosswise about 9 1/2". Measure out two 3" x 40 1/2" rectangles, and one 3" x 39". Pin along each rectangle. Cut out rectangles, cutting along the fold as before. You should now have four 3" x 40 1/2" rectangles and two 3" x 39" rectangles. Unpin. Set any remaining fabric aside.
Repeat for a third time with your final piece of fabric for the lower skirt pieces. Layout the fabric and fold crosswise about 32". Measure and line two rectangles that are 10 1/2" x 40 1/2" and one rectangle that is 10 1/2" x 39". Cut apart and along fold. You should have four 10 1/2" x 40 1/2" rectangles and two 10 1/2" x 39".

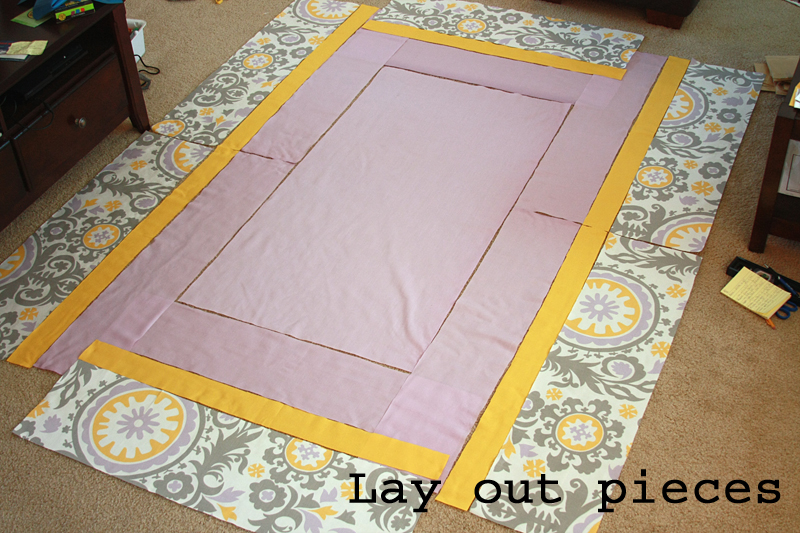
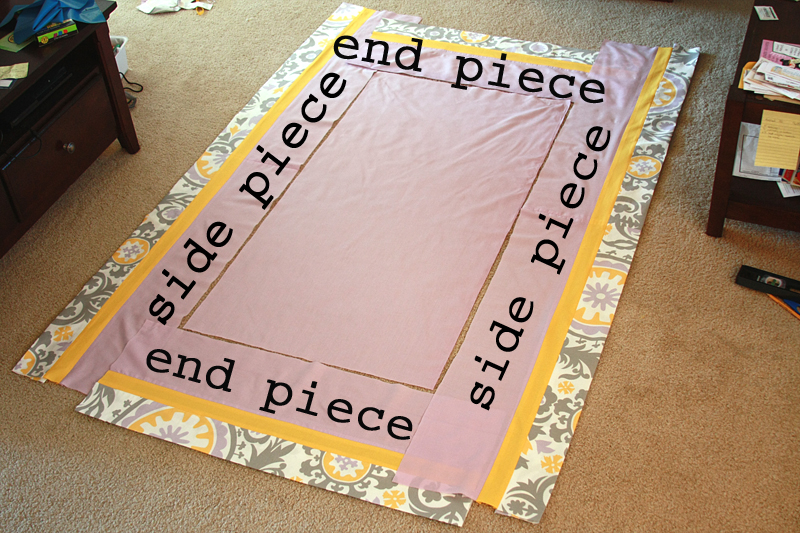
Let's recap. You should have the following:
(1) Base piece - 27" x 51 1/2"
(2) Upper End Skirt Pieces - 8 1/8" x 39"
(4) Upper Side Skirt Pieces - 8 1/8" x 40 1/2"
(2) Middle End Skirt Pieces - 3" x 39"
(4) Middle Side Skirt Pieces - 3" x 40 1/2"
(2) Lower End Skirt Pieces - 10 1/2" x 39"
(4) Lower Side Skirt Pieces - 10 1/2" x 40 1/2"
Iron each piece to remove any wrinkles.
Before you begin sewing, lay out all your pieces in the correct locations and all right side up (pattern-side or side without pencil marks facing up).
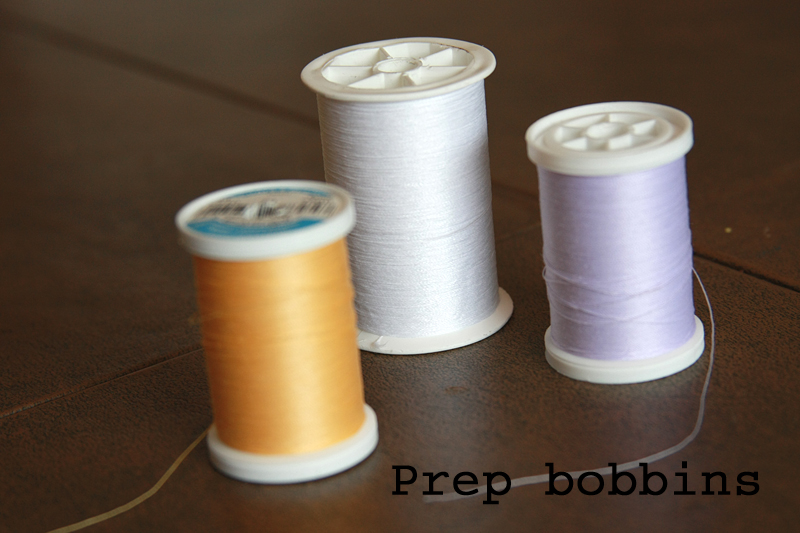
You also may want to prep 3 separate bobbins to go with your thread to make changing out the color easy.
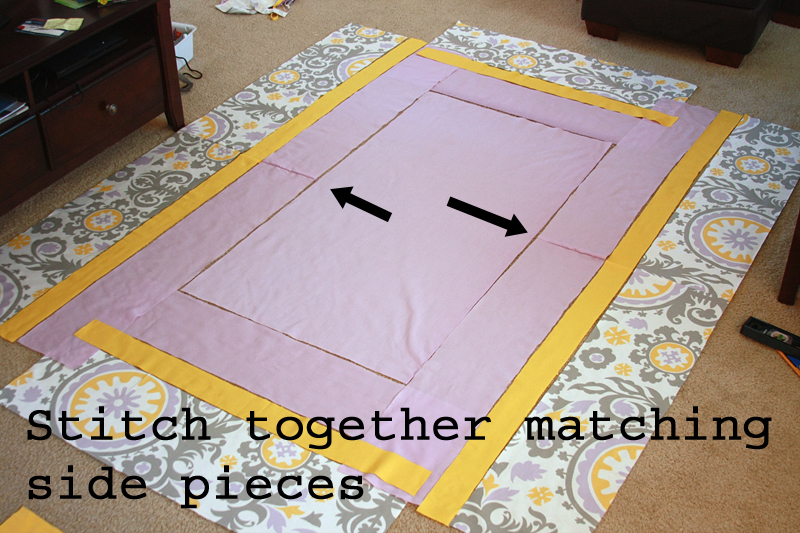
Now, remove two Upper Side Skirt Pieces that are on the same side. Place them with right sides facing each other. Pin one short side together; this will be a seam running down the middle of the side of the skirt. Match the top thread and bobbin up to the upper skirt color (in my case lavender) and sew the two pieces together with a 1/2" seam allowance.
Repeat this with all the remaining side pieces. Make sure you switch the thread/bobbins out to match the corresponding side skirt piece. You should now have 6 total side pieces.
Press each seam open flat.
Lay out one upper side piece right side up. Place one middle side piece right side facing down on top of it, lining up the top edge of the middle side piece with the bottom edge of the upper side piece.
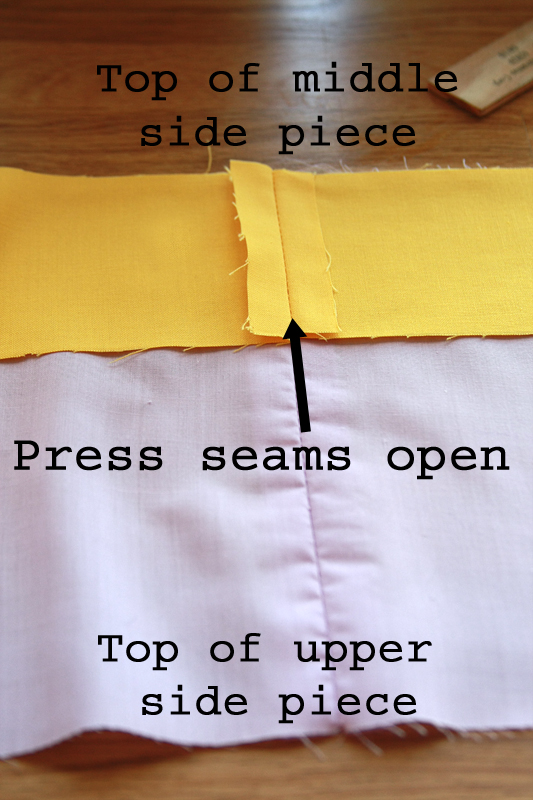
Switch out the top thread to match the top fabric color and the bobbin to match the bottom. You don't have to, but I like to do it "just in case". Sew the middle side piece to the upper side piece with a 1/2" seam allowance.
Repeat with the upper and middle pieces from the other side. Press seams open.
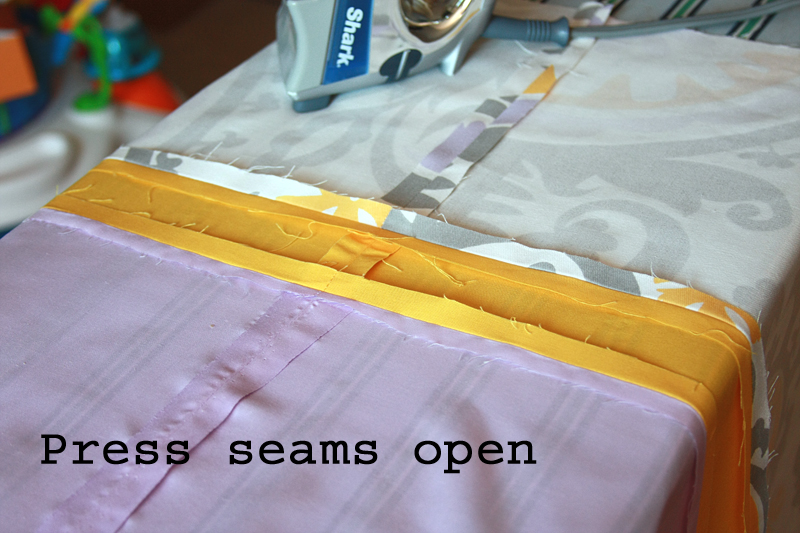
Lay out a lower side piece, right side up. Place one of the upper/middle side pieces on top, right side facing down. Line up the bottom of the middle side piece with the top of the lower side piece. Make sure all the center seams line up.
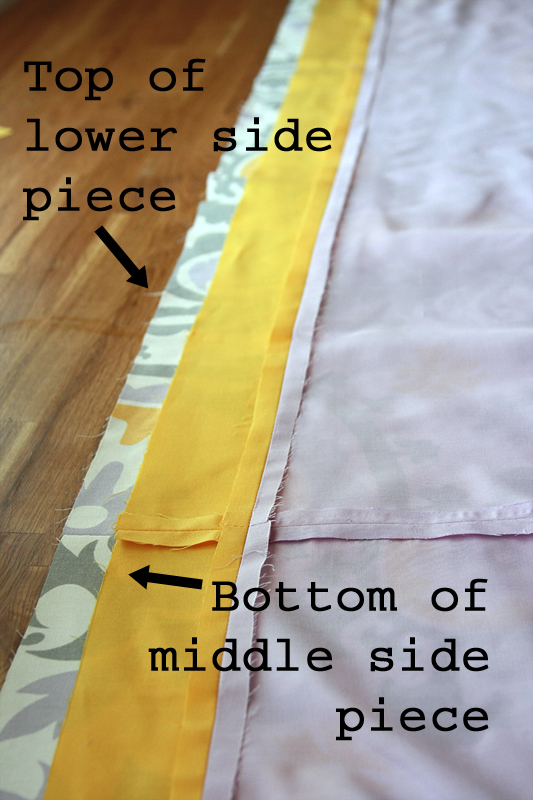
Switch out your top thread and bobbin again to match the fabric. Sew side pieces together. Repeat with remaining side pieces. Press all the seams open. You should now have only two side pieces. Repeat the procedure of attaching the upper, middle, and lower pieces with your end pieces.
Now, instead of simply hemming up the bottom of the lower side piece, we're going to do an "invisible hem". Basically, our goal is not to see any stitches when looking at the crib skirt. So, with one of the side pieces laying right side up, fold the lower side piece under until only 3 3/4" of fabric remains. Press to hold in place.
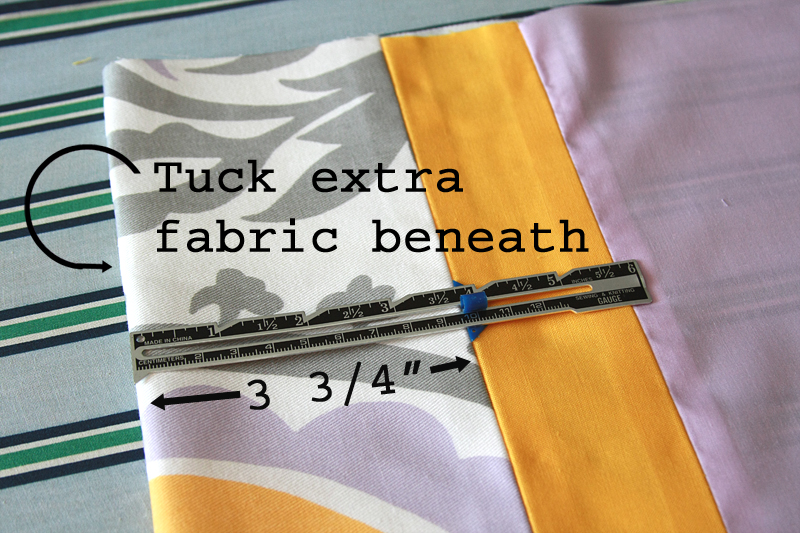
Flip your side panel over. Tuck the extra loose fabric from the lower side piece underneath itself to form a finished edge. This edge should completely cover the seam between the lower and middle side pieces plus a little wiggle room (I made the fold roughly even with the raw pressed edge of my middle side skirt, so about a 1/2" above the seam). Press fold and repeat with the remaining side piece and both end pieces.
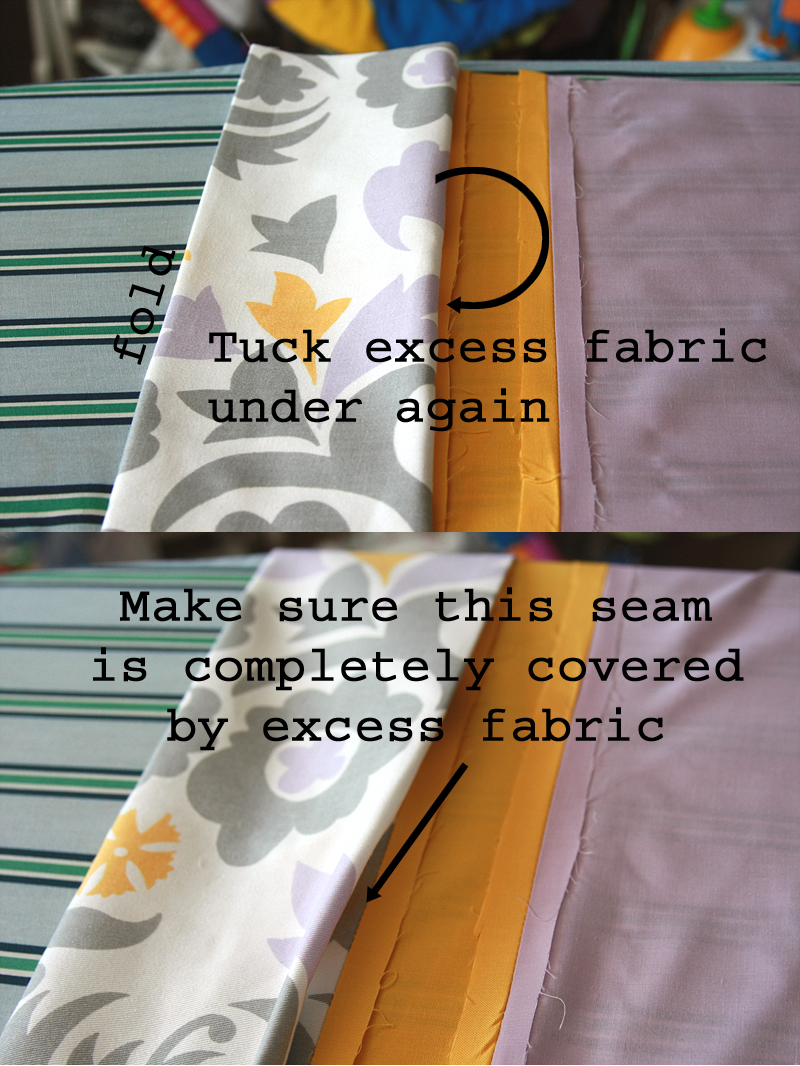
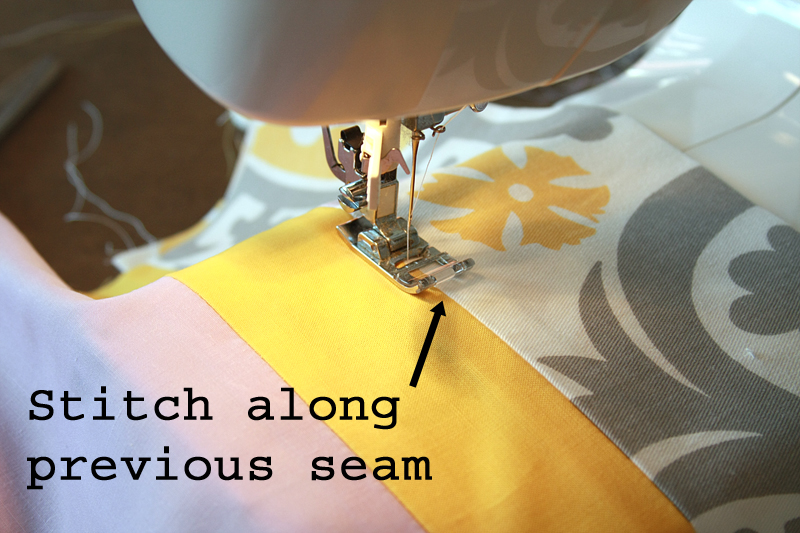
Now to form our "invisible hem". Take your side or end piece with the folded and pressed lower piece. Place the piece right side up and line up the seam between the middle and lower pieces directly underneath your machine needle (you want to use the thread that will show up the least on either piece of fabric, just in case you wander off the seam). The folded piece should be lying flat underneath, covering the original seam, so it will be included in the new one. Remembering to back tack, start stitching slowly, trying to keep your needle following the original seam as much as possible. Repeat with remaining pieces.
While we're here, let's go ahead and hem the sides of each side/end piece. Remember, we're only working with the short edges right now, leave the long raw edge alone.
Fold each raw side over 1/2". Press. Using your first thread color, back tack, stitch down the length of your upper piece, and back tack again.
Repeat on the middle piece using the matching thread.
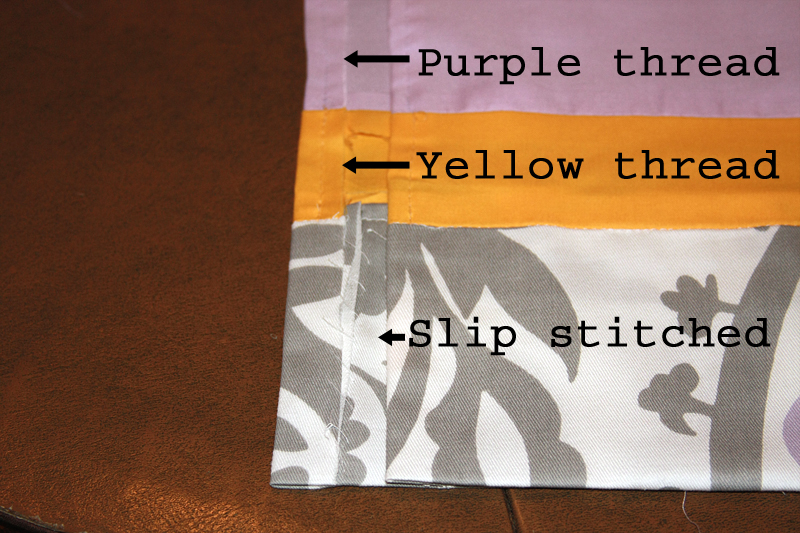
For the bottom "invisible" hem, use a slip stitch to prevent any stitching from showing on the front of the skirt.
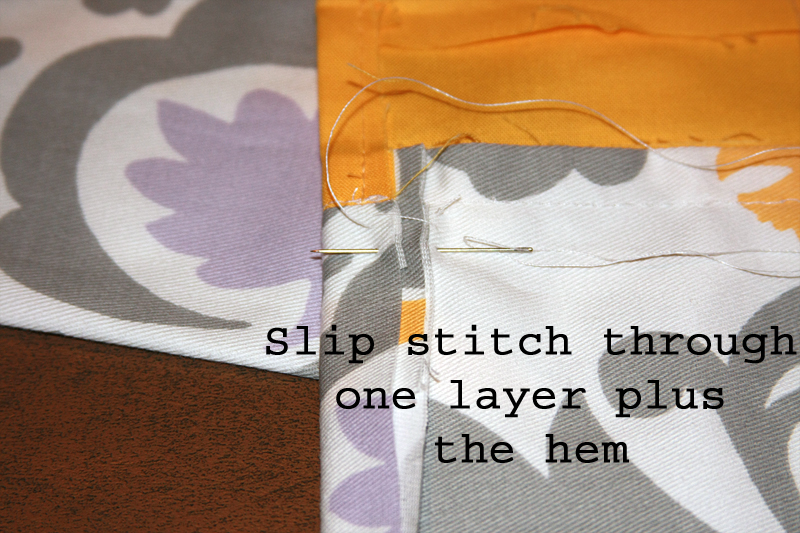
To slip stitch, simply start with a hand needle and thread tied off at the end. Run the needle down through the back layer of the "invisible" hem (the side currently facing up) then up through the hem along the side. Repeat down the length of the "invisible" hem.
Repeat along the remaining short unfinished sides.
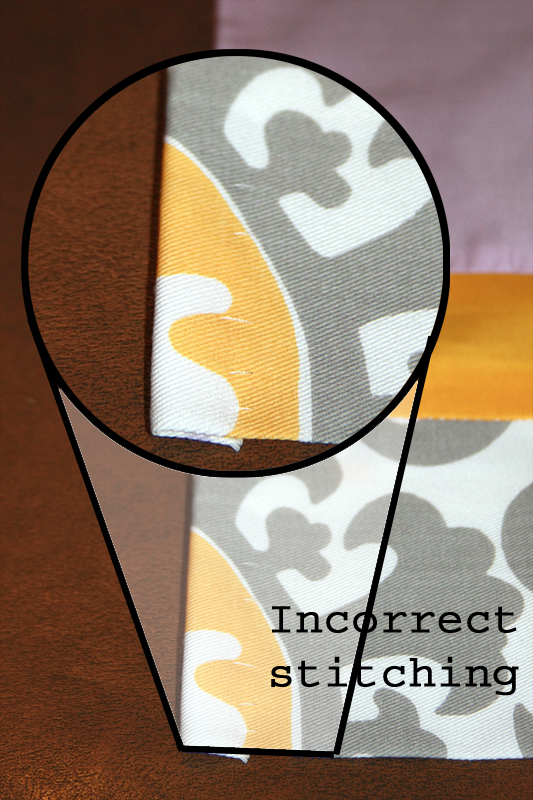
You know you are doing it wrong when you flip it over and see this on the front (do as I say, not as I do):
So, now we have 2 finished side pieces and 2 finished end pieces. All that's left is to add the pleats, then attach to the base.
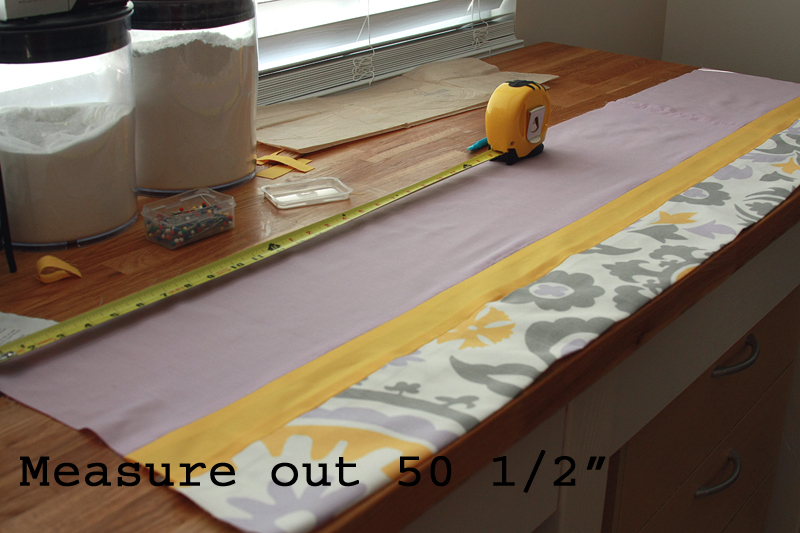
Let's start with a side piece. Measure out 50 1/2" with your tape measure, and lay it next to your side piece (right side up) on a flat surface. As you can see, the side piece is definitely longer than your tape measure. Starting at the top left corner of your piece, measure 19 1/4", and make a small mark. This is going to be the center of your first pleat. The seam down the middle will be the center of your second pleat. Measure 19 1/4" from the opposite top corner of your piece, and this will be the center of your third pleat.
Using the center marks, measure out another 4" to each side. For the first pleat, you will have marks at 15 1/4", 19 1/4", and 23 1/4". Pinch the fabric at the 15 1/4" mark and gently pull it towards your center mark at 19 1/4". This should create a 2" fold. Pin the fabric into place. Continue to fold the fabric 2" down the width of the piece. Pin into place.
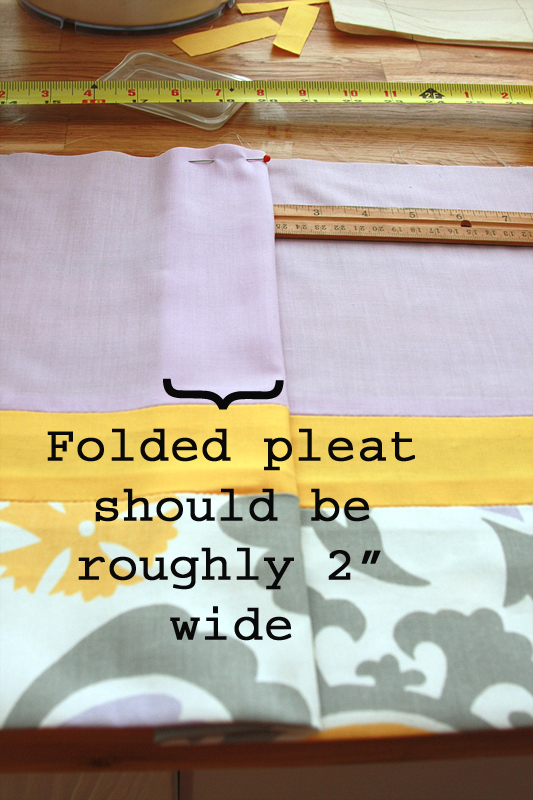
Repeat with on the opposite side of the center mark. (Pull the 23 1/4" mark in to the 19 1/4" mark.) You should now have one pleat with folds about 4" wide.
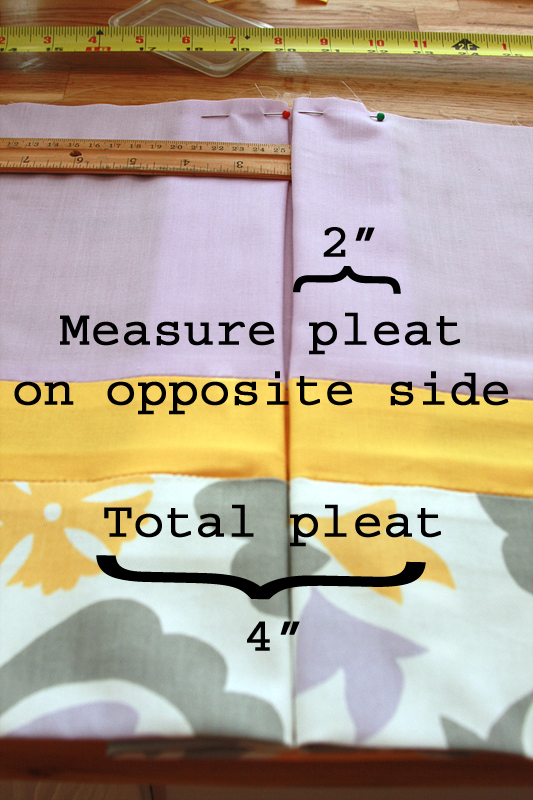
Repeat with remaining two center pleat marks. You should now have 3 pleats pinned into place. Measure out 50 1/2" on your measuring tape again. Place the 24 1/4" line even with your center seam. If the piece extends past either the 0" or 50 1/2" lines, adjust your pleats (use folds on both sides of the center marks and keep the center seam aligned with the 24 1/4" line) until your piece reaches 50 1/2". Pin all pleats into place, then press folds with an iron.

Repeat with remaining side piece. For the end pieces, there will be one pleat in the center (instead of three).
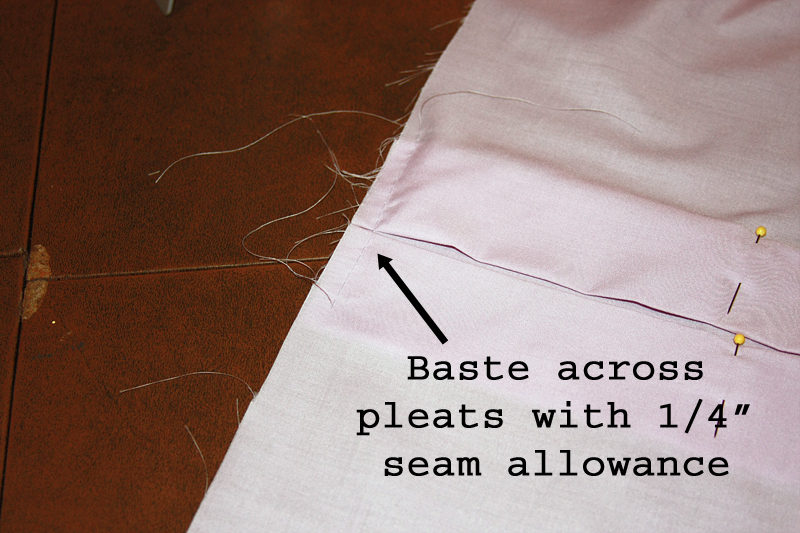
Once all your pleats are pinned into place, set your sewing machine to the longest stitch setting. Baste across each pleat with a 1/4" allowance. (This is so when we flip this piece over to attach it to the base you're not running over any pins.)
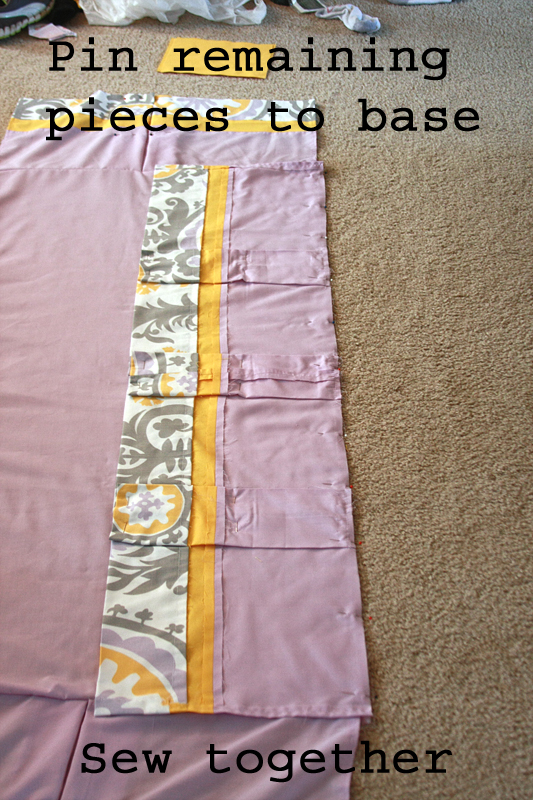
Starting with either a side or an end piece, place the piece face down on top of the base, lined up with a corresponding side. Pin pieces together. You should have a 1/2" overhang from your base on either side of your side/end piece. Sew pieces together (the width of the piece, not including the extra overhang).
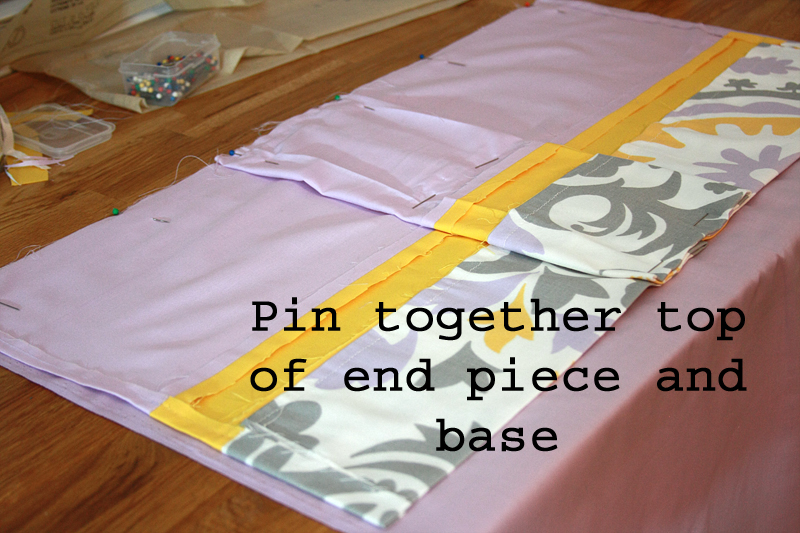
Repeat with remaining 3 pieces.
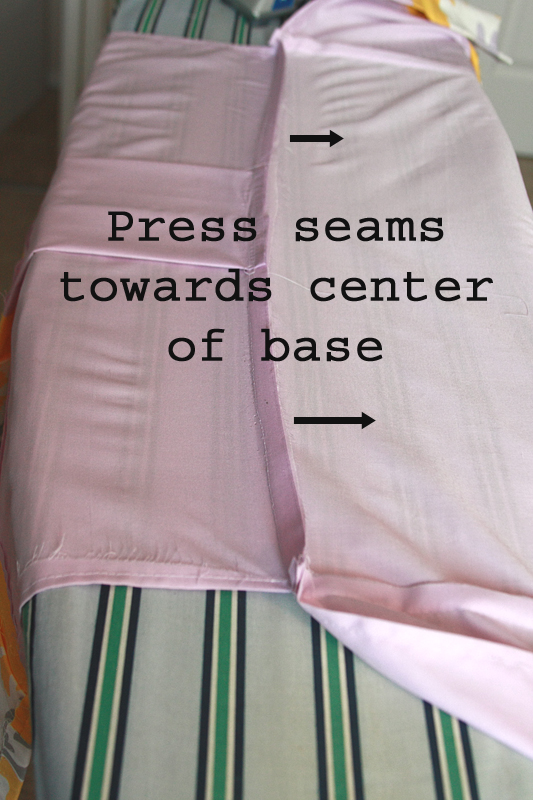
Once all of your side and end pieces are attached, press your newly formed seams towards the center of the base.
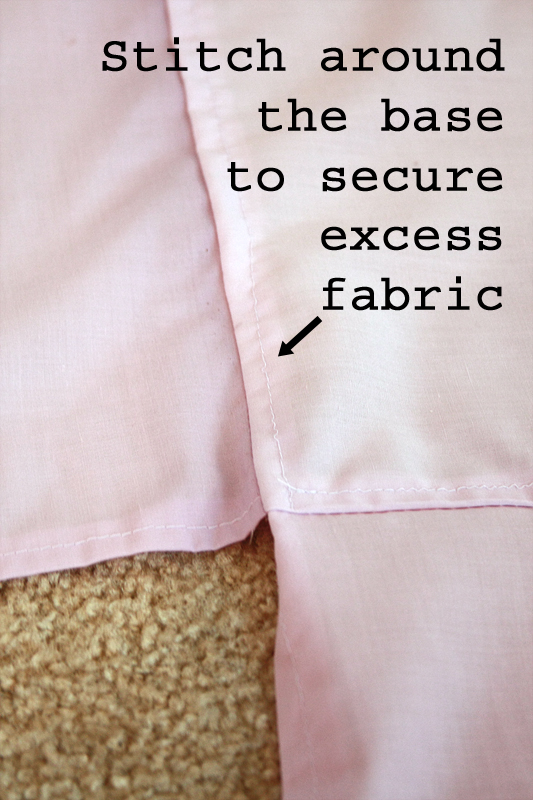
Flip your crib skirt over and stitch around the edge of the base with a 1/4" allowance to affix the seams to the base (this helps to give it a nice finished look).
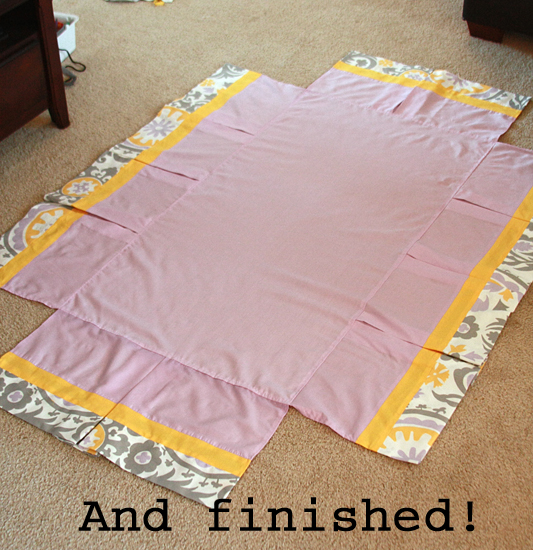
Lay out your crib skirt to make sure everything is in the appropriate place and facing the correct way.
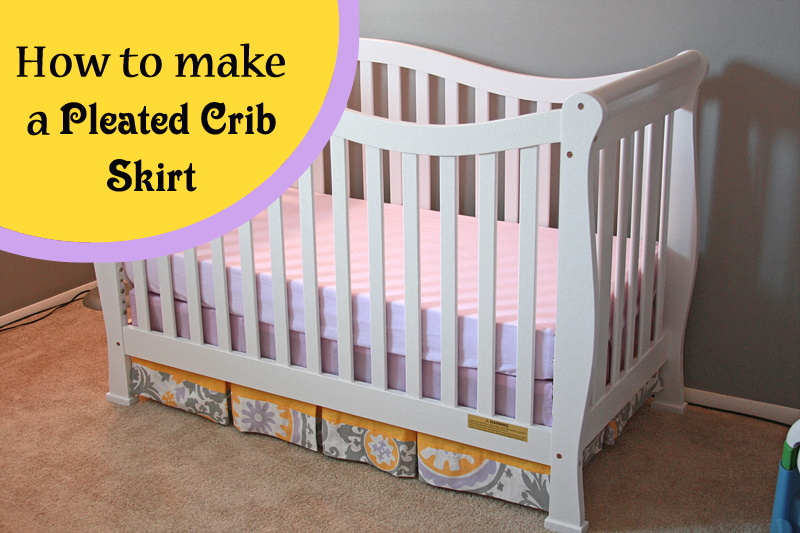
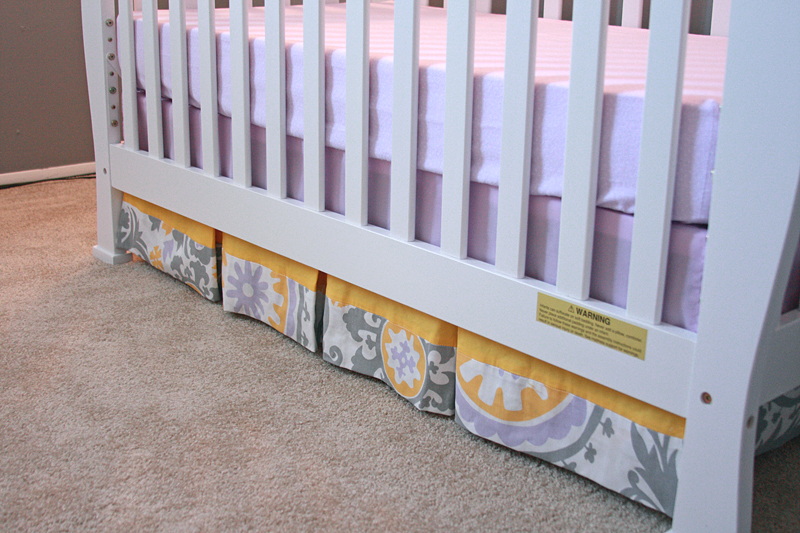
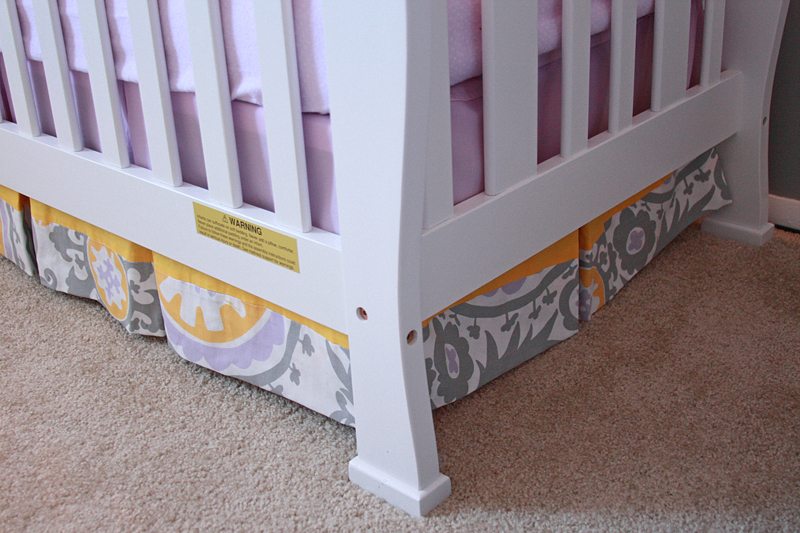
Place the crib skirt in your crib and enjoy!
While this style of crib skirt is a little more work and costs a little bit more than just placing a single piece of fabric across the bottom of your crib, I tend to think it's worth it. It's not like I'm biased or anything... :)
Let's take a look at the price breakdown, shall we?
3 yards cotton broadcloth @ $1.50/yd = $4.50
3/4 yards cotton fabric @ $5.59/yd = $4.19
2 yards cotton twill @ $5.61/yd = $11.22
3 spools of thread @ $1.26/spool = $3.78
Final Price = $23.69
Even though I got all of my fabrics on sale, two of them weren't the cheapest out there to begin with, so as always, you can make this for even less.


Very pretty...so creative....
ReplyDeleteJUST WHAT I WAS LOOKING FOR!!!!!!! You are a LIFE SAVER!!!! :D Thank you SOOOOO MUCH!!!
ReplyDeleteThis is BEAUTIFUL!!! Excellent job!! And you made it for so cheap too, awesome!
ReplyDeleteThanks, I made a no sew bed skirt and it was just blah...I think I am going to try again. I'm also going to try and make a cover for my sewing machine table that is going to double as a changing table when it is not in use!
ReplyDeleteYeah, I was very tempted by the no-sew skirt, but in the end I decided I wanted something a little bit nicer. I'm such a sucker for details! Hopefully they turn out not so blah! :)
DeleteHi there - where did you get that gray/lavendar/yellow fabric? It's EXACTLY what I have been looking for! And so is this crib skirt tutorial! :)
ReplyDeleteThanks! I got all the printed fabric from Fabric.com . It's premier prints in wisteria, though I'm not 100% sure they carry it any more. One was the suzani (sp?) print and the other (curtains) is the Emma.
DeleteThis comment has been removed by a blog administrator.
ReplyDeleteDo you know the measurements if I want to do it without the pleats? I want to use 3 different fabrics but leave out the pleats??
ReplyDelete