Monday, March 25, 2013

The Nursery Reveal

Over the past few months I've gone through quite a few tutorials for nursery items such as curtains, a crib skirt, crib sheets, changing pad cover, and how to recover a glider. All with the expectation of a little girl arriving in January.

Well, she arrived with fanfare (*cough*a nice extended hospital stay*cough*) 4 days early, and we just hadn't quite put the finishing touches on the nursery. So a couple of weekends ago, we finally "finished" it. There's still a few things here and there I want to add, but they're just little things. I have a feeling it's going to be an ever evolving process.

But! We're going to go ahead and call it final and do the big reveal before she gets old enough to move to a toddler bed.


"Little Girls are... Sugar and Spice and Everything Nice"

First off, can I just say how cute this wreath is? A dear friend made it for Baby Spatula and gave it to us at her shower. A little tricky to cart home, but definitely worth it.

Annnnd... ta da! I give you Baby Spatula's nursery:


Athena Nadia Crib by AFG: Walmart
Crystal Baby Mobile: Handmade (based on this tutorial)
Bedding: Handmade (Sheets, Crib Skirt)
Wooden Letters: local craft store, but can also be found at JoAnn's
Butterflies: let's just say my cutting hand hated me for a while...
Clear Beaded Lamp: Target
White Bookcase: Target


Curtains: Handmade (with this tutorial)
Glider: Craigslist (recovered using this tutorial)


Dresser: Craiglist (refinished)
Wicker basket: Burlington Coat Factory (liner handmade)
Summer Infant Changing Pad: Amazon
Changing pad cover: Handmade (using this tutorial)
Wall Art: Handmade (tutorial coming soon!)


Even though it was a TON of work and took several months to pull off, we really couldn't be happier with how it turned out!

Friday, March 22, 2013

Crack Potatoes


Oh my goodness. Baby Spatula is sleeping and I actually have both hands free. And there is nothing superbly pressing that I must-do-this-minute-before-she-wakes-up. It's a miracle.

It might be more of a miracle for you than for me though. Because it actually allows me to share these fabulous cheesy potatoes with you. And you'll thank me for it. Profusely. I know I have them marked as a side dish and all, but honestly, we may or may not have eaten them after day 1 as just a meal. Our arteries love us.

Back home, there is a family friend who makes the absolute best "cheesy po's" ever. Ever, I tell you. (Um, hi Mom, your's are still pretty good too!) But of course it's "a little bit of this", "a lot of that"... no real recipe. So even though I don't know what all goes in them or how much, I do know that these come very close. However, they're not exactly the same as there is a nice healthy addition of ranch flavoring in these. Which is a great spin off of traditional cheesy po's. And yes. They are like crack. Just in case you were wondering.


Crack Potatoes
Adapted from: Plain Chicken

32 ounces reduced-fat sour cream
8 ounces cheddar cheese, shredded
6 ounces real bacon bits (or the equivalent of chopped bacon)
2 (0.4 ounce) packages Ranch powder (I used Hidden Valley Salad Dressing and Seasoning Mix)
30 ounces frozen shredded potatoes (i.e. hashbrowns)

Preheat oven to 400 degrees F. Coat a 9 x 13 pan with baking spray.

In a very large bowl, combine the sour cream through the powdered salad dressing. Stir in the frozen potatoes until completely coated with mixture. Bake for 45-60 minutes.


Makes: 8 servings


Of course, I totally enjoyed these completely guilt-free about a week or so before Baby Spatula's arrival, but now... yeah. I think there might be guilt if I made these now. Maybe. Unless all the sour cream and cheese smother it to death. I think it would be worth it to find out, don't you?


I mean honestly, do you really want to look at the nutrition facts? Just close your eyes and keep scrolling.

Nutrition Facts
Serving Size 272g
Amount per serving
Calories 603Calories from fat 384
% Daily Value
Total Fat 42.7g66%
Saturated Fat 22.3g111%
Cholesterol 95mg32%
Sodium 1201mg50%
Total Carbs 33.1g11%
Dietary Fiber 2.5g10%
Sugars 7.2g
Protein 22.3g
Vitamin A 20%Vitamin C 8%
Calcium 34%Iron 26%

Friday, March 8, 2013

Crafty Fridays: Travel Crayon Roll


Back in January, my middle nephew, The Squishy, turned two. And it was the first birthday party for any of my nephews/niece that I had to miss. (Being overly large and pregnant does not bode well for travel.) Needless to say, I was bummed.

Even though I couldn't be there to help celebrate, I still wanted to get the little man something I knew he would get some serious mileage out of. Over the course of the past few months, we had noticed how much he loved to just sit and color. Or, well, scribble. But that's besides the point. The kid loves his crayons.

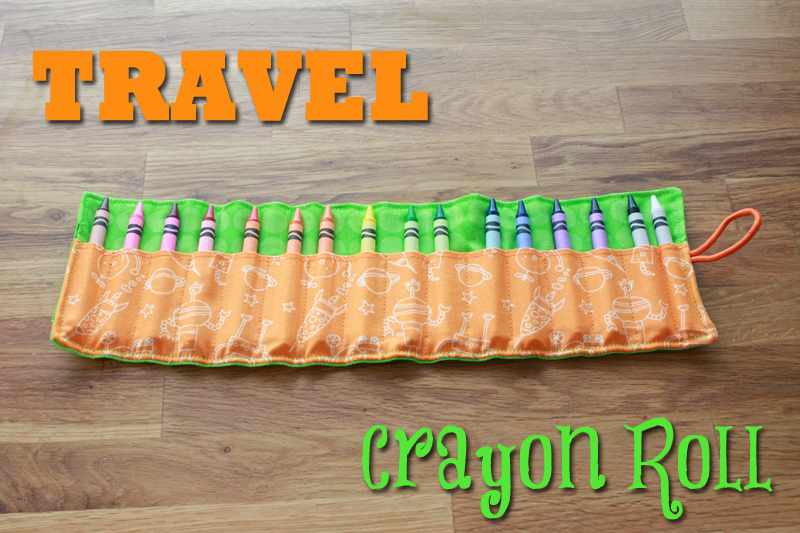
I decided what better to give him than a way to take a fun thing to do along in the car? So I set about trying to find a little lap desk for him to color on, a few coloring books, and making this cute little travel crayon roll for him to take along and keep his crayons nice and organized. Okay, that last part may be more for mom, but that counts too.

While he's still a bit young to be able to put the crayons in and out of their little slots completely by himself, Mom reports that it's still handy to have at restaurants.

Things You'll Need

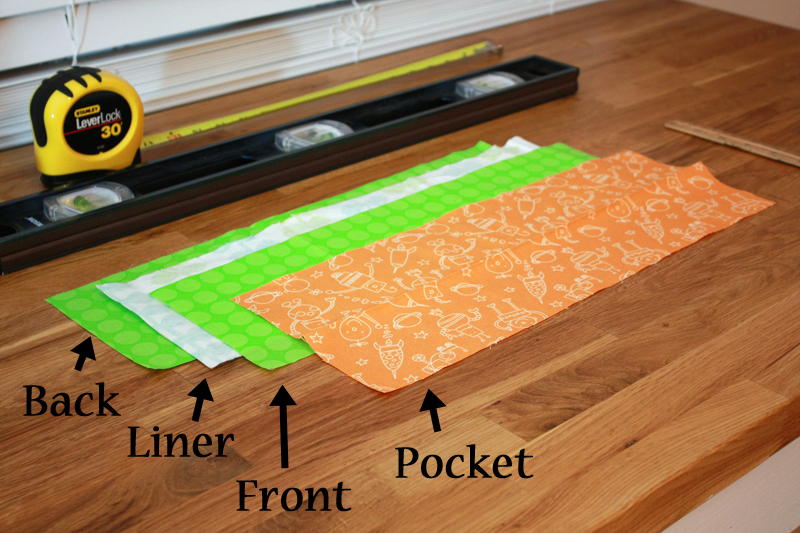
2 pieces of 5" x 16 1/2" fabric for front and back
1 piece of 6" x 16 1/2" coordinating fabric for pocket
1 piece of 5" x 16 1/2" flannel for lining
1 coordinating hair tie
1-2 spools coordinating thread
1 matching button
Scissors
Needle
Dressmaker's pencil
1 box of 16 crayons
Pins


Begin by getting all your fabric cut down to size. You may notice that my flannel isn't just straight white, but some leftover from a different project. If that's all you have too I say go for it (as long as your outside fabric isn't too see-through).


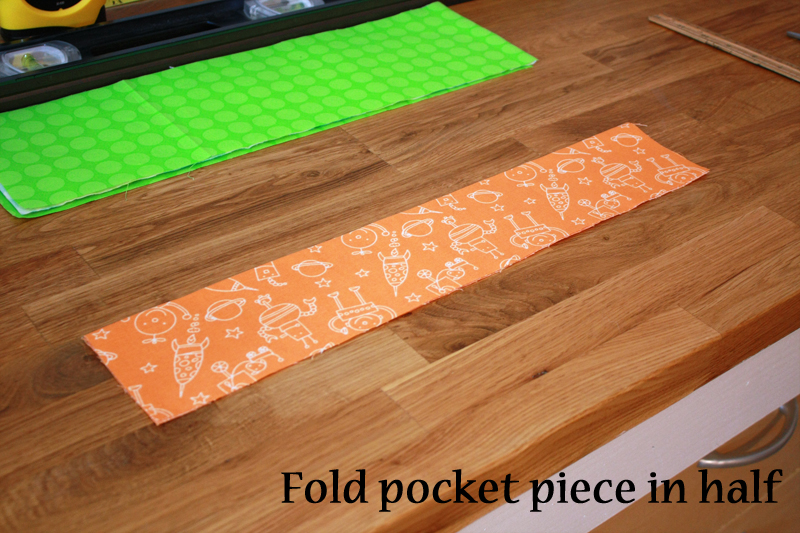
Fold your pocket piece in half length-wise and press.


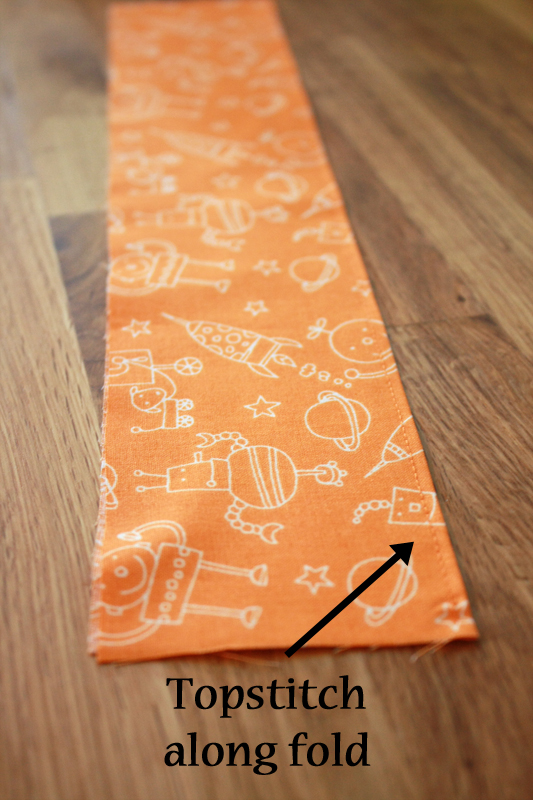
Top stitch 1/4-1/8" from the folded edge.


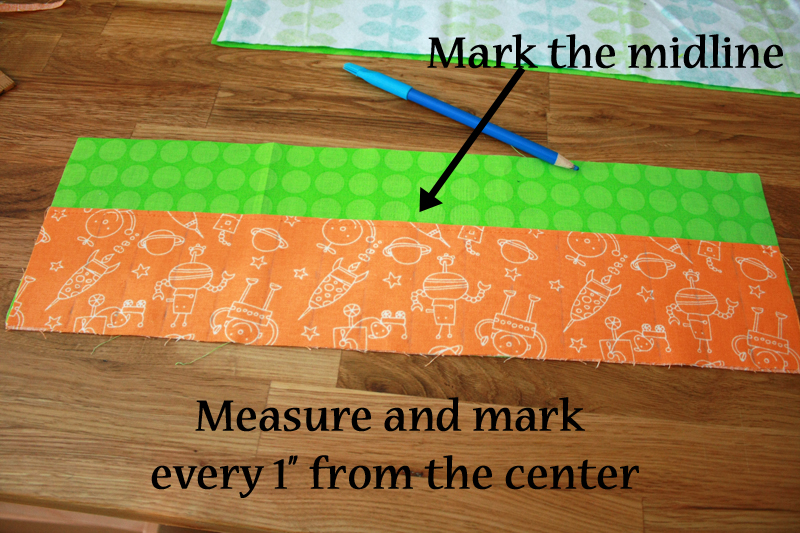
Lay your pocket piece on top of your front piece, with the bottom edges aligned. Mark the midpoint of your pocket piece at 8 1/4". Draw a line at this point from the top of the pocket piece to the bottom. Measure and draw lines on both sides of the midpoint in 1" increments (you should have 15 lines). The last crayon slot at each end will end up being a little wider than 1" to account for seam allowances.


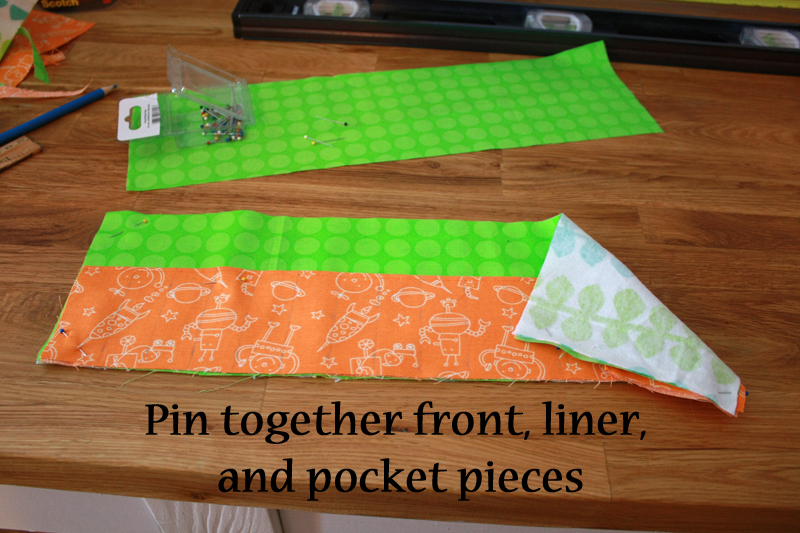
Place your pocket and front pieces on top of your lining. This piece just helps to give the roll stability. Pin pieces together.


Starting 1/4" from the top of the pocket, stitch down your drawn lines (remember to back stitch at the beginning as well as the end).


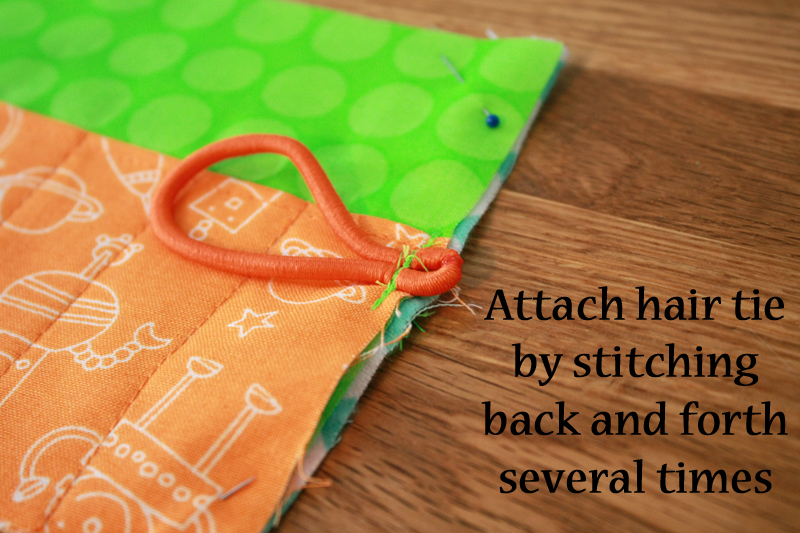
Place the hair tie on the right side of your piece. Pinch together the portion of the hair tie that has been melted together, then stitch back and forth many times across the tie as close to the edge of the fabric as possible. (Go slowly!)


Lay your back piece on top, right-side down. Pin pieces together. Sew pieces together with a 1/4" seam allowance, leaving a 2" gap on the left side. Clip the corners and turn the crayon roll right-side out. Use chop sticks or another blunt object to help turn the corners out. Tuck the extra fabric in at the opening. Press.

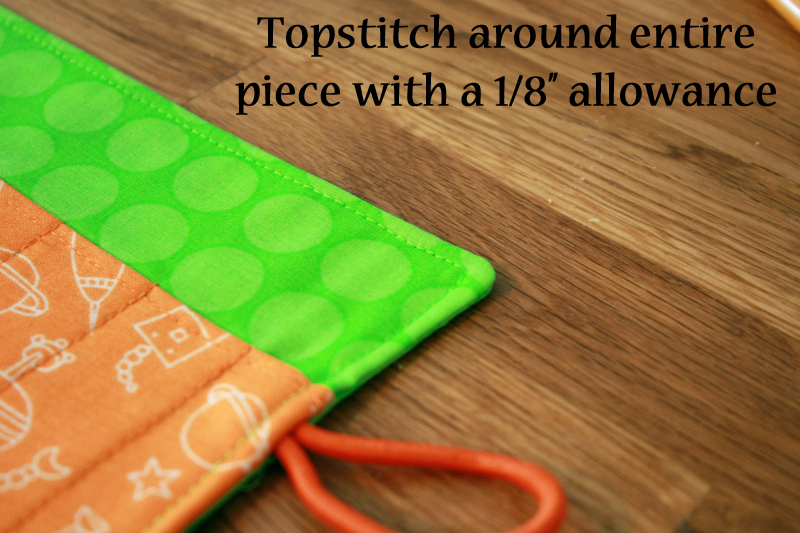
Top stitch 1/8" from the edge the entire way around the roll, making sure to close the gap on the left side.


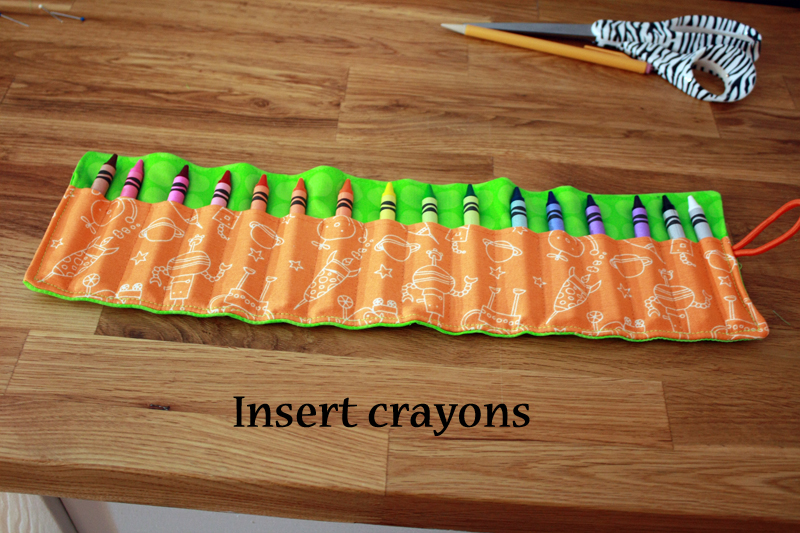
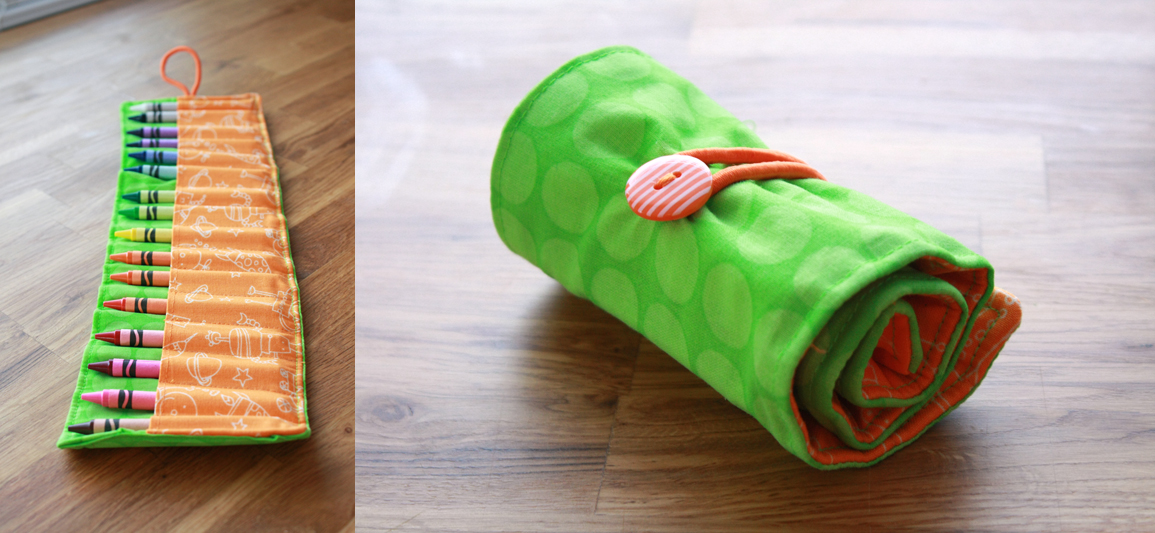
Slide the crayons into the slots.


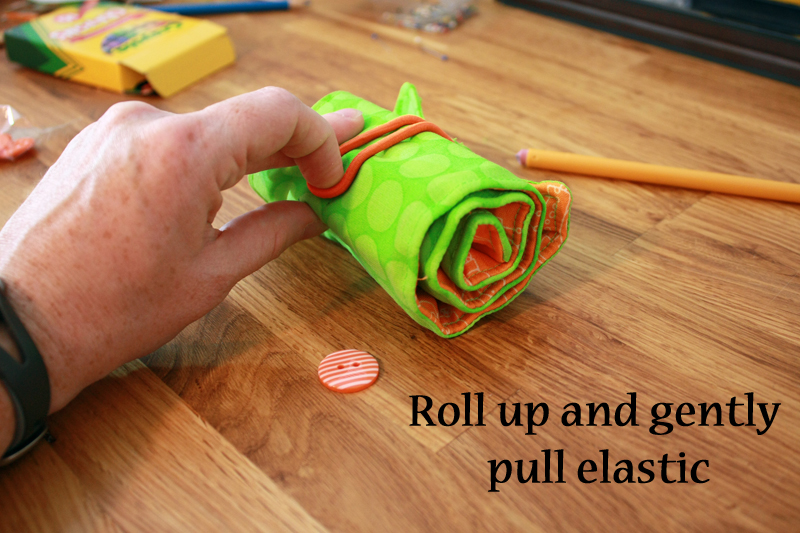
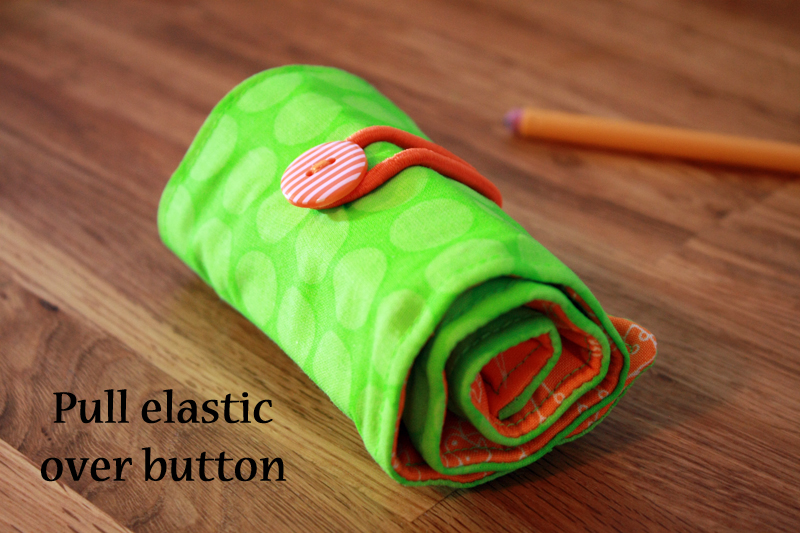
Roll up tightly. Gently pull on the elastic until you find that sweet spot where you feel resistance, but you're also not stretching the band out as far as possible. Mark this location with a tiny dot.


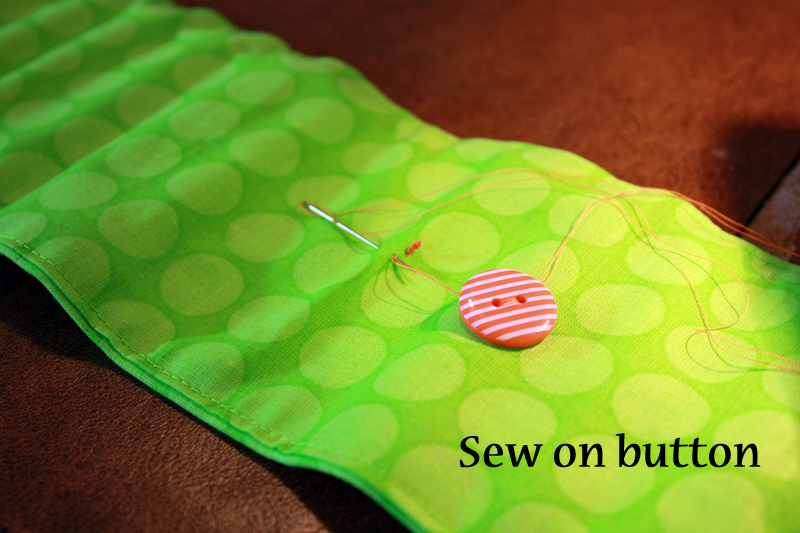
Attach the button by sewing through just the bottom layer.


Pull the elastic around the button to see if everything holds okay. And with that, you're done!


How's that for super easy? I'm pretty sure this took me a whopping 15-20 minutes or so to put together, and it turned out looking great.


My super anal must-put-things-in-just-a-certain-order inner child totally wishes I had this when I was little. Way more awesome than just sticking them back in the box and having to pull them out to see which color is which. (Okay, yes, red and blue are easy, but yellow-orange and orange-yellow? Come on, those are a bit trickier when in the box.)

Let's see where this stands price-wise:

1/4 yard cotton fabric @ $4.99/yd = $1.25
1/4 yard flannel @ $2.50/yd = $0.63
2 spools of polyester thread @ $2.99/spool = $5.98
1 package of hair ties (15 ct.) = $2.17
1 package of buttons (14 ct.) = $3.00

Final Price = $14.28


So if you were only going to be making one of these, this may seem a bit pricey. But, if we were to break it down by only the stuff you were actually using (i.e. 1 button, not 14), it would only cost you $9.46 - even less if you already have the thread.

Sunday, March 3, 2013

Announcing...


Our little sous chef has arrived!


Baby Spatula's Stats:

1.28.13
7 lbs 8 oz
19 inches long
3:49 am


After spending 2 weeks in the hospital for breathing issues, Baby Spatula is finally home and doing well. And we of course love her to pieces. I can't believe she's already over a month old!

Erratic posting will resume sometime shortly in the future. :)

LinkWithin

Related Posts with Thumbnails
 
Pin It button on image hover