Tuesday, August 30, 2011

Compound Butters


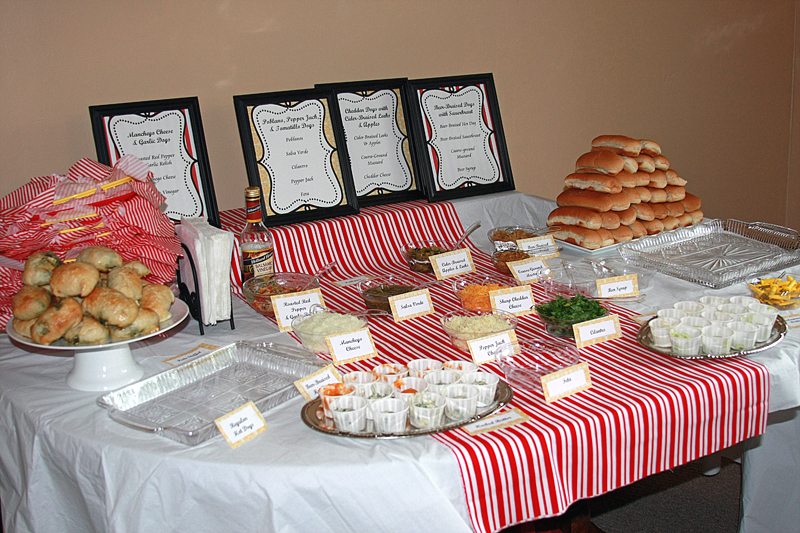
Let me tell you, it's not the easiest thing in the world to come up with a completely finger-food-only meal. Especially when you're not just focused on heavy appetizers, but on actually serving sides.

Goodbye pasta salad.

Goodbye chips and dip.

Hello corn on the cob. Problem solved. And another summer favorite.

But what's the one thing everyone loves to do to corn on the cob? Smother and cover it with some butter. Or, well, at least that's how this family rolls.

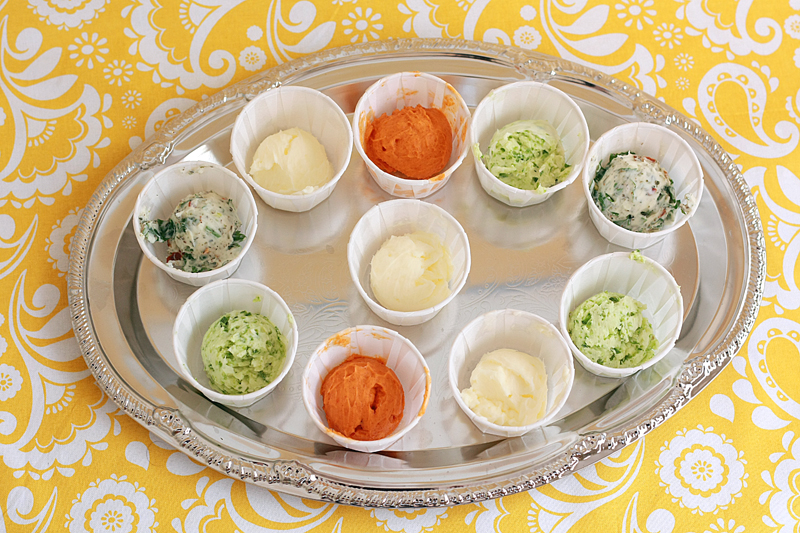
So I might have cheated, and bought little disposable cups to put the butter in and given out knives -- BUT it still worked, and I say it still qualifies as "finger food".

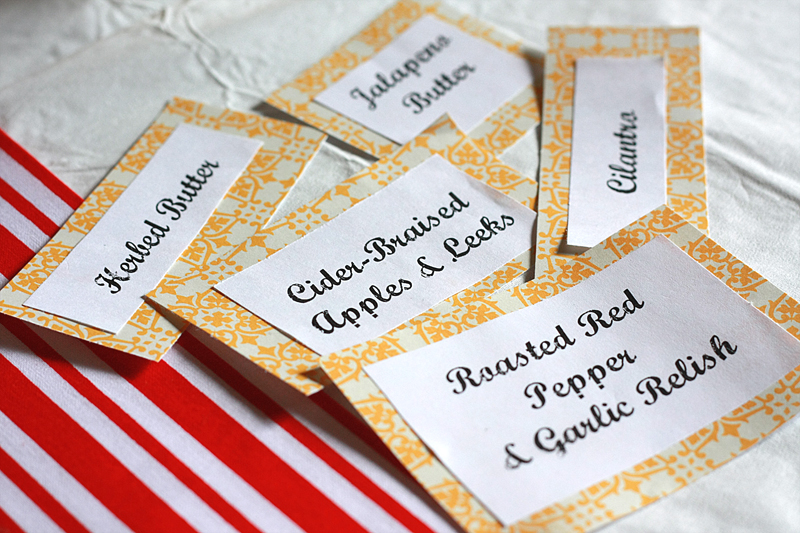
Since we were on a roll with trying new beers and new hot dog toppings, why not go all out and have new butter flavors while we were at it?

So not regrettable. And SO easy to make. I also put out plain butter just.in.case, and not a single one of those cups were touched. I think that speaks for itself.
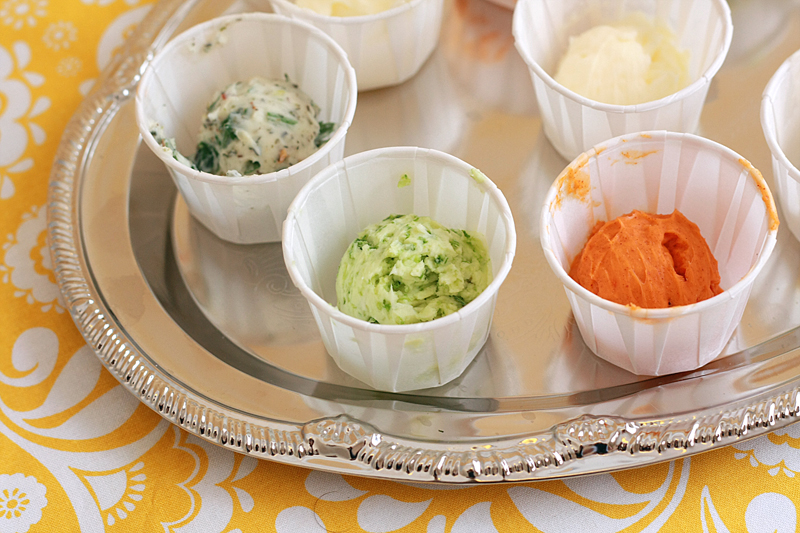
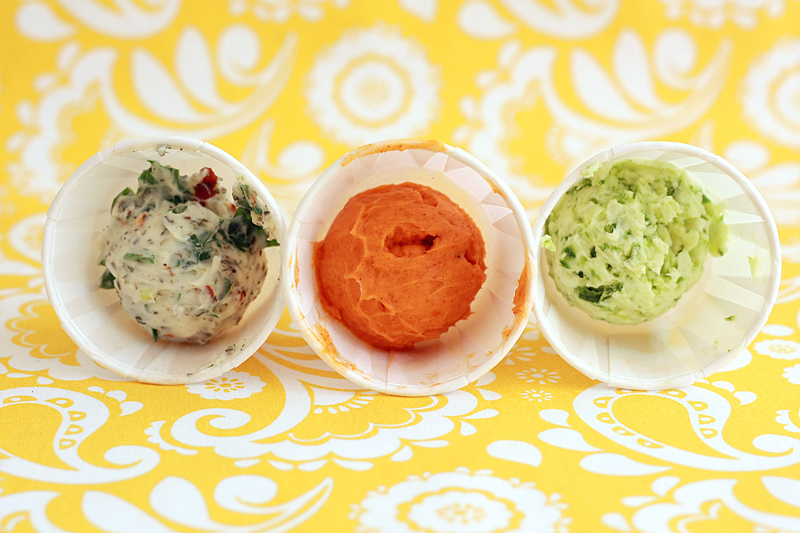

Herbed Butter


Adapted from: Allrecipes.com

1 1/2 cups butter, at room temperature
3 tablespoons parsley, minced
1 1/2 tablespoons garlic, minced
1 tablespoon Italian seasoning
3/4 teaspoon red pepper flakes

In a medium bowl, use the back of a fork to mash the butter. Fold in the remaining ingredients until fully blended. Transfer butter to a 12x18 piece of wax paper. Roll paper up, shaping butter into a log. Store in the refrigerator until ready to use.

Makes: 12 tablespoons (serving size: 2 teaspoons)


Smoked Paprika Butter


Adapted from: 101 Cookbooks

1 1/2 cups butter, at room temperature
2 1/2 teaspoons Smoked Paprika

In a medium bowl, use the back of a fork to mash the butter. Fold in the paprika until fully blended. Transfer butter to a 12x18 piece of wax paper. Roll paper up, shaping butter into a log. Store in the refrigerator until ready to use.

Makes: 12 tablespoons (serving size: 2 teaspoons)

Jalapeño Butter


Adapted from: 101 Cookbooks

1 1/2 cups butter, at room temperature
2 jalapeños, seeded and roughly chopped

In a food processor, blend jalapeños until very finely minced. In a medium bowl, use the back of a fork to mash the butter. Fold in the jalapeños until fully incorporated. Transfer butter to a 12x18 piece of wax paper. Roll paper up, shaping butter into a log. Store in the refrigerator until ready to use.

Makes: 12 tablespoons (serving size: 2 teaspoons)


As I said, these are really easy to throw together, although the key to this easiness is to have room temperature butter. The colder the butter is, the harder it will be to mix everything together. I'm definitely going to have to keep some of these butter on-hand as they really brought a whole other level of flavor to the corn.


Nutrition Facts - Herbed Butter
Serving Size 21g
Amount per serving
Calories 140Calories from fat 140
% Daily Value
Total Fat 15.6g24%
Saturated Fat 9.8g49%
Cholesterol 41mg14%
Sodium 110mg5%
Total Carbs 0.4g0%
Protein 0.2g
Vitamin A 11%Vitamin C 2%
Calcium 1%Iron 0%

Nutrition Facts - Smoked Paprika Butter
Serving Size 19g
Amount per serving
Calories 137Calories from fat 137
% Daily Value
Total Fat 15.4g24%
Saturated Fat 9.7g49%
Cholesterol 41mg14%
Sodium 109mg5%
Total Carbs 0.2g0%
Protein 0.2g
Vitamin A 13%Vitamin C 0%
Calcium 1%Iron 0%

Nutrition Facts - Jalapeno Butter
Serving Size 20g
Amount per serving
Calories 136Calories from fat 136
% Daily Value
Total Fat 15.4g24%
Saturated Fat 9.7g49%
Cholesterol 41mg14%
Sodium 109mg5%
Total Carbs 0.1g0%
Protein 0.2g
Vitamin A 10%Vitamin C 1%
Calcium 0%Iron 0%

Sunday, August 28, 2011

Foodbuzz 24x24: Summer's End Beer Tasting Party

Every month, Foodbuzz selects 24 featured publishers to host parties all around the globe that all happen on the same day. I would like to thank Foodbuzz for including me in this month's 24x24.


Hot dogs, hamburgers, and a nice cold brew. It's the quintessential summer party fare.

But a hot dog topped with ketchup and mustard can get old after oooh, the second go around, so why not switch things up a bit and make it interesting? And while we're at it, why don't we go outside the box on the beer, too?

It'll be the perfect way to wrap up the summer. Trust me.


If you've been following my blog for any length of time, you may remember Adam and I co-hosted a beer tasting back in the fall. It was a small get together of 8-10 people, but we had an absolute blast and decided we wanted to do it again, this time with a much larger crowd.


The concept is simple. A 6-pack gets your guest and significant other in the door.


To ensure variety, we created 4 beer categories, then assigned each person (or couple) to bring beer from one of those categories. We encouraged them to bring 2 types beer within that category they hadn't tried before or was at least not your run-of-the-mill beer. (So 3 bottles of each kind.)


This technique worked well for our large crowd of almost 2 dozen, although with a smaller group you may want to opt for more types of beer per person/couple (such as 2 bottles of 3 kinds of beer) or fewer categories.

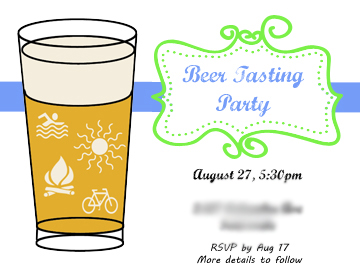
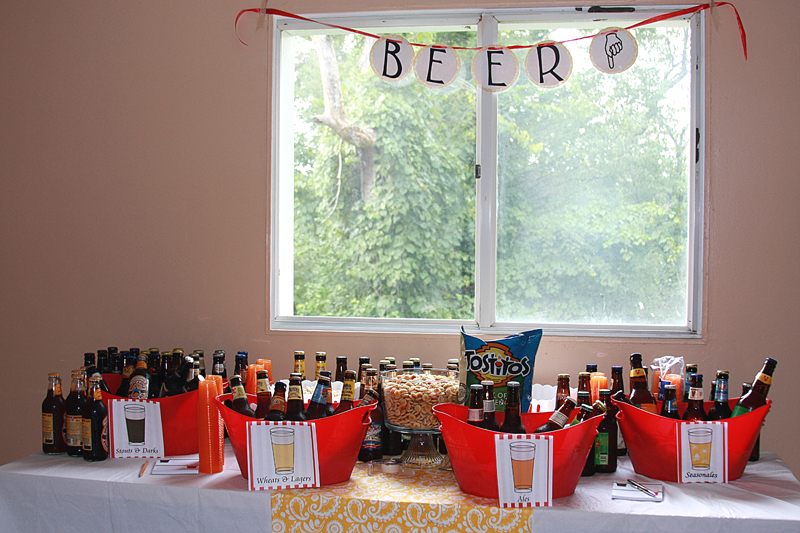
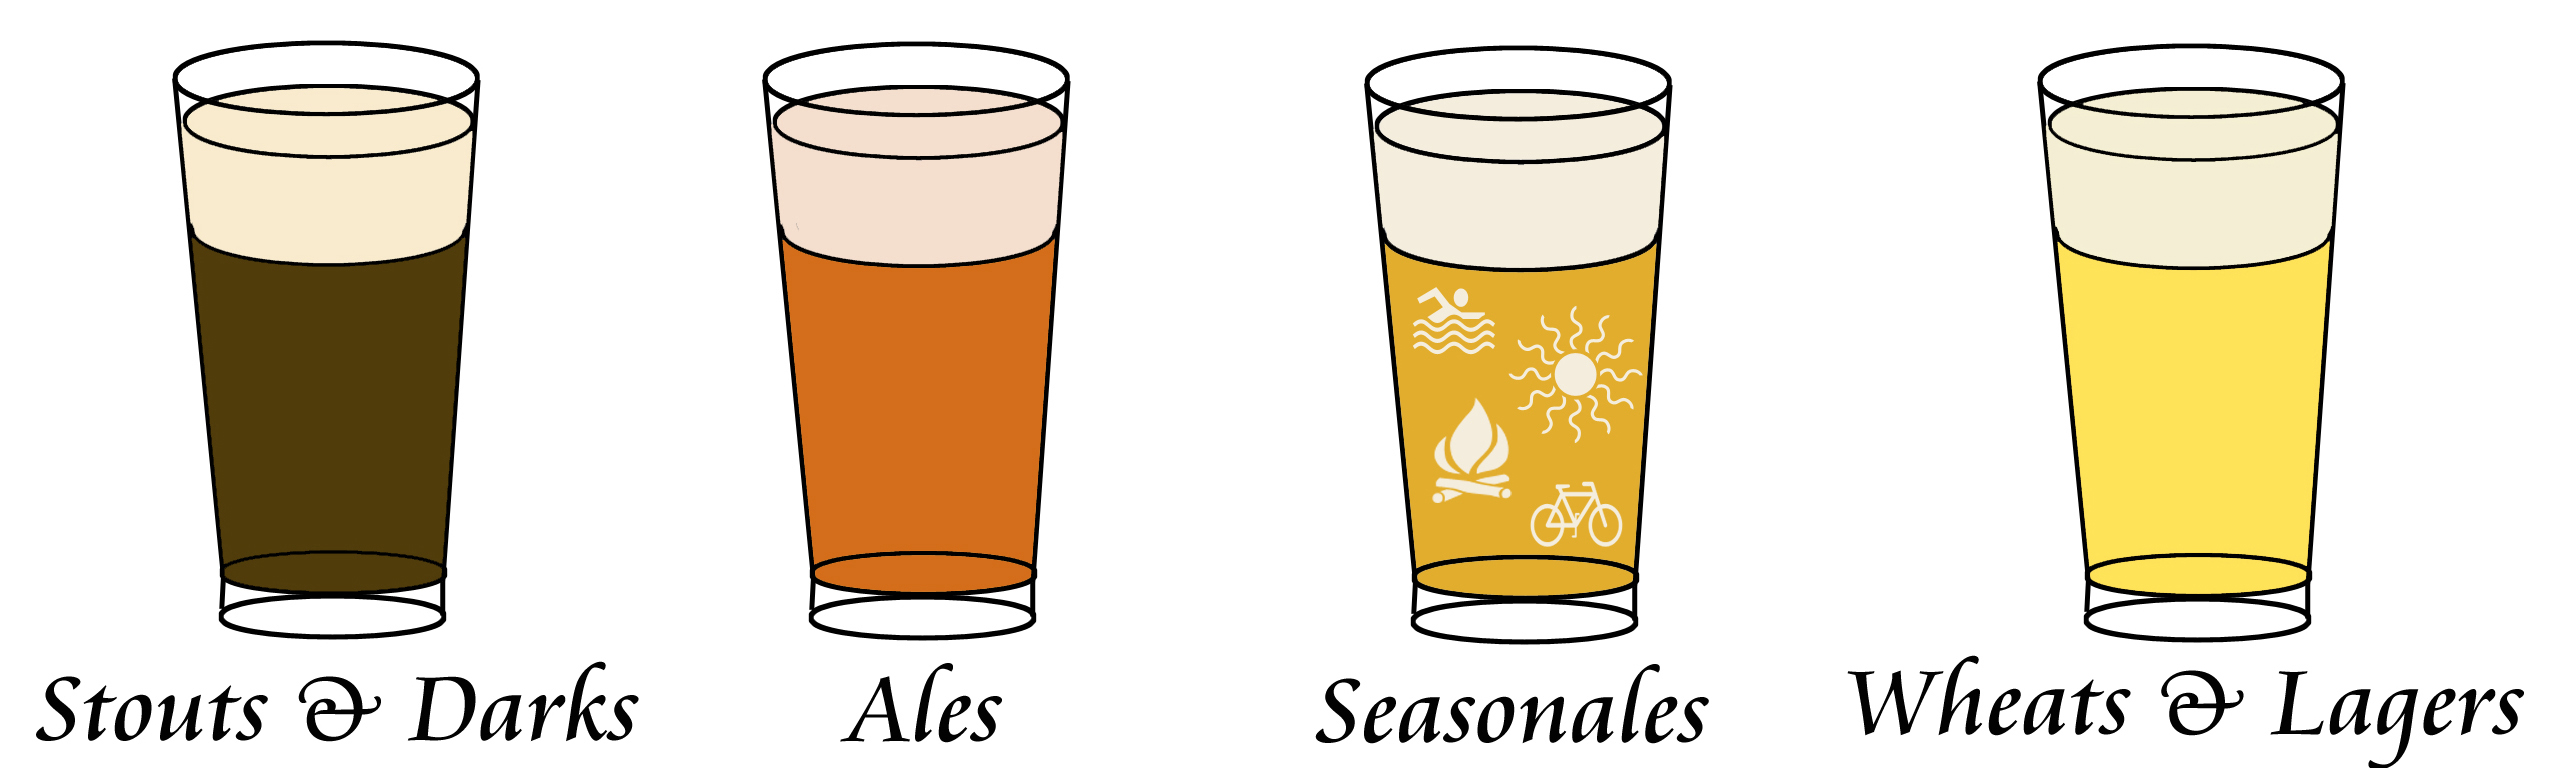
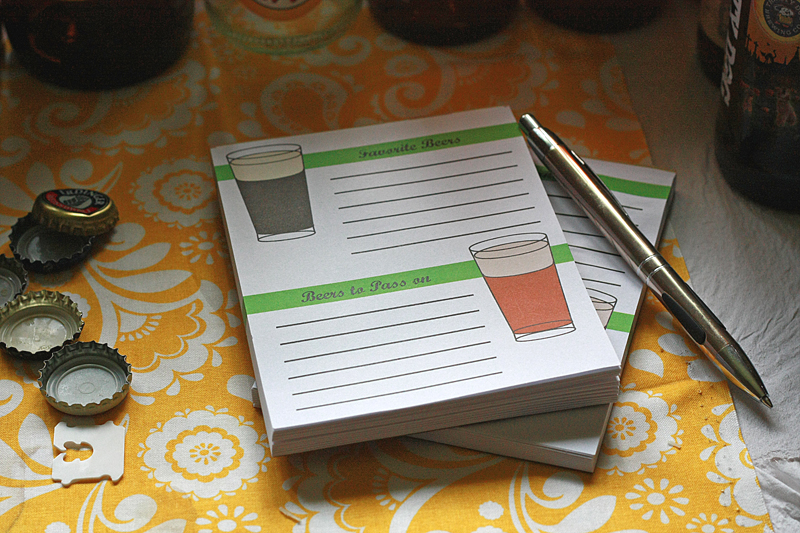
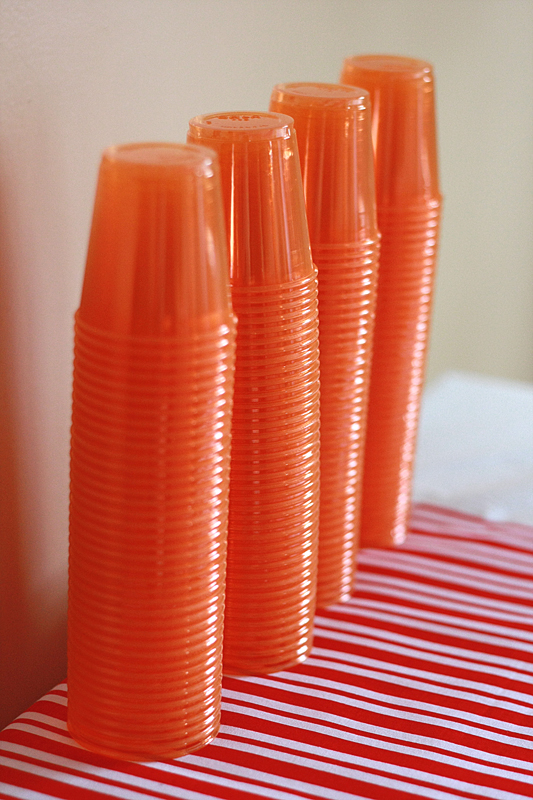
Now, this may seem somewhat silly and trivial, but I think tasting cups are crucial for a tasting party. First and foremost, tasting cups ensure that no one gets stuck with an entire bottle of a beer they really don't like. Secondly, they also cut down on the quantity on beverages consumed by guests as well. This helps to prevent someone drinking too much and getting behind the wheel, or keeping someone back from trying all the beers they want because they know they have to drive later.* These cups don't have to be anything fancy. Simple 3 ounce plastic bathroom cups work just fine (and they look like disposable shot glasses, bonus!), and they're fairly cheap.

Now it's not a party unless there's some kind of food involved. Although straight forward hot dogs would be by far the easiest thing to serve, I apparently have some kind of "must-be-over-the-top" bug and went with the hot dog bar.


Over the past year, I've made a few different kinds of what I call "fancy-pants" hot dogs, and have been really surprised at how tasty each was, especially since I'm not a big hot dog person. I decided to feature each of these hot dogs plus a new one.


Of course, conspicuously absent on the table were your classic standbys -- no ketchup or yellow mustard. And what would you know, people didn't seem to miss them at all. :)

Since you really probably shouldn't stuff yourself full of just hot dogs, we also had two side accompaniments:
Pesto Pretzel Roll-Ups
Grilled Corn on the Cob with:
Smoked Paprika Butter
Jalapeno Butter
Herbed Butter
Plain Butter
along with two "palate cleansers" for people to munch on between beer tastings (Homemade Buttered Popcorn and Seasoned Oyster Crackers).

We also had Brownie Burger Cupcakes and a fruit platter set up for those who wanted a little something sweet to finish out the night.

While it may not be at the top of the list, it's also kind of nice to have options other than beer readily available for people to drink (especially if you have guests who don't drink beer). We had wine, water, and Blueberry Lemonade Soda set up by the desserts for those who didn't wish to partake in the beer tasting.


One of my favorite parts of party planning are the tiny little details that often get overlooked but can make a big impact on the overall feel of the party. Right now is the perfect time to stock up on barbecue-type decor as a ton of it has been put on clearance. (Although another great place for cheap serving platters, bowls, and such is the Dollar Tree.)


I thought these baskets were absolutely perfect for the theme of the party, though they did pose a bit of an issue for what could be served -- finger foods only.
Baskets: Wegman's ($2.49/6 on clearance!)
Waxed Paper: Michael's


Labels for identifying the various condiments


Notepads for guests to jot down their favorite and least favorite beers
Vistaprint (you can usually search for a coupon code to get these on sale)


Despite a few hiccups in timing the food, everything else went fairly smooth. Our guests were very excited to try new beers, and I'm pretty sure a few of them walked away with some new favorites and a couple they now know to stay away from. I think a couple people turned the corner on their take on hot dogs as well -- going from a "meh" attitude to "oh, these can be good!". And that, my friends, is what I call a success.


*Regardless of how you serve your guests alcohol, please make sure that no one who has had too much to drink drives home. Have a designated driver or a cab company phone number handy.

(Oh, and I have to give a shout out to our friends Corey & Stacey who majorly stepped in and helped us out -- we couldn't have finished everything without you guys!)

Thursday, August 25, 2011

Maple-Glazed Baked Long Johns


If it's one thing you don't want to hear first thing in the morning, it's the phone ringing. Especially when it's your dad on the other end calling to tell you your grandfather just passed away. But these things happen, as it did to me last Friday.

So instead of spending a leisurely weekend attending a barbecue and working on things for the house, we spent hours trying to figure out plane tickets and travel arrangements and crap-what-do-I-wear, all while trying not to think about the reason for the impromptu trip. Because stopping to think about the reason would make it true, and I would much rather it not be.

It's funny how certain things in life become status quo -- that maybe one day in the future things will change. But that's in the future, not now. My grandfather had been in a nursing home since around 2001, and always seemed to be doing well. He had his ups and downs, but overall was doing pretty good for his state of health. That's just how things were. Luckily, my sister, mother, and I had to chance to visit this summer, which turned out to be a true bit of luck for me as I hadn't been out to visit in a very long time.

My grandpa was a good man. He loved his family and would have done anything for us. Of course he had his quirks, such as never letting anyone have the remote, then continually channel surfing, but we all loved him just the same. Even when he stared down at my half-finished dinner plate and gruffly asked "you gonna eat that?" then proceeded to finish off the rest of it.

Of course, having almost the entire family together (which is no small feat as he had 6 kids) always brings out hilarious and previously untold stories. What one person remembers as clear as if it had been yesterday, someone else has completely forgotten. Take these Maple-Glazed Long Johns, for example. I knew, almost right away, that my next post was going to be one of Grandpa's favorite foods. Problem was, I didn't remember what it was. Thanks to lots of reminiscing over the past few days, I had my answer.

Some people handle certain emotions by writing, or exercising, or simply just bottling it up. But as for me, I bake. The exact measurements, the mixing, the methodological procedures, somehow makes things better. And right about now, is a little bit of something I need in my life.

These are for you, Grandpa. I know you would have loved them.


Maple-Glazed Baked Long Johns


Adapted from: Sugarcrafter via Brown Eyed Baker & Macheesemo

1 egg
1/4 cup granulated sugar
1 cup milk, 110-115 degrees F
1 tablespoon active dry yeast
1 teaspoon salt
2 teaspoons vanilla extract
3 1/2 cups all-purpose flour, divided
1/2 cup (1 stick) butter, at room temperature

4 large egg yolks
1/3 cup granulated sugar
3 tablespoons flour
2 tablespoons cornstarch
1 1/2 cups milk
1/4 cup heavy cream
2 teaspoons vanilla extract

1/4 cup butter
2 tablespoons milk
1/2 cup Grade B maple syrup
2 cups powdered sugar

For the doughnuts:
In the work bowl of a mixer, beat together the egg and 1/4 cup sugar for 1 minute on medium with the paddle attachment. Mix in the warm milk, yeast, salt, and 2 teaspoons vanilla. Reduce mixer speed to low, then carefully add in 2 cups of flour. Once fully combined, switch to the dough hook. Add butter in 1-inch cubes, one at a time, mixing at medium-speed until the dough is smooth before adding the next one.* Once all the butter has been added, change the mixer speed to low and mix in the rest of the flour. Dough should be tacky, but not sticky. It should cling to the hook and pull away from the side of the bowl.

Transfer dough to a lightly floured work area. Knead until the dough is smooth. Form into a ball and place in a large bowl coated with cooking spray. Cover and place in a warm spot free from drafts. Let rise 1 hour, or until doubled in volume.

Preheat oven to 400 degrees F. Line two baking sheets with parchment paper; set aside.

Remove dough from bowl and place it back on the work area. Punch down the dough, then roll out to a 1/2-inch thick rectangle. Cut the dough into 12 smaller rectangles, and transfer the small rectangles to the prepared baking sheets about 1-inch apart. Cover with plastic wrap and let sit on top of the oven for 25 minutes, or until about doubled in size. Bake for 7-8 minutes, or until lightly golden. Remove from oven and transfer to wire cooling racks.

For the vanilla cream filling:
In a medium bowl, whisk together the egg yolks and 1/4 cup sugar until light in color. Whisk in the cornstarch and flour. Set aside.

In a medium saucepan over medium heat, bring the milk and cream to a simmer, stirring constantly. Slowly temper the egg mixture by adding about 1/4 cup hot milk mixture to the bowl with the eggs, whisking briskly. Continue to whisk and add small amounts of the hot milk mixture to the bowl until it is all combined. Pour the tempered custard back into the saucepan and place over medium-low heat. Add in the vanilla. Continue to whisk until the custard becomes thick and creamy. Remove from heat and set aside. Note: Filling can be made 1-2 days ahead and stored in the fridge.

For the maple glaze:
In a small saucepan, melt the butter over medium-low heat. Stir in the milk and maple syrup. Once completely combined, remove from heat and slowly stir in the powdered sugar, 1 cup at a time. Add more powdered sugar if needed to thicken the glaze. Transfer glaze to a wide, shallow bowl.

To assemble:
Using a butter knife, form a long hollow cavity inside the length of each doughnut. Place the vanilla cream in a pastry bag fitted with a large decorating tip. Insert the tip into the hole of the doughnut and fill with cream.

Dip the top of each doughnut into the maple glaze, then flip right-side up and place back on the cooling rack. Let glaze harden for at least 5 minutes before serving.


Makes: 12 Long Johns

* If butter is not mixing into the dough well (just kind of floats to the side of the bowl), add 1/4 cup of flour at a time until dough becomes sticky enough to pull the butter into the dough. I added 1/4 cup every couple butter pieces up to the 3 1/2 cups.


Nutrition Facts
Serving Size 152g
Amount per serving
Calories 428Calories from fat 142
% Daily Value
Total Fat 15.8g24%
Saturated Fat 9.3g46%
Cholesterol 124mg41%
Sodium 308mg13%
Total Carbs 63.5g21%
Fiber 1.2g5%
Sugars 32.4g
Protein 7.6g
Vitamin A 12%Vitamin C 0%
Calcium 8%Iron 12%

Tuesday, August 16, 2011

Spicy Dill Pickles


Excuse me, Mr. Vlasic. It's time for you to move over. Or just go back to hanging out on your shelf. I think it's time we broke it off. For the summer anyways.

I'm not even going to give you the "It's not you, it's me" line. Because it's most definitely you. And I've found something so much better.

Something more customizable.

Something more crunchy.

Something with a little spice.

Something that's not the same old, same old.

That's right, I cheated on you and made my own pickles. Sorry to say, but I have no regrets. Maybe except for one -- I regret not saving more of your jars to use for whole pickles. Such a tragedy.


Spicy Dill Pickles


Adapted from: Flamingo Musings via All Day I Dream About Food

2 pounds pickling cucumbers (about 6)
1 jalapeno
3 cloves garlic
2 tablespoons fresh dill, chopped
1 1/2 teaspoons whole black peppercorns
1 1/2 teaspoons ground coriander
1 1/2 cups distilled white vinegar
3/4 cup apple cider vinegar
3/4 cup water
1/4 cup kosher salt

Wash and dry cucumbers, then slice 1/4-inch thick into style desired (i.e. rounds, sandwich slices, or you can leave them whole). Divide slices between three pint jars (about 2 cucumbers per jar). Add 1/3 of the jalapeno, 1 clove garlic, 2 teaspoons dill, 1/2 teaspoon peppercorns, and 1/2 teaspoon coriander to each jar.

Bring both vinegars, water, and salt to a boil in a medium saucepan over high heat. Stir until most of the salt is dissolved. Divide brine equally between jars, filling each as full as possible. Screw on lids and let jars sit on the countertop at room temperature for 3 days. After 3 days pickles can bet eaten; store jars in refrigerator.


Makes: 3 pints (serving size: 1 whole pickle)


Before spotting this recipe over at All Day I Dream About Food, making my own pickles never crossed my mind. Sure, I've been exposed to the canning process before -- my grandma had an entire room in her basement filled with canning equipment, but I've really never had a desire to follow in those footsteps. I mean, there's a lot of work that goes into the canning process: buying the equipment, sterilizing it, making sure it's sealed properly, etc. Not my cup of tea.

But, but, but. This is no ordinary canning technique. This is a quick and easy refrigerator method. Sure your jars need to be clean before use, but you don't have to sterilize them. Simply plop in your ingredients, cover with the boiling brine, seal, wait a few days, then refrigerate. Now this type of method my patience can handle.

And the results? Make that short little wait totally worth it.


Note: Due to the brining process, I am unable to calculate nutrition facts for this item. However, I can tell you that these are below 50 calories and have 0 fat per pickle.

Monday, August 15, 2011

Chiles Rellenos


As much as I hate to admit it, I'm totally a "rut" person when we go out to eat. Once I find something on the menu I really like, there's no turning back. I'm going to get it every.single.time we go to that restaurant.

And yet I refuse to make the same thing over and over for dinner in my kitchen? I'm an odd one, I know.

I think I'm the worst when it comes to Mexican restaurants. In my defense, we have very few authentic Mexican restaurants around and honestly, we rarely go to them. However, when we do decide to go, I want to make sure that the meal I have is going to be good. Hence, I order the same thing. Over and over and over.

And queso dip to go with the chips. Can't forget the queso dip. I'm such a sucker for gooey cheese.

The only way I know how to combat this little stuck-in-a-rut deal I've got going on is to try these new and untried menu items at home. Take these Chiles Rellenos for instance. Sure I knew what they were, but had I ever tried them in a restaurant? Of course not. But for some reason or another cheese-stuffed peppers were calling my name when I saw them. Okay, so it was a no-brainer. They're stuffed.with.cheese. Done.

Chiles Rellenos


Adapted from: Cooking Light, June 2011

Cooking spray
1 1/4 cups onion, chopped
1 (15.5-ounce) can diced tomatoes, drained
1/2 cup salsa verde
1/4 cup cilantro
4 poblano chiles
2/3 cup fresh cilantro, chopped
1 cup Monterey Jack cheese, shredded
2 tablespoons goat cheese
3 large egg yolks
3 large egg whites
1/4 cup flour
1/4 teaspoon ground black pepper
3 tablespoons cornmeal
1/4 cup canola oil

Preheat broiler to high.

Warm a large skillet over medium-high heat, coating with cooking spray. Add onion and sauté until tender, about 6 minutes. Add tomatoes and salsa verde. Cook for 12 minutes, stirring frequently, or until mixture has thickened. Place mixture in a food processor with cilantro. Process until smooth. Set aside.

Meanwhile, line a baking sheet with aluminum foil. Place poblanos on baking sheet and broil 3 inches from heat. Broil for 8 minutes, turn chiles, and broil for an additional 2-3 minutes or until skins are blackened. Transfer chiles to a ziploc bag and seal. Let stand 15 minutes, then peel and discard skins. Gently slice a lengthwise slit in each chile and remove seeds, leaving stems intact. Add 1/4 cup Monterey Jack cheese and 1 1/2 teaspoons goat cheese to the cavity of each chile.

Preheat oven to 350 degrees F.

In a small bowl, whisk together the egg yolks. Add the egg whites to a medium bowl and beat with a mixer at high speed until stiff peaks form. Gently fold egg yolks into egg whites. In a shallow dish, stir together the flour and black pepper. Place cornmeal in a second shallow dish. Dredge poblanos in flour mixture, dip into egg mixture, then dredge in cornmeal.

In a large skillet, heat the oil over medium-high heat, then reduce to medium heat. Place coated poblanos to oil and cook 6 minutes or until crisp, turning to cook on all sides. Transfer chiles to a clean baking sheet, and bake until the cheese melts, about 8 minutes. Serve topped with 1/2 of prepared tomato sauce, reserving the remaining half for another use.


Makes: 4


Even though the cheesy goodness was super tempting every time I looked at my weekly menu, I just couldn't bring myself to make them. This was a multiple step process. And it involved whipping egg whites to a stiff peak. Yikes. I was surely going to mess up that step.

Then came the day when I knew it was either now or throw out the peppers. I opted to go with the money-saving technique of actually using my food. While there are most definitely multiple steps involved with this meal, it actually came together much easier than I had originally thought. Well, minus dumping half of my cornmeal all over the dining room floor, but that's another story.

As I've never had Chiles Rellenos before, I don't really have anything to fall back on to compare to. All I know is these were delicious. A bit of crisp and crunch from the cornmeal, heat from the pepper, and, oh yeah -- the gooey cheese inside. Yum. Maybe, just maybe, I'll give these a try when we're out at a Mexican restaurant. In like, another 6 months.


Nutrition Facts
Serving Size 213g
Amount per serving
Calories 353Calories from fat 236
% Daily Value
Total Fat 26.2g40%
Saturated Fat 7.7g38%
Trans Fat 0.1g
Cholesterol 182mg61%
Sodium 293mg12%
Total Carbs 16.6g6%
Fiber 2.0g8%
Sugars 3.3g
Protein 13.1g
Vitamin A 28%Vitamin C 19%
Calcium 24%Iron 9%

Thursday, August 11, 2011

Beef Empanadas with Black Bean Dipping Sauce


Shhhh. I'm going to let you in on a little secret. And it's a good one.

Everybody assumes just looking at empanadas that they involve quite a bit of work. A little bit of time? Yes. A lot of work? No. Oh, and about that little bit of time? Most of it involves waiting for the puff pastry to thaw and the empanadas to bake. So you can be off doing whatever else strikes your fancy, and not running around the kitchen.

Another assumption about empanadas? They're hard to make. Once again, not true. If you are capable of cooking ground beef, cracking eggs, and cutting in a relatively straight line, you're hired. That's about as difficult as it gets. Brown ground beef, mix in spices, take off heat. Cut square into 4 smaller squares (I think we learned this one in kindergarten). Brush egg yolks around edges (yet another awesome kindergarten-acquired skill, painting!). Two scoops of beef mixture, fold into a triangle, and voilà. Trust me, it can be done.

That's the thing about assuming, it makes an as... well, you know how the rest goes.

Want to practice? Empanadas, not assuming.

This is a great starter recipe. A simple blend of spices provides a little bit of heat while the dipping sauce brings a creamy coolness. A yin and yang. Not to mention a little "wow" factor to those friends not in the know.


Beef Empanadas with Black Bean Dipping Sauce


Adapted from: Bon Appetit, June 2011

1 pound ground beef
3 cloves garlic, minced
1 tablespoon tomato paste
2 teaspoons ground cumin
1/2 teaspoon cayenne pepper
2/3 cup fresh cilantro, chopped
1/4 teaspoon ground black pepper
1 1/2 (17.3 ounce) packages (3 sheets) frozen puff pastry, thawed
3 large egg yolks
1 (15.5 ounce) can black beans, drained and rinsed
1 cup sour cream
1/2 (15.5 ounce) can diced tomatoes
2 green onions, chopped, divided

Warm a medium skillet over medium-high heat. Add beef and garlic; cook for about 3 minutes, or just until beef is done, stirring often. Break meat into smaller pieces using a wooden spoon while cooking. Stir in tomato paste, cumin, cayenne pepper, and black pepper. Reduce heat to medium, and cook for an additional 3 minutes. Remove from heat and stir in cilantro. Allow mixture to cool.

Preheat oven to 375 degrees F. Line two baking sheets with parchment paper; set aside.

Lay out the puff pasty on a clean work area. Cut each sheet into four equal 4 1/2" x 4 1/2" squares (12 square total). In a small bowl, lightly beat egg yolks with a fork. Using a pastry brush, brush egg yolks around the edges of each square. Spoon equal amounts of filling into the center of each square. Fold edges over (forming a triangle) and press down to seal. Using the tines of a fork, crimp the edges together. Transfer empanadas to the prepared baking sheets. Brush the tops of each empanada with the egg yolks. Bake for 20 minutes, or until tops are golden brown and puffed.

Meanwhile, add beans and sour cream to a food processor. Blend until smooth. Transfer to a medium bowl and stir in the tomatoes and half the green onions. Top with remaining green onions.


Makes: 12


These empanadas, by all means, should be simple and straight-forward to make. And they are, if you have all the ingredients. What a lovely little surprise when I pulled the beef out of the fridge and discovered it was a nice brown color instead of bright red with a "sell by" date for 5 days earlier. Gross. And into the trash. Since the puff pastry was already thawing, I set out for what would be grocery run #1.

After I came home and read the recipe further, I realized I also didn't have the tomato paste. Grr. I made the hubby do grocery run #2 on his way home. And then... I realized my cilantro had gone bad. After Adam had already been at the store. So, we just didn't have cilantro.

Lesson learned. Make sure your ingredients are fresh, and the recipe was actually on your weekly menu (ergo, all the ingredients already purchased) before starting a meal.

Then you can enjoy hassle-free easy-peasy empanada making. Which I highly recommend.


Nutrition Facts
Serving Size 184g
Amount per serving
Calories 593Calories from fat 284
% Daily Value
Total Fat 31.5g48%
Saturated Fat 9.9g49%
Cholesterol 95mg32%
Sodium 195mg8%
Total Carbs 52.5g17%
Fiber 6.7g27%
Sugars 1.5g
Protein 25.4g
Vitamin A 7%Vitamin C 3%
Calcium 9%Iron 29%

Wednesday, August 10, 2011

Pimiento Mac & Cheese


It is no secret that Adam and I enjoy some blue box blues every now and again. Mostly when we don't know what else to make or our pantry is bare.

While the powdered cheesy goodness works in a pinch, if we're in the mood for actual mac and cheese, it has to be homemade. Hot, bubbly, and super cheesy. No ifs, ands, or buts. Those are the rules.

Most of the time, we focus on inundating the pasta with as much cheese as possible. Occasionally, we'll throw in a few extra bonuses, like chipotles or apples to kick up the flavor a notch or two. I mean, you pretty much can't go wrong with a good base of cheese and pasta.

This version is Bon Appetit's southern spin on mac and cheese, which incorporates various peppers and seasonings to bring that heat up a bit. Although for the life of me I can't figure out why it's named "Pimiento Mac & Cheese" as it doesn't call for any actual pimientos (only red bell peppers, which are close, but not quite it)... Bueller? Bueller?


Pimiento Mac and Cheese


Adapted from: Bon Appetit, March 2011

1/2 cup water
1 bell pepper, seeded and roughly chopped
2 cloves garlic, halved, divided
1/2 cup panko
3 tablespoons butter, at room temperature, divided
1/2 cup Parmesan cheese, grated, divided
3/4 cup sliced hot cherry peppers, drained, 1 tablespoon brine reserved
1/4 teaspoon ancho chile powder
1 1/4 cup extra-sharp cheddar cheese, shredded
1 cup Mozzarella cheese, shredded
8 ounces gemelli, or other medium-sized pasta

In a small saucepan, bring water, bell pepper, and 1 1/2 garlic cloves to a boil. Cover and reduced heat to medium-low. Simmer peppers for 15 minutes, or until soft.

Meanwhile, in a small skillet over medium-high heat, toast panko for 5-6 minutes, stirring often. Once golden, remove from heat and cool until lukewarm. Using fingers, rub in 1 tablespoon butter until all the crumbs are coated. Toss with 1/4 cup Parmesan cheese.

Once bell pepper is ready, transfer mixture to food processor. Add cherry peppers, 1 tablespoon brine, remaining butter, ancho chile powder, and remaining garlic. Add cheddar and 1/4 cup Parmesan. Process mixture until smooth.

Preheat oven to 400 degrees F. Thoroughly coat a 2-quart baking dish with cooking spray.

Bring a medium pot of water to a boil. Add the pasta and cook to al dente according to package instructions. Drain and return to pot. Add pepper sauce and Mozzarella cheese to the pot, stirring until cheese is melted.

Transfer pasta to the prepared baking dish. Cook for 25 minutes, or until top is crisp and the sauce is bubbling. Let stand 10 minutes before serving.


Serves: 4


The original recipe calls for Peppadew peppers instead of cherry peppers. Apparently, Peppadew peppers don't exist in the grocery stores I shop at. Which, of course, leaves me flustered and being "that" person on their cell phone trying to look up alternatives. While trying to dodge around carts and other shoppers giving me the side-eye, I found that you can substitute mild cherry peppers or pimientos. In all my haste, I grabbed the "hot" cherry peppers thinking, "oh it really can't be that bad". Let me tell you. Those little rings of peppers brought some stank to the table. Not a hidden heat, that slowly creeps up on you. Nope. A nice and in your face heat.

Despite the fact that this ended up far spicier than I envisioned, it was still pretty good. Although next time I think I might not puree the cheddar with the rest of the sauce, but simply add it in with the Mozzarella. I think it might give a bit more of a melty, gooey texture that way.


Nutrition Facts
Serving Size 255g
Amount per serving
Calories 633Calories from fat 283
% Daily Value
Total Fat 31.4g48%
Saturated Fat 18.8g94%
Cholesterol 86mg29%
Sodium 722mg30%
Total Carbs 56.1g19%
Fiber 3.2g13%
Sugars 5.6g
Protein 30.2g
Vitamin A 35%Vitamin C 64%
Calcium 63%Iron 17%

Tuesday, August 9, 2011

Blackberry Lime Cupcakes


The lowly blackberry. So often overshadowed by the stars of the berry family. That's right, I'm looking at you strawberries and blueberries.

Sometimes, a berry just needs its time to shine.

In a cupcake.

Smothered and covered with lime buttercream.

Filled with a sweet and tangy blackberry curd.

Need I say more? Alright blackberries, the stage is all yours.

Blackberry Lime Cupcakes


Original Recipe

For the blackberry cupcakes:
1 1/2 cups (3 sticks) butter, at room temperature
3 cups sugar
4 1/4 cups cake flour
5 1/4 teaspoons baking powder
1 1/2 cups pureed frozen blackberries
8 large egg whites
2/3 cup milk

For the blackberry curd:
2 pounds frozen blackberries
1/2 cup water
4 tablespoons flour
1 cup sugar
3 eggs
2 egg yolks
4 tablespoons unsalted butter

For the lime frosting:
1 1/2 pounds powdered sugar
1 1/2 cups (3 sticks) butter, at room temperature
1/2 teaspoon vanilla
2 tablespoons lime zest
2-3 tablespoons fresh lime juice

For the cupcakes:
Preheat the oven to 350 degrees F. Prepare muffin pans with liners or grease, if using.

In the bowl of a mixer, cream together the sugar and butter until light and fluffy. Mix in the blackberry puree. Don't worry if your batter looks super lumpy or chunky, it will work itself out.

In a medium bowl, sift together the flour and baking powder. Slowly (SLOWLY) add the flour to the creamed mixture. Once incorporated, increase the mixer speed to medium and mix for 2-3 minutes until once again it looks light and fluffy. (The end result has also been compared to looking like ice cream.)

In a large bowl, whisk together the egg whites and milk. Add to the batter in two or three additions, mixing only enough to incorporate between each.

Pour the batter into the prepare baking cups. Bake the cupcakes for 18 to 22 minutes, or until a toothpick inserted into the center comes out clean. Allow the cupcakes to cool in the pans for 5 to 10 minutes before removing to a wire rack.

For the curd:
In a medium saucepan, bring the blackberries and water to a boil. Reduce heat to low and simmer 5 minutes, or until the blackberries are soft and mash easily. Pour blackberry mixture through a fine strainer, discarding pulp and seeds.

Add the flour and sugar to another medium saucepan over medium-low heat. Whisk in the blackberry juice. Once flour and sugar are fully incorporated into the juice, add the eggs and egg yolks, whisking frequently until the mixture thickens, about 7 minutes. Remove from heat and stir in butter until completely melted. Cover and place in the refrigerator until completely chilled.

Transfer the curd to a pastry bag. Using an apple corer (or sharp knife), hollow out the center of each cupcake. Fill each hole to the top with the curd.

For the frosting:
In a large mixing bowl, beat the butter until light and fluffy. Slowly add in powdered sugar. Mix until it has a smooth consistency. Add the vanilla, lime juice, and lime zest. Mix until incorporated thoroughly. If frosting is too thick, add a tablespoon of milk and combine well.

Keep cupcakes refrigerated until ready to serve.


Makes: 36 cupcakes


Even though the blackberries give these light and fluffy cupcakes a great purple-blue coloring, the flavor in the cupcake alone didn't really come through the way I'd hoped. Enter, the blackberry curd. While it is a couple extra steps to put this together and pipe it into the cupcakes, I think given the light flavor of the cupcakes makes this part that much more important. It's definitely a great burst of flavor when you bite into it. Just don't forget that curd does need to stay chilled, so make room in the fridge!


Nutrition Facts
Serving Size 134g
Amount per serving
Calories 394Calories from fat 159
% Daily Value
Total Fat 17.7g27%
Saturated Fat 10.8g54%
Cholesterol 72mg24%
Sodium 139mg6%
Total Carbs 57.1g19%
Fiber 2.3g9%
Sugars 42.8g
Protein 3.8g
Vitamin A 13%Vitamin C 13%
Calcium 6%Iron 6%

Monday, August 8, 2011

Tequila-Glazed Grilled Chicken Thighs


The other day, Adam informed me that he didn't consider grilling to be a chore. Which, he apparently considers any other kind of cooking.

Um, major win for me!

Now all I have to do is find lots, and lots, and lots of grilling recipes. :) Oh, and I suppose I should keep the fridge stocked with some nice cold beverages for him too.

As of late, I've been shying away from using full chicken breasts as the main focus of the meal. I think I was scarred when Adam begged me to stop at one point as it seemed that is all we were eating. And I have to admit, he had a point. I had stuffed, baked, and pan-fried our way into chicken breast overdose.

After running across this recipe in a recent issue of Cooking Light, I knew it was time to break the "no-chicken-only" streak. That's right, 7 months without a meal planned around a solitary breast of chicken. (Okay, minus one meal, but I digress, as it was part of a Recipe Re-Do.)

And well, it might have been the tequila-glaze that won me over. Let's just be honest. With pineapple and lime juice? We can all use a little Hawaiian flair in our lives.

Psssh, and anyways. These are thighs, not chicken breasts. It shouldn't even count.

Tequila-Glazed Grilled Chicken Thighs


Adapted from: Cooking Light, June 2011

1 1/2 teaspoons ground cumin
1 teaspoon chili powder
3/4 teaspoon kosher salt
1/4 teaspoon chipotle chile powder
6 boneless, skinless chicken thighs (about 1 package)
3/4 cup pineapple juice
1/3 cup tequila
1/4 cup honey
2 teaspoons cornstarch
2 teaspoons water
2 teaspoons lime zest
3 tablespoons lime juice
1/4 teaspoon crushed red pepper

Preheat grill. (Indirect and direct heat will both be used, so if using a gas grill, preheat one side to medium-high and the other to medium-low. If using a charcoal grill, heat coals, then place in a pile on one side of the grill.)

In a small bowl, combine cumin, chili powder, salt, and chipotle chili powder. Rub the spices evenly over both sides of the chicken thighs.

In a small saucepan over medium-high heat, stir together the pineapple juice, tequila, and honey. Bring to a boil and cook 10 minutes, or until reduced to about 3/4 cup. Meanwhile, in another small bowl, whisk together cornstarch and water. Once juice mixture has reduced, stir in cornstarch slurry. Whisking constantly, bring to a boil and cook for 1 minute. Remove from heat, stir in zest, lime juice, and red pepper.

Arrange chicken on grill rack over direct heat. Cover and grill for 5 minutes, basting with redued juice mixture once. Flip chicken, baste, cover and grill for another 5 minutes. Move chicken to indirect heat. Baste, then cover and grill for 5 minutes. Repeat on the other side for an additional 5 minutes, or until chicken is done.


Serves: 6


This type of recipe works out perfectly, as it lets both of us get in on the cooking action. I prepped the chicken and part of the glaze, he did the other half of the glaze and grilled the chicken. Please just excuse the anemic looking asparagus... it was an afterthought we dug out of the depths of the fridge.

We both really enjoyed these -- there might not have been any leftover for the next day. (Although I totally am blaming the other party involved here.) The thighs cook up perfectly juicy with a nice sweetness from the pineapple juice accented by the heat from the red pepper flakes and chipotle chili powder. Definitely a great change of pace from what we've been eating.


Nutrition Facts
Serving Size 185g
Amount per serving
Calories 315Calories from fat 78
% Daily Value
Total Fat 8.6g13%
Saturated Fat 2.3g12%
Cholesterol 101mg34%
Sodium 395mg16%
Total Carbs 17.8g6%
Sugars 14.9g
Protein 33.1g
Vitamin A 5%Vitamin C 11%
Calcium 3%Iron 11%

LinkWithin

Related Posts with Thumbnails
 
Pin It button on image hover