Showing posts with label Under 100. Show all posts

Tuesday, December 13, 2011

Chocolate Crinkles


At one point last week, at least half of my freezer was completely filled with cookies. No, but really. Even after I cleaned things out. Since then, I've mailed a few of them off, but there still remains well over 6 dozen cookies in there (probably closer to 7 or 8).

We are going to have one tasty Christmas, that's for sure.

See, I just don't believe in Christmas without a cookie plate. It's a necessity -- just part of how this holiday works. You walk by the cookie plate and grab a cookie. Christmas cookies don't come with any calories. Fact.

Okay, or so I wish.

I am not sure how I've made I through 27 Christmases and these have yet to grace the cookie plate. Kind of a crime when you think about it. Or taste them. Time to change that business. After making 2 batches of these, they are well on their way to becoming a holiday staple.

Chocolate Crinkles
Adapted from: Allrecipes.com

1/2 cup unsweetened cocoa powder
1/2 cup Dutch-processed cocoa powder (such a Hershey's Special Dark)
2 cups granulated sugar
1/2 cup vegetable oil
4 eggs
2 teaspoons vanilla extract
2 cups all-purpose flour
2 teaspoons baking powder
1/2 teaspoon salt
1/2 cup powdered sugar

In the large work bowl of a mixer, beat together the cocoas, granulated sugar, and vegetable oil until the cocoa powder is well hydrated. Beat in eggs, one at a time, fully mixing in before adding the next. Add vanilla.

In a medium bowl, stir together the flour, baking powder, and salt. Slowly add in thirds to the wet ingredients. Once the flour mixture is fully incorporated into the batter, cover dough with plastic wrap and place in the fridge for a minimum of 4 hours.

Preheat oven to 350 degrees F. Line baking sheets with parchment paper. Scoop dough into a tablespoon or a #50 size cookie scoop. Drop dough into the powdered sugar, roll until coated with sugar, then roll into 1-inch balls. Transfer dough ball to prepared baking sheets.

Bake for 10-12 minutes, or until the dark, cracked part of the cookie looks baked. Let rest on baking sheet for 1-2 minutes, then transfer to wire cooling racks.


Makes: 5 dozen


I'll admit, I was a little leery when I saw these went for oil instead of butter -- until I remembered that's how brownie and cake mixes roll, soooo I should just go with it. And you know what? It works.

These are rich and fudgey -- pretty much just a brownie in cookie form covered in powdered sugar. Totally a cookie Adam can get behind. And me. Although I usually don't discriminate, I'll back most any cookie.


Nutrition Facts
Serving Size 18g
Amount per serving
Calories 69Calories from fat 21
% Daily Value
Total Fat 2.3g4%
Saturated Fat 0.6g3%
Cholesterol 12mg4%
Sodium 24mg1%
Total Carbs 11.8g4%
Fiber 0.6g2%
Sugars 7.7g
Protein 1.1g
Vitamin A 0%Vitamin C 0%
Calcium 1%Iron 3%

Monday, October 10, 2011

Russian Tea


Ever since fall hit (okay, ever since I had to sit around a chilly house) I started craving a warm satisfying drink from my childhood.

I am by no means a "tea" drinker. Quite the opposite in fact. I really can't stand it when it's by itself. However, when mixed with other flavors, by all means, count me in. I like to call this tea version fall-in-a-cup. Because that is exactly what comes to mind anytime I think about it or smell the mix with its cinnamon and cloves. It just doesn't seem right to bust this out in the middle of summer.

It's for comfy pants and sweatshirts.

And being wrapped in layers of blankets. While it's raining.

And smelling fall. Burning leaf piles and all.

Russian Tea


Adapted from: Family Recipe

1 cup powdered Tang
1/2 cup powdered lemonade (such as Country Time)
1/4 cup unsweetened instant tea
1/4 cup sugar
1/4 heaping teaspoon ground cloves
1/2 heaping teaspoon ground cinnamon

In a large ziploc bag, combine all the ingredients. Shake well to mix. Pour into storage container. To use, stir 2 tablespoons powder into about 10 ounces (a coffee mug) of hot water.

Makes: 2 cups (serving size: 2 tablespoons)


Now I'm sure there are recipes out there for this same drink that are "all-natural"/"non-processed" -- basically they don't use the powdered beverages in the mix. However, that usually entails fresh items, and quite frankly, that involves time. And usually when I'm craving this drink, I am not in the mood to be putzing about the kitchen. So, this version of the drink works perfectly for me.

Believe it or not, I actually found the original recipe to be a tad on the sweet side. I know, I thought something was too sweet? What is the world coming to? In order to fix this, I scaled back the sugar by half and have reflected the change in the recipe above. If the final product doesn't taste sweet enough for you, simply add in up to another 1/4 cup of sugar.


Nutrition Facts
Serving Size 25g
Amount per serving
Calories 83Calories from fat 0
% Daily Value
Total Fat 0.0g0%
Saturated Fat 0.0g0%
Cholesterol 0mg0%
Sodium 57mg2%
Total Carbs 18.4g6%
Sugars 18.1g
Protein 0.1g
Vitamin A 28%Vitamin C 287%
Calcium 30%Iron 0%

Thursday, January 13, 2011

Cheese Straws


I have been really good lately, focusing more on meals and actually figuring out what's for dinner more than 5 minutes before I need to start cooking it. I had a nice break from sweets and snacks and everything I shouldn't be eating between meals.

And then I ran across these. All I could think of was homemade Cheez-Its. For days.

Homemade Cheez-Its, people.

Over a cup of cheese is involved. Have I convinced you yet? Because I think I might have convinced myself, again.

Cheese Straws
Adapted from: Gourmet, via How Sweet It Is

1 1/2 cups coarsely grated extra-sharp Cheddar
1 cup all-purpose flour
3/4 stick cold unsalted butter, cut into tablespoons
1/8 teaspoon smoked paprika
1/8 teaspoon cayenne
1 1/2 tablespoons milk

Preheat oven to 350 degrees F with racks in upper and lower thirds.

In the bowl of a food processor, combine cheese, flour, butter, paprika, and cayenne. Pulse until mixture resembles coarse meal. Add milk and continue to pulse until dough forms a ball.

On a lightly floured surface, roll out dough with a lightly floured rolling pin into a 1/4-inch thick rectangle. Using a lightly floured pizza wheel or lightly floured sharp knife, slice the dough into 1/3-inch-wide strips. Carefully transfer to 2 ungreased baking sheets or 2 baking racks sprayed with cooking spray. Arrange strips 1/4-inch apart. (If strips tear, pinch back together.)

Bake until pale golden, 12-15 minutes, switching position of sheets halfway through baking. Allow to cool completely on baking sheets or racks, about 15 minutes.

Makes: about 24 straws


The straws that came out of the oven all golden and lovely were everything I hoped they would be. Cheesy with a little kick from the cayenne and paprika. But then there was the other half. Those that were a little thinner, thus a little browner. Once they passed from that perfect yellow color towards having a hint of brown, the Cheez-It dream was over. While they weren't necessarily bad, you could definitely taste the overdoneness, and a few were just downright burnt. I think it's high time I invest in some Rolling Pin Rings. That way I can go back to stuffing my face with a full batch of perfectly cooked cheese straws.


Nutrition Facts
Amount per serving
Calories 45Calories from fat 26
% Daily Value
Total Fat 2.9g5%
Saturated Fat 1.8g9%
Trans Fat 0.0g
Cholesterol 8mg3%
Sodium 21mg1%
Total Carbs 4.0g1%
Protein 0.6g
Vitamin A 2%Vitamin C 0%
Calcium 0%Iron 1%

Thursday, December 23, 2010

Spritz Cookies

What is this? A present for me? Nope. It's for you.


It's filled with something small but oh-so-delicious.


It's Spritz Cookies!


I am pretty sure every family has their own version of this recipe. I can still remember making these with my mom and sister growing up, although I have no idea what happened to the recipe we used. So instead, I poked around on the internet and came up with my own Spritz Cookies. I think they turned out fantastic -- I just love that little extra bit of flavor the almond extract gives these.

Spritz Cookies
From: Original Recipe

Note: You will need a cookie press for this recipe

1 cup salted butter, at room temperature
1/2 cup granulated sugar
1 egg
1 teaspoon vanilla extract
1 teaspoon almond extract
2 1/4 cup flour
Food coloring (optional)

Preheat oven to 350 degrees F.

In the work bowl of a mixer, cream together the butter and sugar until light and fluffy. Add in the egg and mix until completely incorporated. Mix in the vanilla and almond extracts (and food coloring if using). Slowly beat in the flour until just mixed in.

Fill cookie press, then press out cookies onto an ungreased, unlined baking sheet. Bake for about 8 minutes or just until the edges are starting to brown. Remove from oven and immediately transfer cookies to a wire cooling rack.

Makes: 7 dozen (small cookies)


I haven't made Spritz Cookies in a very long time, and I'm so glad I did. Adam even said these took him back to his childhood. :) That counts as a win in my book. The only bad thing about these is how addictive they are -- I'm pretty sure I took down a whole dozen before I was even done baking all of them. Oops.


Nutrition Facts
Amount per serving
Calories 37Calories from fat 20
% Daily Value
Total Fat 2.3g3%
Saturated Fat 1.4g7%
Cholesterol 8mg3%
Sodium 16mg1%
Total Carbs 3.8g1%
Sugars 1.2g
Protein 0.4g
Vitamin A 1%Vitamin C 0%
Calcium 0%Iron 1%

Friday, November 12, 2010

World Peace.... Cookies


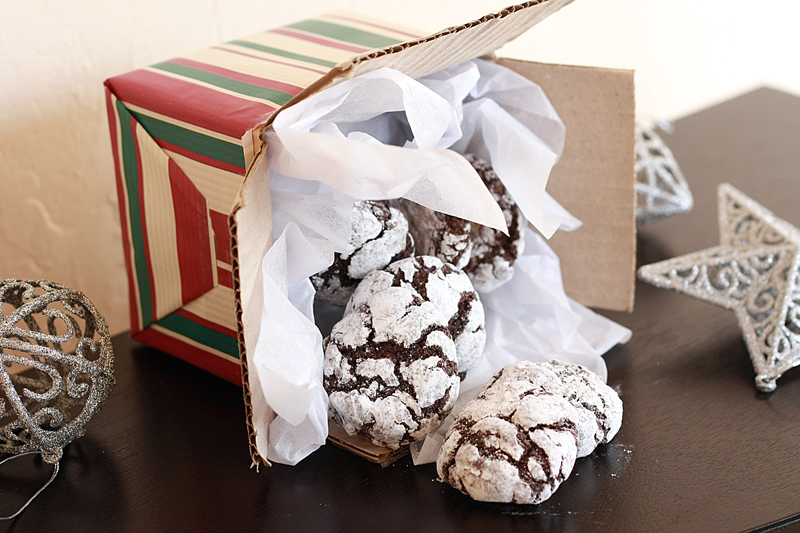
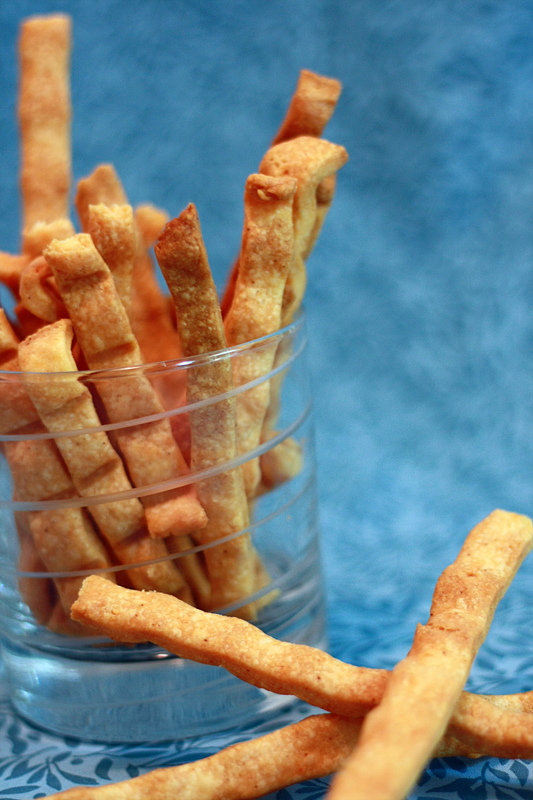
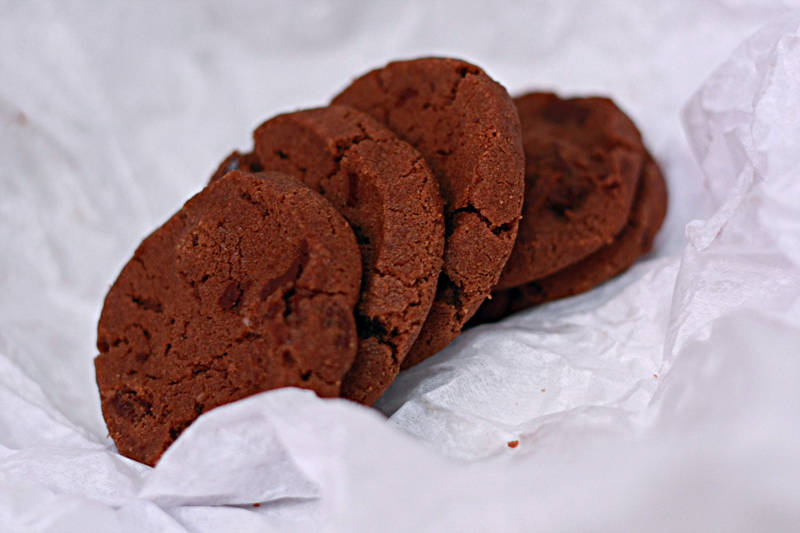
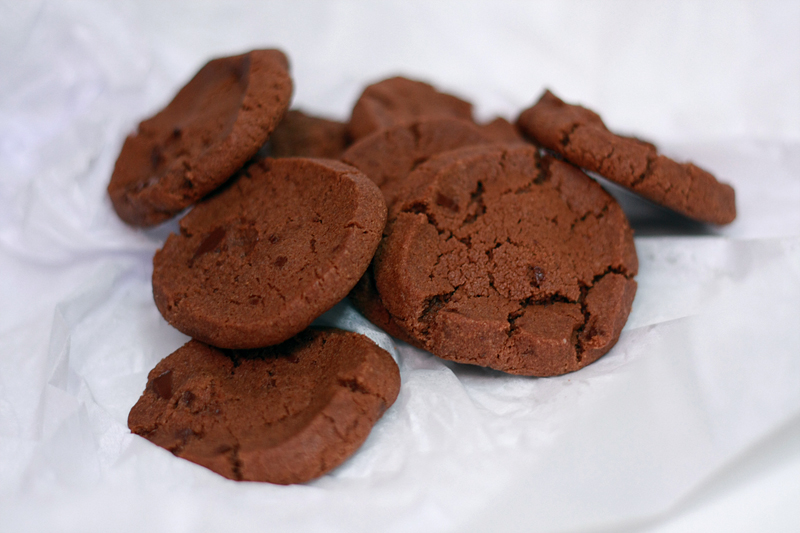
World Peace Cookies, named for the thought that a daily dose of these cookies is all that is needed to have peace and happiness throughout the world. Such a lofty goal for such a simple cookie.

I can't say that I would jump on the full-agreement train, but these cookies are delicious. These are not your typical moist, tender, chewy cookies. These are shortbread cookies. They aim for crispiness, a little bit of crunchiness, and melt in your mouth tenderness. And they're chocolate. Come on now, seriously.

Glass of milk? Yes please.

World Peace Cookies
Adapted From: Dorie Greenspan

1 1/4 cups all-purpose flour
1/3 cup unsweetened cocoa powder
1/2 teaspoon baking soda
11 tablespoons unsalted butter, at room temperature
2/3 cup light brown sugar, packed
1/4 cup sugar
1/2 teaspoon kosher salt
1 teaspoon vanilla extract
5 ounces (3/4 cup) mini chocolate chips

In a medium bowl, combine flour, cocoa, and baking soda.

In the work bowl of a mixer, beat butter until smooth (but not fluffy). Mix in brown sugar, white sugar, vanilla, and salt and continue beating until mixture becomes fluffy, about 2 minutes. Slowly add dry ingredients while continuing to mix. Beat until just blended (mixture will be very dry and almost crumbly). Stir in chocolate chips.

Turn dough out onto a clean surface. Shape dough into a ball, then divide in two. Roll dough halves into 1 1/2-inch logs, then wrap with plastic wrap. Place in fridge to chill for 3 hours (up to 3 days).

Preheat oven to 325 degrees F. Line baking sheets with parchment paper.

Slice chilled dough logs crosswise into 1/2-inch thick coins. Place on baking sheets about 1-inch apart. Bake one sheet at a time for 11-12 minutes. The cookies will not appear done or firm, but remove from oven. Allow to cool on a baking rack until warm.

Makes: 36 cookies


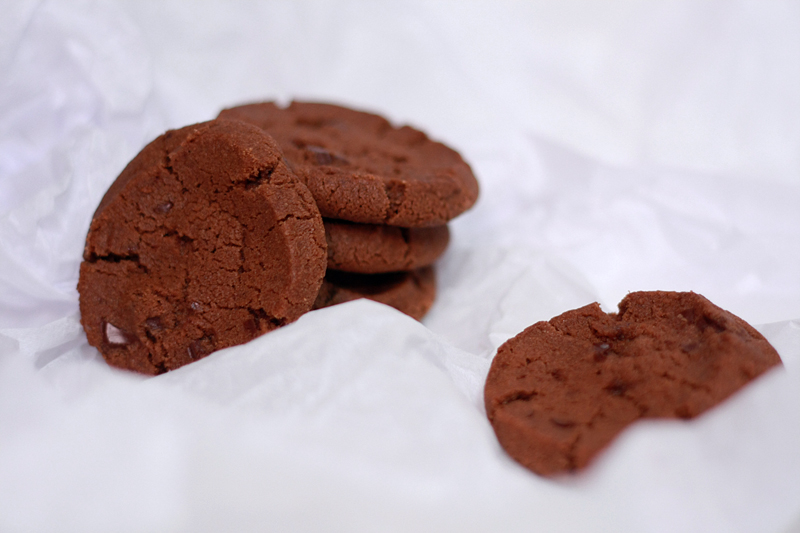
Now don't go about trying to take out the salt and use less butter and all that nonsense. The salt really helps to make the chocolate in these cookies sing, and the butter. Well, it's butter. It does what it does best (and anyways, it's pretty much the only "wet" ingredient in here, so you definitely don't want to reduce that or you will have crumbles not cookies).

While these may not be my favorite.cookie.ever, they are very addicting. I'm not sure where all 36 of these disappeared to, I refuse to believe it was my stomach. But I have a pretty good feeling I'm wrong on that one.


Nutrition Facts
Amount per serving
Calories 86Calories from fat 44
% Daily Value
Total Fat 4.8g7%
Saturated Fat 3.1g16%
Cholesterol 10mg3%
Sodium 77mg3%
Total Carbs 10.1g3%
Dietary Fiber 0.5g2%
Sugars 6.1g
Protein 0.9g
Vitamin A 2%Vitamin C 0%
Calcium 1%Iron 2%

Get Up and Move Challenge Day 12: Does eating healthy mean I have to give up desserts and sweets?

Absolutely not. 
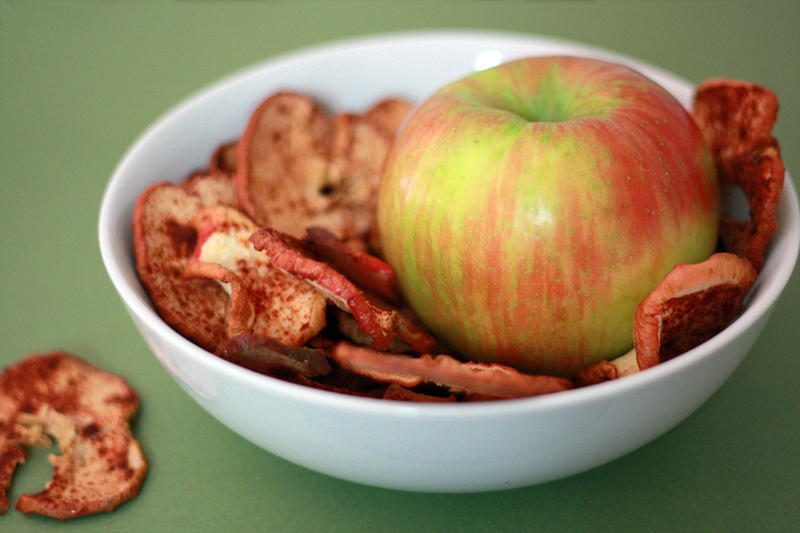
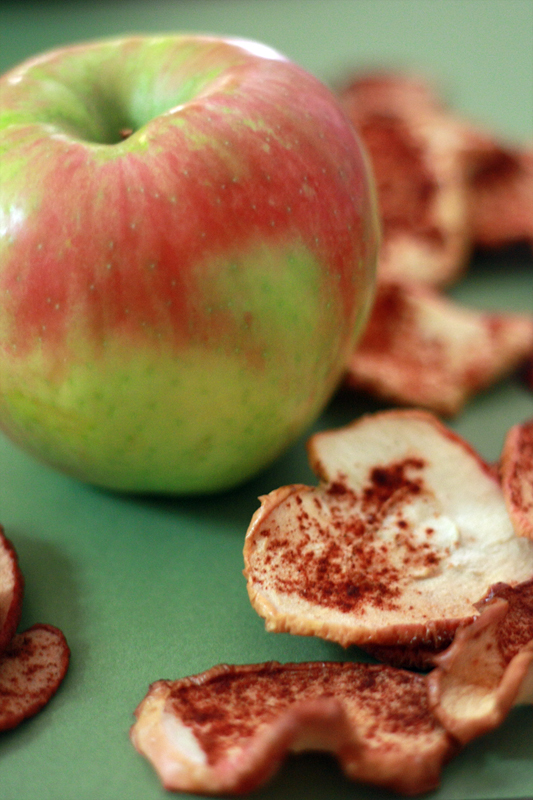
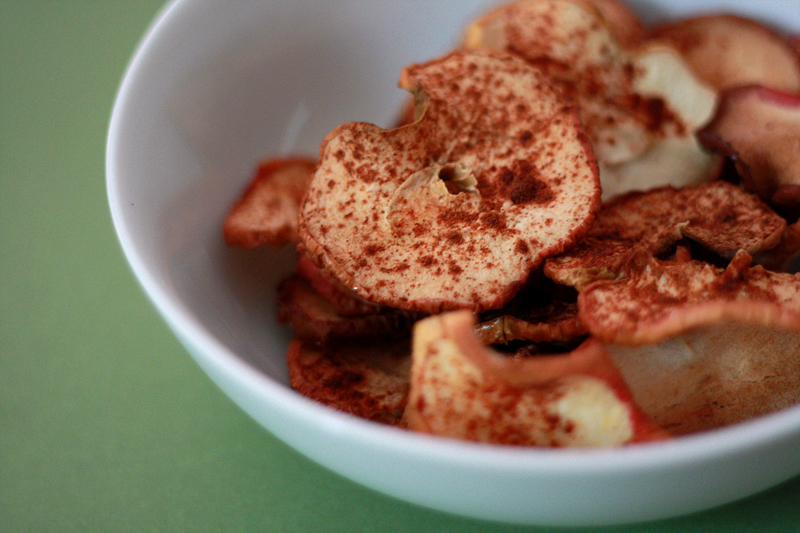
"Healthy eating" is considered eating a nutritionally balanced diet, which by all accounts, can include a sweet here and there. Now, this doesn't mean you can live off of cheesecake and ice cream, but you can indulge every once in a while.

If you find yourself succumbing to one of those new-fangled "diets" out there that cut you off from such a thing, run away and take your chocolate with you. Diets that claim you can't-eat-such-nonsense are wrong, and can really set you up for failure. The key, my friends, is all about moderation.

If you've ever tried to steer away from sweets or certain cravings because they're "bad" for you, you know that substituting something else just does.not.work. So by the time you finally give in to that chocolate cake craving, half the cake disappears and you have a belly-ache for three days. This is just not the way to go about it. Instead of munching on granola when what you really want is a cookie, eat the cookie. Eat a small cookie, and eat it slow. Really take the time to enjoy it. And then walk away. Craving satisfied.

Don't believe me? A recent study has shown that trying to suppress thoughts about cravings actually leads to consuming more of it when you do eat it [1], which isn't really what we're going for.

So how do we approach desserts and our need for a sweet-fix? With reckless abandon? Once a week?

How about, in small amounts when those cravings do hit.

Do you have to have a cupcake right now? Bake mini cupcakes instead of full size, eat one, save one for later, and take the rest of them to work.

What about those cookie cravings? Chill the dough, roll it into a log, then freeze it until the craving hits. Slice off one or two cookies and bake. Craving satisfied, and no extra cookies sitting around tempting you.

Then there's that ice cream beckoning to you in the freezer. Scoop out one serving size (not 5 scoops), and put the rest back into the freezer, rather than eating out of the container.

And then there's desserts at a restaurant. I just can't resist cheesecake from the Cheesecake Factory. Cut it in half right when it comes and ask your server to bag the rest for you to take home. Out of sight, out of mind and you won't miss it.

Last but not least, plan for it. If you know the chocolate craving hits around 3:00pm, keep a few Hershey's Kisses in your desk and have a couple (not the whole bag). Just go into the day knowing that you will eat them and work them into your diet plan, much like you do breakfast, lunch, and dinner. If it's planned for, and eaten in moderation, there's no reason you can't enjoy a little bit of happiness every day.

What are your favorite desserts, and how do you work them into your day?

[1] Erskinea JAK and Georgioub GJ. Effects of thought suppression on eating behaviour in restrained and non-restrained eaters. Appetite. 2010;54(3):499-503.

Thursday, November 11, 2010

Apple Chips


We were just talking about snacks, weren't we? Here's another super easy treat that involves very little prep, and letting the oven do the work.

I am probably going to get looks of horror when I say this, but I'm not the biggest fan of your every day potato chips. Especially Lays Original. Super greasy and gross. The only time I'll really ever go out of my way to eat them is when they happen to be the vehicle that gets a tasty dip to my mouth. Now, when we start talking about chips such as Tostitos or Doritos, they jump up quite a bit higher in the "like" category. But I still don't really ever crave them or have them mysteriously "fall into the cart" like Reese's or chocolate has a habit of doing.

Once I got on my "I need healthier munchies" kick, I started thinking of all the different snack foods that you find in the grocery store, and of course potato chips came up. Why potato? Surely there's a way to make chips out of other things. But I wasn't sure of the "how", so the idea slowly faded away. That is until Lindsey over at Hot Polka Dot made these lovely Apple Chips for one of her Project Food Blog Challenges. Fruit chips are now back on the table!

Apple Chips
Adapted From: Hot Polka Dot

2 Honeycrisp apples
1 - 1 1/2 tablespoons lemon juice
1/2 tablespoon sugar
1 teaspoon cinnamon

Preheat oven to 225 degrees F. Line two baking sheets with parchment paper. Set aside.

Cut each apple into thin slices using a mandoline (please watch your fingers) or a very sharp knife. Removing seeds and stems, place apple slices in a medium bowl. Pour lemon juice over slices and toss with your fingers to make sure each slice is lightly coated (you don't want them completely soaked).

Place the apple slices in a single layer on your baking sheets. Sprinkle slices with sugar and cinnamon. Bake in the preheated oven for 1 - 2+ hours (depends on thickness of apple slices). Remove from oven and allow chips to cool on the baking sheet.

Serves: 2 (unless your husband gets to them first)


So these chips don't get quite as crispy as your normal potato chip does, but they are still fantastic nonetheless. In fact, I was on my way to the grocery yesterday when I realized my husband might get home from work before I got back home and those wonderful little chips were still cooling off on the baking sheet. I had to make sure I called him and told him to stay far away from what was in the kitchen and not to eat it. Lucky I did, as the entire batch disappeared within seconds after I finished taking pictures. Well at least the boy can restrain himself, although I think he was drooling a bit and staring longingly in their direction when I got home.


Nutrition Facts
Amount per serving
Calories 89Calories from fat 2
% Daily Value
Total Fat 0.2g0%
Cholesterol 0mg0%
Sodium 2mg0%
Total Carbs 23.8g8%
Dietary Fiber 3.9g16%
Sugars 17.7g
Protein 0.4g
Vitamin A 2%Vitamin C 17%
Calcium 2%Iron 2%

Get Up and Move Challenge Day 11: Time to increase our work out time from 10 to 20 minutes!

How is everybody doing with the challenge? Hopefully we're sticking with it!

It can definitely be a challenge to find time during the day to squeeze in a workout, and now I'm asking you to make it longer? That's right! We are slowly building our way up towards ACSM's guidelines of 30 minutes. But what if you just don't have a chance to do 20 minutes straight of exercise? Or what if that's just a little too much all at once? Never fear, you can still keep your exercise bouts in sections of 10 minutes (as I explained here), just make sure you perform two of those ten minute bouts to get to 20 minutes total. (Just a reminder that 10 minutes is the lowest you can go to still receive the health benefits.)

So what can we do for 20 minutes (or two 10 minute sessions)?

*Walking, jogging, running
*Biking (inside or out)
*Swimming
*Walking your kids to school
*Walking your kids to the playground and then playing with them
*Working out during your child's sports practice
*Workout videos, either online or on TV -- perform full-length videos or a combination of shorter ones
*Yoga
*Join a "beer-league" sports team (basketball, softball, soccer, etc.)
*Take a ballroom dancing class
*Go outside and build a snowman (if you have snow)
*Shovel the driveway (snow related again)
*Mow the grass with a push mower (if you don't have snow)

What unique exercises do you like to do in 20 minutes?

Wednesday, November 10, 2010

Black & Blue Fruit Leather


First things first here:

I've been given a One Lovely Blog Award by Lindsey at Gingerbread Bagels. Her site is absolutely fantastic, specializing in baked goods. I always want to make everything she posts and I love getting the notice that she's posted something new! Thanks Lindsey! Now the rules of the award stipulate that I nominate 15 other bloggers for this award, so here goes!


1. Annie from Annie's Dish
2. Lindsey from Fresh Air + Fresh Food
3. Karen from Tasty Trials
4. Whitney from Amuse Bouche
5. Eric and Charisse from Foodies @ Home
6. Briarrose from Flour Dusted
7. Kate from Kate's Kitchen
8. Sarah from Baking Serendipity
9. Carolyn from All Day I Dream About Food
10. Heena from Tiffin Tales
11. Kim from Life as a Foodie
12. Kath from In the Kitchen with Kath
13. Debbie from Squirrel Bakes
14. Lindsey from Hot Polka Dot
15. Casey from Eating, Gardening & Living in Bulgaria

I could go on and on and name a ton more, there are just so many awesome blogs out there!

If I have tagged you, here are the rules regarding the award:

1. Accept the award. Posit it on your blog with the name of the person(s) who granted the award and their blog link. And thank them!

2. Pay it forward to 15 other bloggers, whose blogs you admire

3. Contact those blog owners and let them know they’ve been chosen.


Now, about this fruit leather. I've been in the munching mood as of late, and as I mentioned before, I really need to munch on things that are healthy, rather than junky. Growing up my parents didn't keep all the fun kids' treats in the house, like Gushers or Fruit Roll Ups or anything else that would rot your teeth out just looking at it. Any time I had the opportunity to eat something like that, I was all over it.

As an adult and fully capable of making my own grocery store purchases, sometimes it's hard to not sneak a box or two of candy snacks in the cart. So what's my next best option? Make my own. Fruit leather is pretty similar to your Fruit Roll-Ups, without all the artificial ingredients (and a little tougher).

You can use pretty much whatever fruit you desire to make this. We had a few bags of frozen fruit tucked away in the freezer from who knows when, so I opted to go with what we had. Which just so happened to involve one of Adam's favorites: blueberries. I also threw in some blackberries as I didn't quite have enough blueberries. Yum. I love me some berries.

Black & Blue Fruit Leather
Adapted from: Indian Simmer

3 cups blueberries
1 cup blackberries (or 4 cups of any fruit)
1/2 cup water
1 1/2 tablespoons sugar
1 teaspoon lemon juice

Preheat oven to 150 degrees F. (Or lowest temperature your oven will go.) Line a baking sheet with plastic wrap (such as Glad Cling Wrap).

In a large pot, bring the fruit and water to a boil, stirring frequently. Reduce heat to low and add the sugar and lemon juice. Simmer until fruit is cooked, stirring frequently, about 5 minutes (cooking time may vary with different fruit).

Carefully pour fruit mixture into a blender (remove center piece in the top and cover with a towel to allow the steam to escape) and blend until the mixture is smooth.

Pour the blended mixture onto your baking sheet, using the back of a spoon to smooth out to about 1/4-inch thickness. Take care that the plastic wrap does not fall on top of the mixture, as this will prevent drying. Place baking sheet in oven for 8-10 hours. Fruit leather is done when it no longer sticks to your fingers and can be peeled off the plastic wrap.

Makes: 4 fruit leather strips


Now, I know you must be freaking out over the whole plastic wrap in oven issue. I did too at first since Glad clearly states on their website not to put it in the oven. Well at 375 degrees of course not. But we're looking at only 150 degrees. So I was a big nerd and looked up what the material was that makes up Glad Wrap, and checked out the melting point and all that fun stuff. (Glad wrap is BPA free by the way so you don't have to worry about it leaching chemicals.) You start to enter the danger/melting zone around 176 degrees F, so as long as your oven's lowest temp is well below that you should be okay. My plastic wrap actually didn't melt at all until about the last 2 hours, and then it was just barely at the edges (not touching the fruit leather). Note: the plastic wrap under the fruit mixture will always be cooler than the part hanging out in the breeze -- at least until the fruit is completely dried.

Other than that little worry, this was super easy to make (minus being impatient with the long cooking time). Adam really enjoyed it, he's a sucker for those fruity snacks, too. I highly recommend cutting your fruit leather into four sections and leave the plastic wrap attached. This makes for easy storage so they don't stick together (just make sure to leave a little overhang if you're going to trim it).


Nutrition Facts
Amount per serving
Calories 96Calories from fat 5
% Daily Value
Total Fat 0.5g1%
Cholesterol 0mg0%
Sodium 2mg0%
Total Carbs 24.1g8%
Dietary Fiber 4.5g18%
Sugars 17.4g
Protein 1.3g
Vitamin A 3%Vitamin C 31%
Calcium 2%Iron 3%

Yesterday we talked about the importance of breakfast, today let's talk snacks.

Get Up and Move Challenge Day 10: What are some healthy snack ideas?

I do it. You do it. Everybody loves their little snacks here and there. Some days it can be hard to make it from 12 to 6 or 7 or whenever your next meal is with having a little something something to tide you over. Snacking isn't necessarily bad for you, as long as you plan it into your day and don't get carried away.

So what are some super quick and easy things I can munch on? Several companies have jumped on the 100 calorie pack train and are turning out some of our favorite snacks in 100 calorie quantities. While you may not care about the calorie number, it is nice to have pre-portioned bags of snacks. How many times have you opened a big bag of chips, sat down in front of the TV, and before you knew it, the bag was almost gone? I have done more than my fair share of this. Having snacks already portioned out for you can massively help with overeating. Not only for caloric purposes, but you did want to be hungry at dinnertime, right?

But buy those cute little packages can be expensive. One box usually hold 6 bags, and can run between $3-4. However, you can easily make your own snack bags for a fraction of the cost by simply buying the big version and dividing out the portion sizes into baggies when you get home.

These 100 calorie baggies are a great place to start with watching how much you're eating, but keep in mind that these may not be the "healthiest" snacks around. Some can have a high amount of saturated fat, cholesterol, or sodium and you're not thinking twice because it's just a little bag. So make sure you give those a good once over before chowing down.

There are also many more options out there to satisfy your snack cravings:
*Whole portable fruit, such as apples, bananas, pears, grapes, etc.
*Cheese cubes (be careful with the saturated fat content though)
*Applesauce
*Granola bars
Not to mention the array of things you can make yourself at home (such as the roasted garbazno beans I made the other day, or the fruit leather above).

So remember, snacks aren't always evil in disguise. Just plan for them, and grab something healthy, rather than a 6 month old candy bar from the vending machine.

What are some of your favorite healthy go-to snacks?

LinkWithin

Related Posts with Thumbnails
 
Pin It button on image hover