Friday, September 30, 2011

Sneaky Macaroni & Cheese


I'm such a sucker for mac 'n' cheese. Pretty much any kind. I don't discriminate.

Unless it's conglomerated into one huge glob that's been sitting out for a while and looks suspicious. Then... gross.

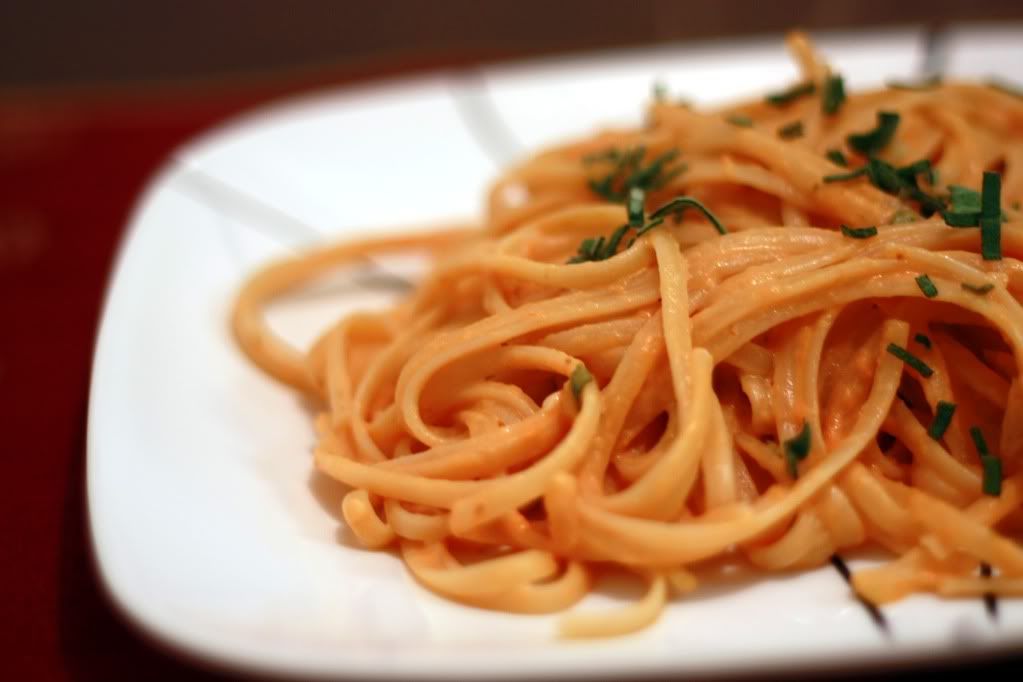
There are some days I want my mac 'n' cheese just a puddle of sharp cheddar with a few noodles floating around in it. Other times, I want a milder version with some Parmesan and Romano mixed in, topped with some panko and thrown into the oven until a large pan of bubbling goodness comes forth.

But as for healthy?

Well, mac 'n' cheese usually just doesn't fit that bill. Save that title for an apple, or some kind of fancy-pants salad. My mac 'n' cheese is supposed to be loaded with calories and is as sinful to my hips as it tastes. Although, I suppose if I always had my macaroni that way I'd never get to eat it.

Which is exactly why this recipe caught my eye. Butternut squash as the base? Excuse me? This is supposed to be mac 'n' cheese, not mac'n'veg'n'cheese. But I was intrigued anyways.


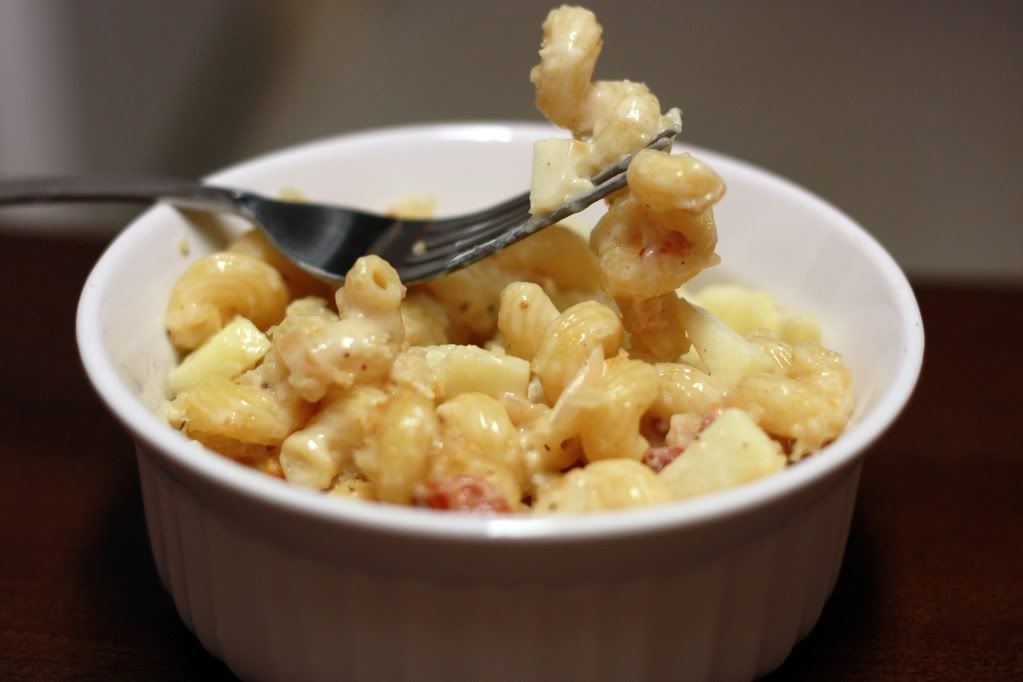
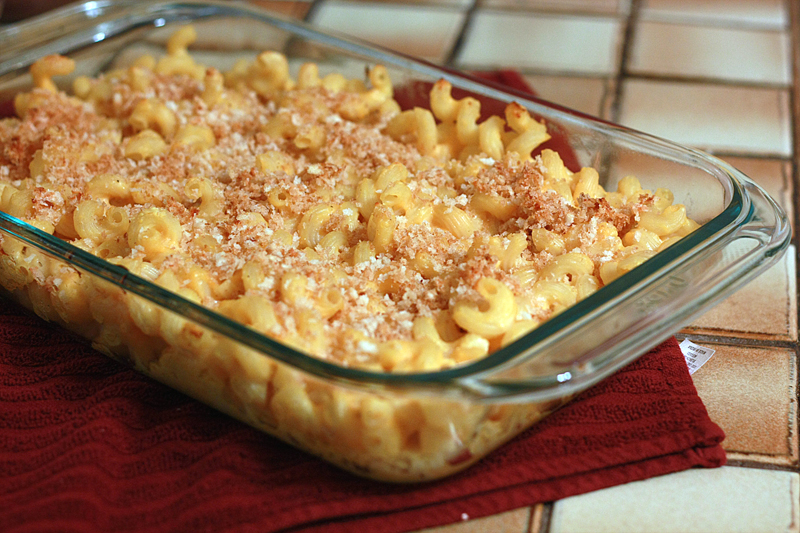
Sneaky Macaroni and Cheese


Adapted from: Cooking Light, September 2011

Cooking spray
3 cups (about 1 pound) peeled and cubed butternut squash
1 1/4 cups fat-free, reduced-sodium chicken broth
1 1/2 cups 1% milk
2 cloves garlic
1/2 teaspoon kosher salt
1/2 teaspoon ground black pepper
2 tablespoons fat-free Greek yogurt
1 1/4 cups shredded Swiss cheese
1 cup grated Romano cheese
1/4 cup grated Parmesan cheese, divided
1 pound uncooked cavatappi
1 teaspoon olive oil
1/2 cup panko
2 tablespoons chopped fresh parsley

Preheat oven to 375 degrees F. Coat a 9x13 baking dish with cooking spray; set aside.

In a medium saucepan over medium-high heat, bring squash, broth, milk, and garlic to a boil. Reduce heat to medium. Simmer until squash is tender when pierced, about 20 minutes.

Transfer squash mixture to a food processor and add salt, pepper, and Greek yogurt. Secure the lid of the food processor (remove spout cover if present, and cover opening with a towel). Process mixture until smooth. Pour the squash mixture into a large bowl. Add Swiss, Romano, and 2 tablespoons Parmesan cheese. Stir until cheese is fully combined.

Meanwhile, bring a large pot of water to a boil over high heat. Add the pasta and cook according to package directions. Drain.

Add the pasta to the large bowl with the squash mixture and toss until all the noodles are well coated. Spread the pasta mixture evenly into the prepared baking dish.

In a small skilled over medium heat, warm the olive oil. Add panko, and cook 2 minutes, or until golden brown, stirring frequently. Revome from heat and toss with remaining 2 tablespoons Parmesan cheese. Sprinkle panko mixture evenly over the pasta.

Bake 25 minutes or until bubbly. Sprinkle with parsley, and serve immediately.


Serves: 8


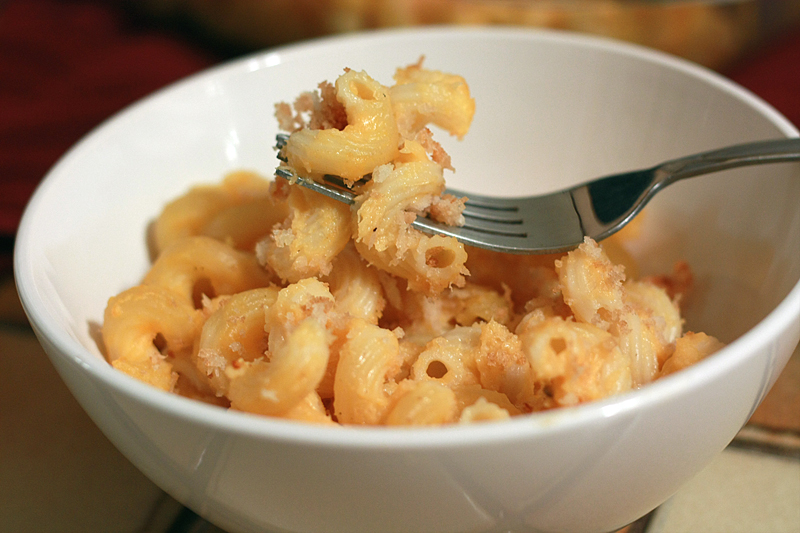
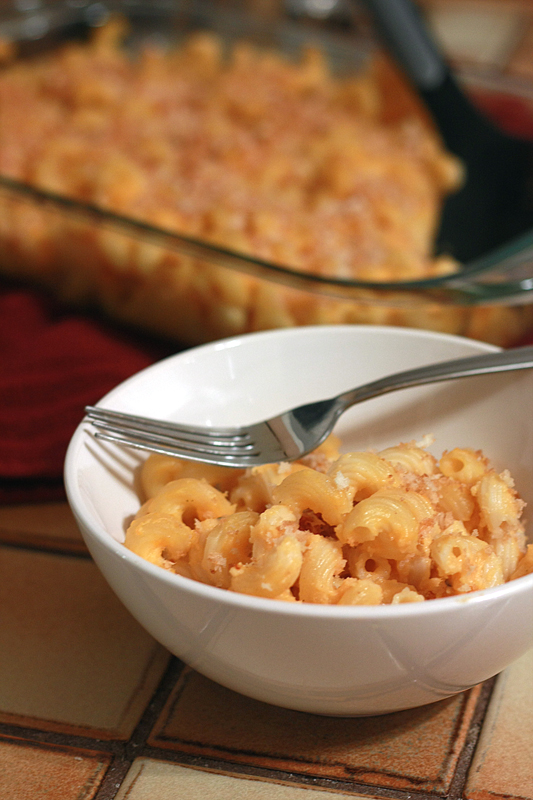
Now don't jump into this expecting your heavy cheddar flavor. This version relies heavily on the Romano for the cheese flavor with a nice nuttiness in the background from the butternut squash. Which somehow is reminiscent of cheese before any cheese is added at all. Magic I tell you, magic.

I actually broke this recipe into two sections -- everything up through dumping the pasta mixture in the pan and topping with panko, then baking it in the oven. (I didn't have time to make it all at once after practice.) Of course I had a taste test before sticking the pan in the fridge -- delicious. Nice and creamy with a good flavor. However, after sticking it in the fridge for a few hours, then pulling it back out and baking it, the sauce kind of dried up a bit. Nothing bad, it just left the pasta with a little less sauce than before. Next time I probably wouldn't make the dish ahead of time and bake it later. Just do it all at once so we can enjoy the saucy goodness.


Nutrition Facts
Serving Size 240g
Amount per serving
Calories 422Calories from fat 107
% Daily Value
Total Fat 11.9g18%
Saturated Fat 6.4g32%
Cholesterol 35mg12%
Sodium 542mg23%
Total Carbs 56.3g19%
Fiber 3.4g14%
Sugars 6.5g
Protein 20.8g
Vitamin A 119%Vitamin C 21%
Calcium 42%Iron 16%

Wednesday, September 28, 2011

Cheesy Jalapeno Chicken


Unlike my last recipe re-do, where I wasn't thrilled with the original recipe, the starting recipe this time around is actually really good. This Garlic Lemon Double-Stuffed Chicken is a hot mess of gooey cheese and buttery crunchy breadcrumbs. Kind of hard to add or take away anything from that without losing the essence of the dish.


(The original post doesn't have a picture, but I unearthed a few from my hard drive, and now I know why. There's a whole lot of oozing cheese in this picture and it's hard to tell what else is going on.)

After struggling with this dilemma for a long time, a quick look at the nutrition facts made the decision for me. Clocking in at over 900 calories per serving is really quite a bit ridiculous. Especially when we're talking chicken.

What to do? The cheese has to stay -- it's what makes the dish! Instead, I omitted the butter, used reduced-fat cream cheese, and less cheddar -- shredding it instead of using a slice so I felt like there was still the same amount. A 400 calorie reduction later, and we now have a dish that went from a "special indulgence" to acceptable for dinner almost any night.


Cheesy Jalapeno Chicken


Original Recipe

Cooking spray
1 teaspoon olive oil
1 jalapeno, seeds and membranes removed, finely diced
2 cloves garlic, minced
2 ounces cream cheese
2 (4 ounce) boneless, skinless chicken breasts
4 tablespoons shredded cheddar cheese
1/2 cup 1% milk
1/2 cup panko (japanese-style breadcrumbs)
1/8 teaspoon smoked paprika

Preheat oven to 350 degrees F. Thoroughly coat a 8x8 baking pan with cooking spray; set aside.

In a small skillet over medium heat, cook the jalapeno for 3 minutes. Add the garlic and cook for an additional 2 minutes. Remove from heat and transfer to a small bowl. Add the cream cheese and mix together until the jalapeno mixture is fully incorporated. Set aside.

Using a sharp knife, slice each chicken breast in half horizontally through the center (butterfly), cutting almost but not completely through. Spread half the cream cheese mixture on the inside of a chicken breast. Sprinkle with 2 tablespoons of cheddar, then fold the unused half of the chicken breast back over, securing with toothpicks. Repeat with remaining chicken breast and cheese.

Pour milk into a shallow bowl. In another small bowl, toss together the panko and paprika. Dip each stuffed breast in milk, then roll gently in breadcrumb mixture, patting lightly to coat. Place breasts in the prepared baking dish. Bake for 25-30 minutes, or until chicken is no longer pink and juices run clear.


Serves: 2


I was a little leery at first dumping a whole jalapeno into the cream cheese for just two chicken breasts, but the cream cheese really mellows it out. It remains spicy, but definitely not overpoweringly so. I also really like that subtle hint of smokiness from just that little touch of smoked paprika -- it gives the chicken that extra little nuance of flavor.

Adam and I both gave this two thumbs up, and I really wished I had made more that just two chicken breasts so we could have leftovers the next day.


Nutrition Facts
Serving Size 257g
Amount per serving
Calories 505Calories from fat 214
% Daily Value
Total Fat 23.8g37%
Saturated Fat 10.4g52%
Cholesterol 139mg46%
Sodium 532mg22%
Total Carbs 24.1g8%
Dietary Fiber 1.5g6%
Sugars 5.2
Protein 45.3
Vitamin A 15%Vitamin C 7%
Calcium 27%Iron 16%

Monday, September 26, 2011

Pasta Carbonara with Corn & Chiles


If you've been following me for a while, you might happen to notice that I love me some pasta. Pasta with marinara. Pasta with alfredo. Pasta with a meat sauce. Pasta with an olive oil drizzle. Loaded with veggies or speckled with bacon. I have over 60 different pasta recipes floating around on this blog, each one different than the last. And I love it.

Of course I like those classics such as spaghetti and meatballs and lasagna, but every now and again I like to switch things up. Put a new spin on the same ol' same ol'.

As of late I've needed some lickety-quick meals to put together as the hubby and I don't get home until 6 or later. Typically when I think of carbonara, "fast" isn't usually the first word that comes to mind.

Usually it's "eh" because I know tempering eggs is involved. And tempering eggs likes to act like my arch nemesis at times. Ok, most of the time.

Surprisingly, the tempering went without a hitch, and prepping the jalapeno and garlic earlier in the day made this dish come together rather quickly as well.

Pasta Carbonara with Corn and Chiles


Adapted from: Everyday with Rachel Ray via Dinners, Dishes, and Desserts

1 pound fettuccine
1/3 pound bacon, chopped
2 cups frozen corn
1 jalapeno, seeds and membranes removed, finely diced
6 cloves garlic, minced
1/4 cup fresh parsley, chopped
1/2 cup dry white wine
3 large egg yolks
1/2 cup Parmesan cheese

Bring a large pot of water to a boil over high heat. Add pasta and cook according to package directions. Drain, reserving 1 cup of the pasta water.

Meanwhile, cook the bacon until brown and almost crispy over medium-high heat. Add the corn; cook for about 5 minutes, or until edges are just starting to turn light brown. Add the jalapeno and garlic, cooking for an additional 2 minutes. Stir in the parsley and wine, reducing heat to low. Simmer until most of the wine has been absorbed.

In a small bowl, beat the egg yolks lightly with a fork. Pour about 1/4 cup of the reserved pasta water into the eggs, whisking quickly. Continuing to whisk, add the remaining pasta water in 1/4 cup increments. In a large bowl, toss together the pasta, corn mixture, and tempered eggs. Add the Parmesan and quickly toss to form the sauce, 1 to 2 minutes.


Serves: 8


Oh Rachel Ray, why on earth would you add thyme to this dish? (The original recipe called for 2 tsp. dried thyme.) It just doesn't fit in with corn and jalapenos. Not at all. Without it though, the corn and chiles were definitely a great contrast to the usual carbonara -- a silky smooth sauce but with heat from the peppers and crunch from the corn. Yum.


Nutrition Facts
Serving Size 177g
Amount per serving
Calories 363Calories from fat 118
% Daily Value
Total Fat 13.2g20%
Saturated Fat 4.5g23%
Cholesterol 146mg49%
Sodium 559mg23%
Total Carbs 40.5g30%
Fiber 1.2g5%
Sugars 1.6g
Protein 18.3g
Vitamin A 8%Vitamin C 11%
Calcium 10%Iron 16%

Friday, September 23, 2011

Happy Fall!

Today is the first day of fall, and honestly, I have no idea where the summer went. The kid I wanted to stick around the longest ran away the fastest. Just my luck.

I have to admit though, fall isn't too bad either. Even though the days are getting shorter and colder, it just gives us an excuse to wear cute sweaters and comfy sweatpants all while grabbing a warm mug of tea or hot chocolate and debating which pumpkin recipe we want to tackle next.

Fall is the season of cloves and cinnamon. Pumpkin and squash. And most importantly -- halloween candy. Which should be a food group all to itself.

Since it's finally time to jump with both feet into fall cooking/baking (rather than just dipping a toe in the middle of summer, and looking sheepishly around to make sure no one is looking at you like you're off your rocker) here are a few of my favorite fall treats:


What are your favorite fall dishes?

Monday, September 19, 2011

Finally...

Oy vey. It's been forever. I know.

It's been rainy and crappy and I've felt completely uninspired in the kitchen lately. Not to mention Adam and I started coaching a middle school soccer team, so that eats up my afternoons and early evenings. Bye bye recipes of any length. Hello 30 minute dinners. Maybe. Or take out. Usually take out.

We won't even talk about how my kitchen has looked like this for the past few weeks:


And my dining room like this:


That's right, remember my lovely little letter to Ikea? You know, so we could build a nice sturdy table to fill this hole:


Well, I didn't end up with the 4' butcher's block countertop like I was wanting since they never got those in. Instead, we opted for the 6 footer. Win.

After we finally got all of our 4x4s cut down to the right size, the countertop oiled and sanded, and then all those dang legs and side boards painted (ugh 4 hour wait time between coats!), we finally started on the actual building process.


Ok, who am I kidding? Adam and my dad got started on the actual building process. Which took a good chunk of Sunday morning and afternoon. But, by about 3:00, all the legs and boards were attached.


After a quick flip and some kitchen clean-up... ta da!


Even better than what I was envisioning! Now I finally have tons of counter space to play on!


That's right, be jealous.

Thursday, September 1, 2011

Sweet Chipotle Snack Mix


At least once a month, Adam and I pack up the car and head out to New Jersey to visit two of the cutest boys around. Oh, and my sister and brother-in-law.

I hate to admit it, but the two of us are major car trip munchers. We usually stop halfway between Pittsburgh and Philly to switch drivers and stretch our legs. Which usually involves wandering into the little service station stops and perusing the candy and chip aisles. (And a total side note: PA probably has the worst turnpike service stop food selections.) But these little food wanderings can end up being quite expensive if we're not careful.

Lately, I've been trying to come up with car-friendly snacks that we can bring with us to enjoy, rather than spending the $10 every time we stop. While the overall cost of this nut and seed mixture might go past $10, it makes a ton -- far more than we would ever eat in one go. Not to mention this might be slightly healthier than some fake-powdered-cheese chips or popcorn.

Sweet Chipotle Snack Mix


Adapted from: Cooking Light, August 2010

1/4 cup sugar
1/2 teaspoon kosher salt
1 teaspoon ground chipotle chile pepper
1/2 teaspoon ground cumin
1/2 teaspoon dried oregano
1/2 teaspoon chili powder
1 egg white
1 cup slivered almonds
1 cup unsalted cashews
1 cup unsalted pumpkinseed kernels

Preheat oven to 325 degrees F. Line two baking pans with parchment paper.

In a small bowl, whisk together the first 6 ingredients (through chili powder).

In a large bowl, whisk the egg white until foamy. Stir in the almonds, cashews, and pumpkinseeds until all the nuts and seeds are lightly coated. Sprinkle with seasoning mixture, tossing well to coat. Divide the nut and seed mixture between the two prepared pans. Spread mixture out into even layer.

Bake for 15 minutes, stirring halfway through. Turn oven off. Remove pan from oven, stir, then place back in the oven (still turned off) for another 15 minutes. Remove from oven and transfer pans to a wire rack to cool. Store in an airtight container for up to 2 weeks.


Makes: 3 1/2 cups (serving size: 3 tablespoons)


I, of course, failed to pick up the unsalted versions of the cashews and pumpkin seeds. And then I failed to adjust the salt addition when making this. Oh.my.saltiness. Actually, it was mostly just the pumpkin seeds. The flavor of the seasoning is pretty good, and we both would have enjoyed this mix if it hadn't been for my slip on the salt. Whoopsies.


Nutrition Facts
Serving Size 27g
Amount per serving
Calories 137Calories from fat 91
% Daily Value
Total Fat 10.2g16%
Saturated Fat 0.9g5%
Cholesterol 0mg0%
Sodium 80mg3%
Total Carbs 7.8g3%
Fiber 1.2g5%
Sugars 3.5g
Protein 4.9g
Vitamin A 0%Vitamin C 0%
Calcium 2%Iron 4%

LinkWithin

Related Posts with Thumbnails
 
Pin It button on image hover