Monday, August 23, 2010

S'mores Whoopie Pies


Making s'mores is a childhood right of passage. I'm pretty sure. It doesn't matter if it's over a bonfire on a beach, a campfire in the woods, a fire pit in your backyard, or even in the microwave on a rainy day. Well, I suppose that last one is negotiable. You have to have the right equipment -- graham crackers, huge marshmallows, Hershey's chocolate bars, a fire, and a long stick. These are requirements -- no substitutions allowed (except for the whole microwave bit, but I'm not sure that even qualifies as a legitimate s'more). Catching on fire and burning the marshmallows is optional. Fancy-pants marshmallow roasting forks are completely unnecessary, but are still allowed. Last but not least, no napkins or wet wipes of any kind until the whole shindig is over.

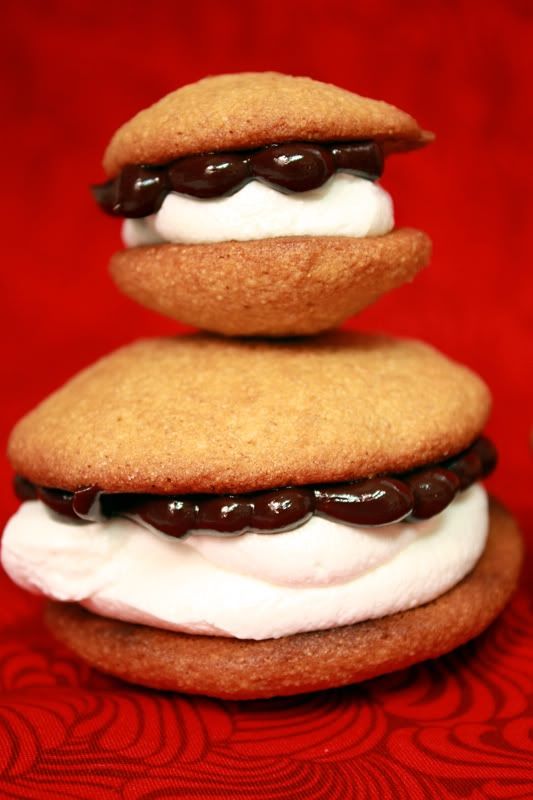
I think that may be one of the best parts of the s'more. You have your bottom graham cracker ready to go, topped with your chocolate. Then you place the piping hot marshmallow on top, followed by the top graham cracker and squish down on the whole thing so you can fit it in your mouth. Marshmallow and molten chocolate go shooting out the back and the sides and all over your fingers with that first bite. Now that's the perfect s'more.

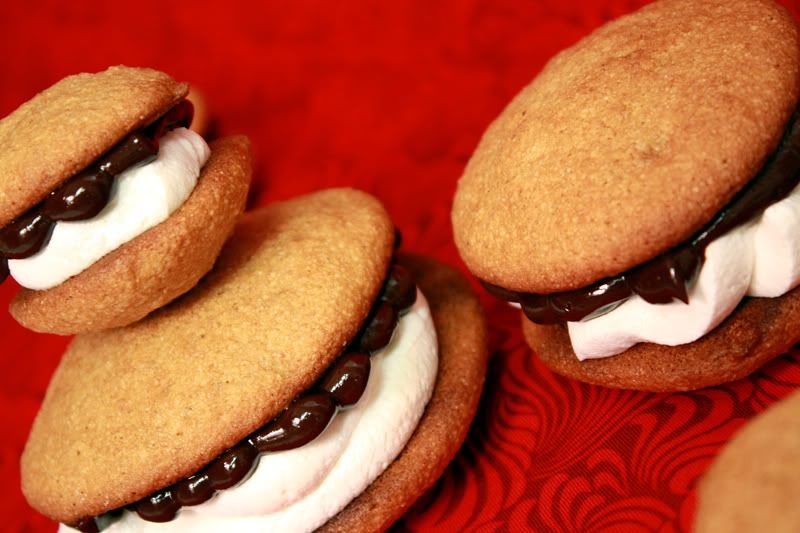
So these whoopie pies don't exactly "qualify" as a true s'more, but those long lazy days of summer with nothing to do are long gone. Stuff these guys full of marshmallow filling and chocolate and it will make you feel, if just for a minute, like a kid again.


S'mores Whoopie Pies
From: Whoopie Pies by Sarah Billingsley & Amy Treadwell
via: Brown Eyed Baker


For the Graham Cracker Cookies:
1 1/2 cups graham flour*
3/4 cup all-purpose flour
1 1/2 teaspoons baking powder
1/2 teaspoon salt
4 tablespoons unsalted butter, at room temperature
4 tablespoons vegetable shortening
1 cup (packed) dark brown sugar
2 large eggs
1/2 cup buttermilk
2 tablespoons milk
1 teaspoon baking soda
1 teaspoon white vinegar
1 teaspoon vanilla extract

For the Marshmallow Filling:
1 1/2 cups Marshmallow Fluff
1 1/4 cups vegetable shortening
1 cup confectioners’ sugar
1 tablespoon vanilla extract

For the Chocolate Ganache Filling:
8 ounces bittersweet or semisweet chocolate chips (or solid chocolate, finely chopped)
1 1/2 cup heavy cream

Position a rack in the center of the oven and preheat the oven to 375 degrees F. Line two baking sheets with parchment paper.

In a medium bowl, stir together both flours, baking powder, and salt.

In the work bowl of a stand mixer fitted with the paddle attachment, beat together the butter, shortening and brown sugar until light and creamy, about 3 minutes. Add the eggs and the buttermilk and beat until combined.

In a measuring cup, combine the milk, baking soda, and vinegar. Add the milk mixture to the batter along with the flour mixture and beat on low speed until just combined. Add the vanilla and beat on medium speed for about 2 minutes, until completely combined.

Using a spoon, drop about 1 tablespoon of batter onto one of the prepared baking sheets and repeat, spacing them at least 2 inches apart. Bake one sheet at a time for about 10 minutes each, or until the cakes begin to brown. Remove from the oven and let the cakes cool on the sheet for at least 5 minutes before transferring them to a rack to cool completely.

Make the Marshmallow Filling: In the work bowl of a stand mixer fitted with the paddle attachment, beat together the Marshmallow Fluff and the vegetable shortening, starting on low and increasing to medium speed until the mixture is smooth and fluffy, about 3 minutes. Reduce mixer speed to low, add the confectioners’ sugar and the vanilla, and beat until incorporated. Increase mixer speed to medium and beat until fluffy, about 3 minutes more.

Make the Chocolate Ganache Filling: Put the chocolate in a large, heatproof bowl. Heat the cream in a large, heavy saucepan over medium heat just until it bubbles. Pour the hot cream over the chocolate in the bowl and let it sit for about 10 minutes, until the chocolate is melted. Stir with a wooden spoon or spatula until smooth. Allow the mixture to rest at room temperature until firm enough to spread, about 2 hours. You may also refrigerate the mixture for about 30 minutes, until it is firm enough to spread, stirring every 10 minutes.

Assemble the whoopie pies: Pipe or spread a layer of chocolate ganache filling onto the flat side of one of the cakes. Using the same method, top the chocolate filling with the marshmallow filling. Top it with another cake, flat-side down. Repeat with the rest of the cakes and filling.

Makes: about 24 whoopie pies

*No, graham flour is not graham crackers finely ground in a food mixer. It's actually a type of whole-wheat flour. Thus, if you can't find graham flour (I found it with the other flours/grains in the organic section), or don't want to spring for a bag of it just for this, you can substitute with whole-wheat flour. This will give these the same flavor, but a slightly different texture.

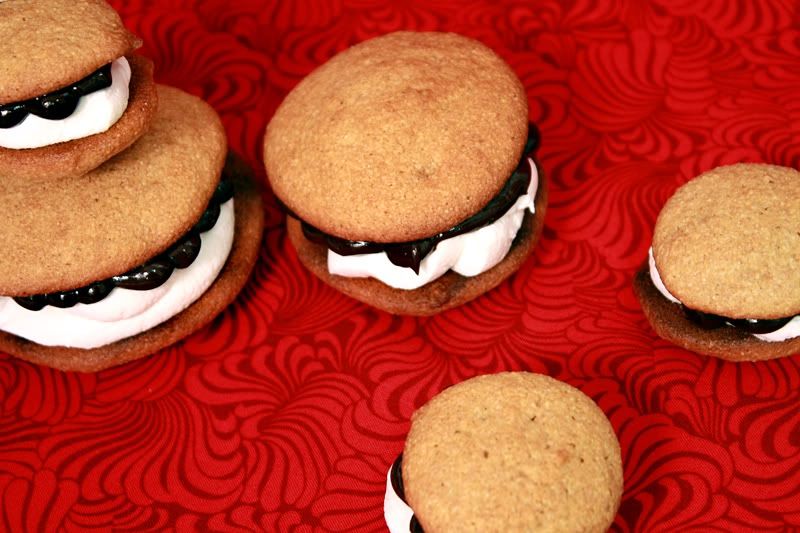
Note: If you want to make baby s'mores, as seen in the pictures above, use a teaspoon-sized drop of batter instead, and bake for 7-8 minutes. This will give you a bite-sized s'more.


I forgot just how much I hate working with vegetable shortening. It is virtually impossible to remove from measuring cups and spatulas without a pound of dish soap. Yet these make it so worth the hassle.

The graham flour definitely adds that wheaty/grainy texture so reminiscent of graham crackers. I am pretty sure if you wanted, you could just melt Hershey's bars down and use those instead of making a ganache for a more authentic flavor. Either way, I would hide these well until you are ready to share (if that moment ever comes). I had to wrestle my plate of just finished whoopie pies back from Adam after his attempt to steal them and eat them as his dinner.


Nutrition Facts
Amount per serving
Calories 336Calories from fat 189
% Daily Value
Total Fat 21.0g32%
Saturated Fat 8.7g44%
Trans Fat 0.0g
Cholesterol 33mg11%
Sodium 133mg6%
Total Carbs 31.7g11%
Dietary Fiber 1.5g6%
Sugars 20.6g
Protein 2.7g
Vitamin A 4%Vitamin C 0%
Calcium 3%Iron 3%

Friday, August 20, 2010

Penne with Chicken & Asparagus


I think I have come to the conclusion that I grew up on chicken nuggets and baked goods. Surely I had to eat more than that, but Lord knows it was not vegetables. If we would have owned a dog while I was growing up, I would have totally been that kid shoving veggies under the table for it to eat. We just don't get along. We have a love-hate relationship. They love me and I hate them. Good thing veggies don't have feelings.

You want me to eat squash? How about I eat an apple. Green beans? I think I'll go with strawberries instead. Now there are a few vegetables that I have come to enjoy (occasionally) over the years -- tomatoes (as long as they are cooked in something), onions (as long as they aren't raw), broccoli, lettuce, carrots, corn. Um. Yeah, I'm sure there are more. There must be. I think there are veggies out there that I've had before, liked, and then forgotten that I liked them. Such as asparagus. I always tend to forget about it.

When performing one of my marathon recipe searches the other day, I came across this recipe for pasta with chicken and asparagus. It was simple and to the point. Good thing one of my good friends had made grilled asparagus for us a few months back. It jumped started my memory that -- why yes, in fact, asparagus does belong on the "vegetables I like" list.


Penne with Chicken and Asparagus

Adapted From: Allrecipes.com


1 pound penne pasta
5 tablespoons olive oil, divided
2 (4 ounce) skinless, boneless chicken breast halves, cubed
3/4 tsp salt
1/2 tsp pepper
1 - 2 teaspoons garlic powder
1/2 cup low-sodium, fat-free chicken broth
1 bunch slender asparagus spears, trimmed, cut on diagonal into 1-inch pieces
1 clove garlic, thinly sliced
1/4 cup Parmesan cheese

Bring a large pot of lightly salted water to boil. Add pasta, and cook until al dente, about 8 to 10 minutes (or according to package directions). Drain, and set aside.

Warm 3 tablespoons olive oil in a large skillet over medium-high heat. Add chicken; season with 1/2 teaspoon salt, 1/4 teaspoon pepper, and 1 to 1 1/2 teaspoons garlic powder. Cook until chicken is cooked through and browned, about 5 minutes. Remove chicken to a paper towel-lined plate.

In the same pan, add chicken broth. Stir in asparagus, garlic, remaining garlic powder, salt, and pepper. Cover, and steam until the asparagus is just tender, about 5 to 10 minutes. Return chicken to the pan and warm through.

Add chicken to pasta, mixing well. Let sit about 5 minutes. Drizzle with 2 tablespoons olive oil, stir again, then sprinkle with Parmesan cheese.

Serves: 8


When I had first started on my little culinary adventure a couple years ago, I wish I had found recipes like this to being with. It is quick and easy, yet still fairly healthy. It's simple enough for a beginner cook, but flexible enough to be played with by a cook with more experience.

I liked the nice quick steam of the asparagus with chicken broth done in the same pan as the chicken (gotta love those one dish deals). I have a new love of cooking/boiling things in broths and stocks instead of water nowadays. It just seems to give the food so much more flavor. The other part I like about this dish is that it fits in with my "light sauce for pasta" craving that hits with summer. No heavy red or white sauce here. Just a nice light olive oil drizzle to finish it off. It's that kind of sauce that really makes the summer produce shine.


Nutrition Facts
Amount per serving
Calories 319Calories from fat 115
% Daily Value
Total Fat 12.8g20%
Saturated Fat 2.5g13%
Cholesterol 69mg23%
Sodium 240mg 10%
Total Carbs 33.7g11%
Dietary Fiber 1.2g5%
Sugars 1.1g
Protein 17.2g
Vitamin A 10%Vitamin C 6%
Calcium 6%Iron 20%

Thursday, August 19, 2010

Easy Cajun Jambalaya


For as many years as I lived in the south (oh... about 9 or so years) I don't think I have ever had jambalaya. Okay, so maybe I didn't live all that far south, but I still find it weird that I have never eaten this dish, regardless of my state of residence. If you had asked me what all was in a jambalaya I really couldn't have told you. Rice? Beans? Shrimp? Right. Wrong. Depends.

While searching around the internet for some new recipe ideas, I happened upon this Easy Cajun Jambalaya. Easy? Sounds good to me. A quick scan of the ingredient list and reviews showed this recipe to have some promise. And one paragraph for directions? Count me in.

Um, yeah. Sooo tasty. I think how good this dish was going to be hit me when I walked by during the rice cooking stage -- all I could smell was the kielbasa and banana pepper melding with the garlic and cayenne pepper. And I started drooling. Maybe a little bit. It's been a while since a meal made me do that. I'm pretty sure we each gained 5 pounds after that meal, and we were fighting for leftovers for the next couple of days as well. Yes, I did in fact get the sad look from Adam when he found out I ate some of the leftovers for lunch the following day. He had evil plans to keep it all for himself. Yeah, nice try on that one.


Easy Cajun Jambalaya

Adapted from: Allrecipes.com


2 teaspoons olive oil
2 (4 ounce) boneless skinless chicken breasts, cut into bite-size pieces
8 ounces kielbasa, diced
1 cup onion, diced
1 banana pepper, diced
2 tablespoons chopped garlic
1/4 teaspoon cayenne pepper
1/2 teaspoon onion powder
1/2 teaspoon salt
1/4 teaspoon ground black pepper
2 cups uncooked white (long grain) rice
4 cups low-sodium, fat-free chicken broth
3 bay leaves
2 teaspoons Worcestershire sauce
1 teaspoon hot pepper sauce

Heat oil in a large pot over medium high heat. Sauté chicken and kielbasa until lightly browned, about 5 minutes. Add onion and next six ingredients (through black pepper). Cook 5 minutes, or until onion is tender and translucent. Add rice. Stir in chicken broth and bay leaves; bring to a boil. Reduce heat, cover, and simmer 20 minutes, or until rice is tender. Stir in Worcestershire sauce and hot pepper sauce. Remove bay leaves prior to serving.

Serves: 6


Not only is this dish super easy to throw together, but it only uses one dish to get it all done (well, and a cutting board). That's my kind of cooking.

The original recipe calls for bell peppers, but we all know how Adam feels about those -- they had to go. This is not supposed to be a super spicy dish, so I decided to replace the bell peppers with a banana pepper to kick up the heat a little bit. It also called for celery, but, ew. No thanks. Skipped that one. This is what I love about cooking at home... I get what I want. :)


Nutrition Facts
Amount per serving
Calories 443Calories from fat 112
% Daily Value
Total Fat 12.4g19%
Saturated Fat 3.7g19%
Cholesterol 60mg20%
Sodium 1216mg51%
Total Carbs 56.1g19%
Dietary Fiber 1.7g7%
Sugars 2.6g
Protein 24.2g
Vitamin A 14%Vitamin C 56%
Calcium 4%Iron 24%

Wednesday, August 18, 2010

Garbanzo Tomato Pasta Soup


Fall is coming. I can feel it every night as the sun goes down and the temperature drops. I love summer nights that stay warm and muggy long after the sun has set. When tank tops and shorts are still appropriate while trying to catch fireflies in the dark. Not anymore. Now I have to remember to bring long sleeves and maybe a blanket with me any time we're out at night. Seriously, it's supposed to get down to 59 degrees tonight. Not fair. Summer needs to stick around a little while longer.

Despite my love of summer, it does occasionally rain every once in a while. And what better to enjoy than a nice bowl of soup? This soup is light enough for summer eating, but still hearty enough to keep Adam happy. :)


Garbanzo Tomato Pasta Soup

Adapted From: Allrecipes.com


3 (14.5 ounce) cans vegetable broth
3/4 cup (6 ounces) small shell pasta
1 tablespoon olive oil
1 cup onion, chopped
2 cloves garlic, minced
1 (15 ounce) can garbanzo beans, drained and rinsed
1 (28 ounce) can whole peeled tomatoes, chopped, juice reserved
1/2 teaspoon dried basil
1/2 teaspoon dried thyme
salt and pepper to taste

Bring vegetable broth to a boil in a large pot (cover with a lid to hurry it along if needed). Add pasta and cook for 8 to 10 minutes, or until al dente.

Meanwhile, heat oil in a small skillet over medium heat. Sauté onions and garlic until translucent, about 5 minutes. Stir into pasta. Add garbanzo beans, tomatoes, basil, thyme, salt and pepper. Heat through and serve.


Nice, easy, and tasty. Perfect for those lazy rainy days.


Nutrition Facts
Amount per serving
Calories 638Calories from fat 117
% Daily Value
Total Fat 13.0g20%
Saturated Fat 1.8g9%
Cholesterol 31mg10%
Sodium 1028mg43%
Total Carbs 99.9g33%
Dietary Fiber 21.4g86%
Sugars 18.7g
Protein 33.7g
Vitamin A 35%Vitamin C 53%
Calcium 16%Iron 53%

Tuesday, August 17, 2010

Blueberry, Lemon, and Gingersnap Cheesecake Pudding


I love getting mail, don't you? About the middle of every month I get all excited because it's magazine subscription time. Unlike most 20-something ladies, I'm not on the hunt for a new Cosmo or Glamour magazine. Nope, I'm waiting for my Cooking Light or Bon Appétit to arrive. Or if I'm really lucky, the quarterly issue of Kraft Foods also shows up.

As of late though, I have been a little disappointed with my Bon Appétit. I'm not sure if it's the photography:

I mean, seriously? That's supposed to look appetizing?

Or just that the recipes are just not that appealing to me any more. Either way, I had almost given up hope on the magazine.

I had the most recent copy of the magazine laying on the back of the couch one day waiting to be flipped through when Adam snatched it up staring intently at the cover. "You need to make that, but with blueberries," was all he said. Over and over again. Every time he saw that darn magazine. So I finally gave in. We were having guests over for dinner and I figured, why not?

I fudged through a few steps as I didn't want to spend forever on dessert when I had other meal things to attend to. Didn't matter. It was lemony and creamy and full of blueberries. Yum.


Blueberry, Lemon, and Gingersnap Cheesecake Pudding

Adapted from: Bon Appétit, August 2010


Lemon Pudding:
1 (2 oz) box of Jell-O Lemon Flavored Pudding Mix
2 cups milk

Blueberry Compote:
2 cups fresh blueberries (about 12 ounces)
3 tablespoons sugar
2 tablespoons + 1 teaspoon lemon juice

Remaining Ingredients:
4 ounces gingersnap cookies (about 16)
1 1/2 cups chilled heavy whipping cream
1/3 cup mascarpone cheese
Pinch of salt

Place blueberries in a medium bowl. Lightly crush some of the berries to release the juices. Cover and chill until sugar dissolves and juices form, about 3 hours up to 1 day.

In another medium bowl, mix lemon pudding mix and milk, following package directions. Place in refrigerator until set and ready to use.

Place gingersnaps in large zip-top plastic bag. Crush cookies with mallet or rolling pin until largest pieces are about 1/2 inch.

Using electric mixer, beat cream, mascarpone, and pinch of salt in large bowl just until soft peaks form.

To assemble:
Arrange six 8-ounce glasses on work surface. Spoon 4 to 5 berries and some of juices in bowl into each cup. Cover and chill remaining berries in bowl for serving. Spoon 1/4 cup mascarpone whipped cream over berries in each cup, spreading in even layer. Add generous 1 tablespoon pudding, spreading to edges. Sprinkle 1 tablespoon crushed gingersnaps over. Repeat layering 1 more time with mascarpone whipped cream, pudding, and crushed gingersnaps. Top with remaining cream. Cover; chill at least 1 hour and up to 3 hours.
Uncover desserts. Spoon remaining berry mixture over and serve.

Serves: 6


Like I said, I switched out a couple components of this dessert: lemon pudding for lemon curd and blueberries for blackberries. And it was still delicious.

I was a little concerned that there was no sugar going into the mascarpone whipped cream. I tried it, and was even more concerned. It tasted liked it needed sugar, bad. Fingers crossed I went along with the recipe, hoping that the sugar from the blueberries and pudding would somehow pull it through. In one bite, I was hooked. It worked. Somehow the sweetness in the berries and pudding makes up for the lack of it in the whipped cream. Just don't try and serve it by itself... All in all it was a wonderful light summer dessert.


Nutrition Facts
Amount per serving
Calories 464Calories from fat 248
% Daily Value
Total Fat 27.6g42%
Saturated Fat 16.3g81%
Trans Fat 0.0g
Cholesterol 95mg32%
Sodium 410mg17%
Total Carbs 50.7g17%
Dietary Fiber 1.18g5%
Sugars 35.5g
Protein 5.0g
Vitamin A 22%Vitamin C 12%
Calcium 17%Iron 5%

Monday, August 16, 2010

Spicy Malaysian-Style Stir-Fried Noodles


Last October, Cooking Light came out with a medley of Asian noodle recipes. All of them looked scrumptious, especially their Spicy Malaysian-Style Stir-Fried Noodles. So I perused the ingredient list and directions and it all seemed very doable. Until I went grocery shopping. No sweet bean sauce at Giant Eagle. No sweet bean sauce at McGinnis Sister's. Problem. This delicious looking dish got shuffled into "the pile", continuing to be skipped over time and time again.

Then, at the end of June, Adam and I decided to visit my parents for the 4th of July weekend. And I had a brainstorm. I knew the town right next to my parents had both Latin and Asian grocery stores -- score. This recipe had life again! It only took forever for us to finally locate the can of sweet bean sauce hiding out on the shelves, but we did. I brought that sucker home and knew just what we were having for dinner the first time I got a chance (which unfortunately wasn't for a while). That poor little can of sweet bean sauce sat on my kitchen counter staring at me for almost a month.

Far far too long before we got to enjoy this dish. Well of course after all that wait, finding the remaining "normal" ingredients was supposed to be a breeze. Ha. Of course we went grocery shopping late on Sunday so the shelves were all but stripped bare. Including the organic section where we were trying to find the tofu. All that was left was firm tofu, not extra-firm. I said "screw it, we're going with firm, and I am making this dish". Good call, good call.


Spicy Malaysian-Style Stir-Fried Noodles

Adapted from: Cooking Light, October 2009


1 (14 ounce) package water-packed extra-firm tofu, drained
2 (6 ounce) packages Chinese chow mein noodles
2 tablespoons sesame oil
4 garlic cloves, minced
1/4 teaspoon salt
1 head bok choy, trimmed and cut crosswise into 2-inch-thick strips
1 tablespoon sugar
3 tablespoons chile paste with garlic (such as sambal oelek)
2 tablespoons fresh lime juice
2 tablespoons sweet bean sauce
2 tablespoons soy sauce

Line a plate with a triple layer of paper towels; top with tofu. Place a triple layer of paper towels on top of tofu; top with another plate. Let stand 20 minutes. Cut tofu into 1/2-inch cubes.

Cook noodles in a large saucepan of boiling water according to package directions; drain in a colander over a bowl, reserving 1 cup cooking liquid. Wipe pan with paper towels. Heat oil in pot over medium heat. Add garlic to pan; cook 30 seconds, stirring constantly. Add salt and bok choy; cook 30 seconds, stirring frequently. Stir in 1/2 cup reserved cooking liquid; bring to a boil. Reduce heat, and cook 4 minutes.

Combine sugar and the final four ingredients, stirring until combined. Add noodles, remaining 1/2 cup cooking liquid, and sugar mixture to pan; toss to combine. Cook 30 seconds or until thoroughly heated, tossing to coat. Add tofu; toss to combine. Serve immediately.

Serves: 6


So the extra-firm tofu is probably the wiser choice for this dish as I found the firm to be kind of squishy and weird. But then again it was the first time I'd cooked with tofu, so I had no idea what to expect.

This dish was super tasty. Really really spicy, but very tasty. As in, oh-my-gosh-it's-so-spicy-it-hurts-but-its-so-good-I-have-to-keep-eating-it. I think I might back off a tidge on that chile paste next time (go for 2 tablespoons rather than 3) so we can enjoy this dish even more. Even if it's too spicy, a nice big glass of milk makes it totally possible. Now I just need to find a place up here that sells that sweet bean sauce. Although... the sweet been sauce reminded me of a mixture of hoisin and teriyaki sauces, but much thicker. Maybe I can get away with doing a combination of the two with some cornstarch... I'll have to think on that one.


Nutrition Facts
Amount per serving
Calories 433Calories from fat 235
% Daily Value
Total Fat 26.1g40%
Saturated Fat 3.5g18%
Cholesterol 0mg0%
Sodium 835mg35%
Total Carbs 40.8g14%
Dietary Fiber 4.0g16%
Sugars 4.6g
Protein 13.9g
Vitamin A 126%Vitamin C 114%
Calcium 28%Iron 29%

Saturday, August 14, 2010

Pasta with Roasted Garlic, White Cheddar & Wine Sauce


Shhh don't tell Adam -- I have a little crush. Okay, maybe a big one. On roasted garlic. The first time I made it (for the Manchego Cheese and Garlic Dogs) I was worried that my place would just reek of garlic for days. But it didn't. I was nervous that adding two whole heads of garlic to a dish would completely overpower it. But it didn't. Instead, those little cloves of garlic happily popped out of their wrapping, mashed up beautifully, added a wonderful mellow and sweet garlicky flavor to the dish. So when I saw another dish pop up on my Google Reader incorporating a ton of my favorite ingredients, I knew I had to try it.


Pasta with Roasted Garlic, White Cheddar & Wine Sauce

From: Annie's Eats


8 oz. penne, or other medium-sized pasta
1 1/2 tbsp. butter
1/4 cup roasted garlic paste (made from 2 heads of garlic)*
1 1/2 tbsp. flour
1/4 cup dry white wine
1 cup low-sodium, fat-free chicken broth
1 cup white cheddar cheese, shredded
1/2 pound frozen broccoli cuts, thawed
1 (4 oz) boneless, skinless chicken breast, cooked and cut into bite size pieces
Salt and pepper, to taste

Bring a large pot of salted water to boil. Cook the pasta until al dente according to the package directions.

Meanwhile, in a large skillet or saucepan set over medium heat, melt the butter. Once the butter is melted, whisk in the roasted garlic paste and cook just until fragrant, 30-60 seconds. Whisk the flour into the mixture and cook, stirring constantly, until the mixture begins to turn golden brown, 1-2 minutes. Stir the white wine and broth into the pan. Bring to a simmer and cook, stirring frequently, until slightly thickened, about 2 minutes. Whisk in the cheddar, stirring until melted. Season the sauce with salt and pepper to taste.

Mix in the broccoli and chicken pieces, and cook just until heated through. Mix in the cooked pasta until evenly coated with the sauce. Serve warm.

Serves: 4

*To make roasted garlic paste, peel the outer papery skins off two heads of garlic, leaving the heads still intact. Slice about a quarter off the top of each head so that all of the cloves are partly exposed (may have to individually remove the tops off the small outer cloves). Places the heads on a square of foil and drizzle with olive oil. Wrap the heads in foil and bake at 350˚ F for one hour. Remove from the oven and let cool. Once cool enough to touch, squeeze the garlic cloves out of the peels and smash with a fork to make roasted garlic paste.


It's cheesy and tangy from the wine with that nice mellow garlic flavor that sneaks through. Definitely ready to make this dish again in the very near future.


Nutrition Facts
Amount per serving
Calories 477Calories from fat 152
% Daily Value
Total Fat 16.9g26%
Saturated Fat 9.4g47%
Cholesterol 119mg40%
Sodium 586mg24%
Total Carbs 48.0g16%
Dietary Fiber 2.2g9%
Sugars 1.5g
Protein 31.2g
Vitamin A 16%Vitamin C 100%
Calcium 30%Iron 21%

LinkWithin

Related Posts with Thumbnails
 
Pin It button on image hover