Sunday, February 8, 2009

Sugar Cookies


Hi. My name is Danielle, and I have an addiction to sugar cookies. I have been an addict for the last 21 years. Well hey, admitting you have a problem is the first step, right? Right? Oh, you mean you have to want to fix the problem? Nevermind.

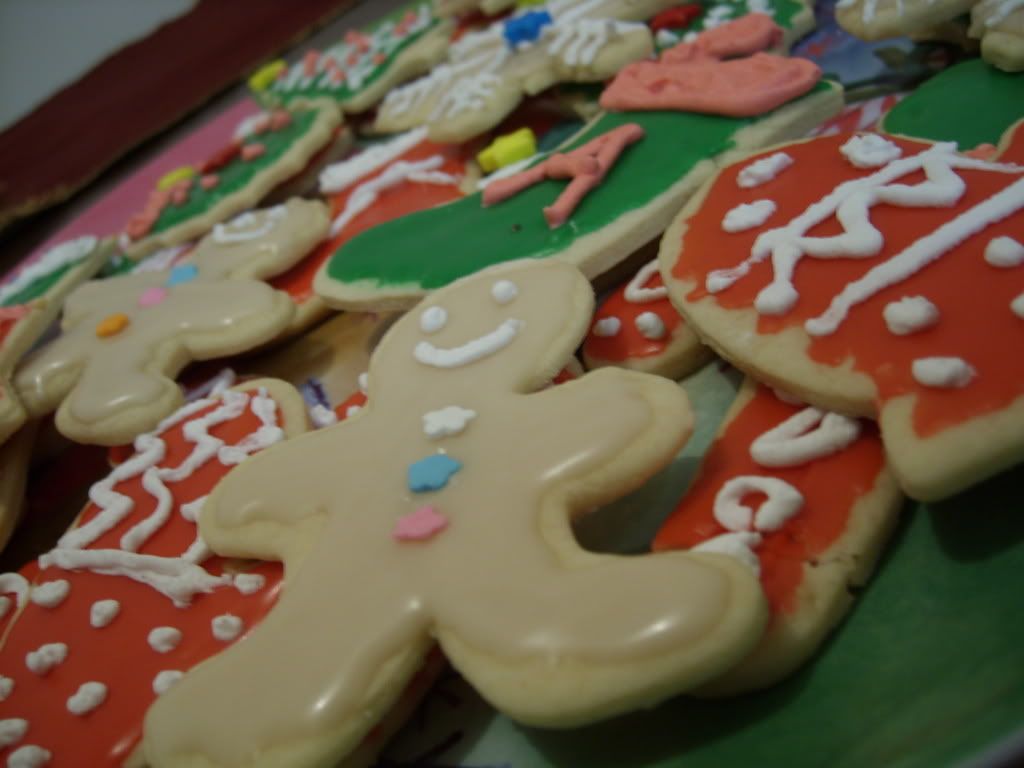
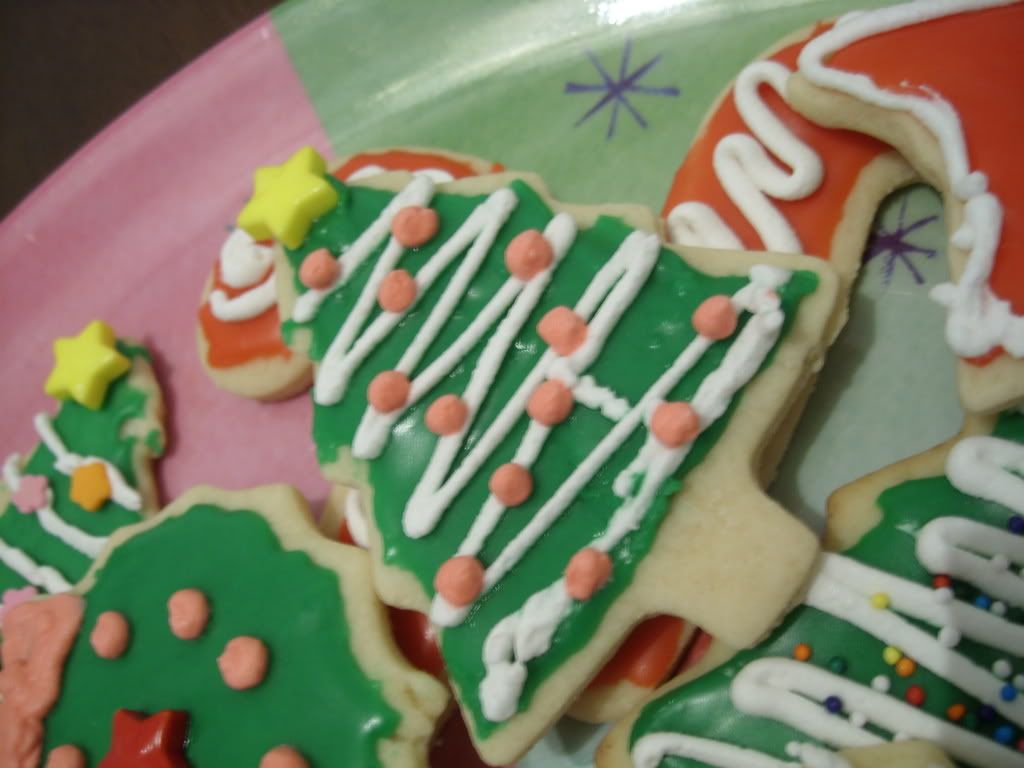
This is one of those cases in which I am glad Christmas comes only once a year. To me, it's not Christmas until somebody busts these babies out. I'm not sure when exactly it started, but I can always remember either making sugar cookies at Grandma's or somebody bringing them. They have always been a part of the dessert tray. And it doesn't count if they were bought at the store or if they aren't the roll-out kind with icing. It's just not the same.

This year, we weren't going anywhere for Christmas. Why? Oh, that's right, I had to work. On Christmas. Yeah. People still get sick and have chest pains on Christmas. Mostly from eating too much turkey/ham/mashed potatoes and drinking too much beer/wine/cider/mulled wine but I digress.

Nevertheless, working did not stop me from pulling out the ol' family recipe and making a batch of these delicious little gems. Except... they weren't delicious. Try flavorless and crunchy. Not buttery and chewy. (WTF?)

So I did what I had never done before. I said screw the family recipe, I'm going to try the one everybody has been raving about -- the Williams Sonoma Sugar Cookie recipe. I had seen this recipe on both Cast Sugar and Good Eats & Sweet Treats, so I figured it was worth a shot.


Sugar Cookies
From: Williams Sonoma

1/2 c. unsalted butter, at room temperature
1/2 c. granulated sugar
2 tsp. grated lemon zest (I used vanilla extract instead)
1 large egg
1 -3/4 c. all-purpose flour
1/2 tsp. baking powder
1/4 tsp. salt
Royal icing for decorating (I did use our "family recipe" for the icing, recipe below)

Preheat oven to 350 F.

In a food processor, combine the butter, granulated sugar, and zest and pulse until creamy. Add the egg and pulse 5 or 6 times until fluffy and blended. In a small bowl, whisk together the flour, baking powder, and salt. Add one-third of the flour mixture to the food processor and process until blended, about 45 seconds. Add the remaining flour in two batches, processing after each addition until the dough is smooth.

Turn the dough out onto a well-floured work surface, shape into a ball, and then roll out 1/8-inch thick. Chill the dough for about half an hour. Using cookie cutters, cut the dough into desired shapes. Then, using a spatula, transfer the cutouts to the baking sheets. Gather up the dough scraps, form into a ball, roll out and cut more shapes, and add to the baking sheets.

Bake until lightly browned on the bottom and pale golden on top, 6-8 minutes. Transfer to wire racks and allow to cool on the baking sheets for 5 minutes, then transfer to the racks alone to cool completely.

Decorate the cooled cookies.

Makes: about 24


Icing
"Family" Recipe

Powdered sugar
Milk
Capful of vanilla extract
Food coloring

Mix powdered sugar and milk together in a small bowl until desired consistency. Add vanilla. Add food coloring.


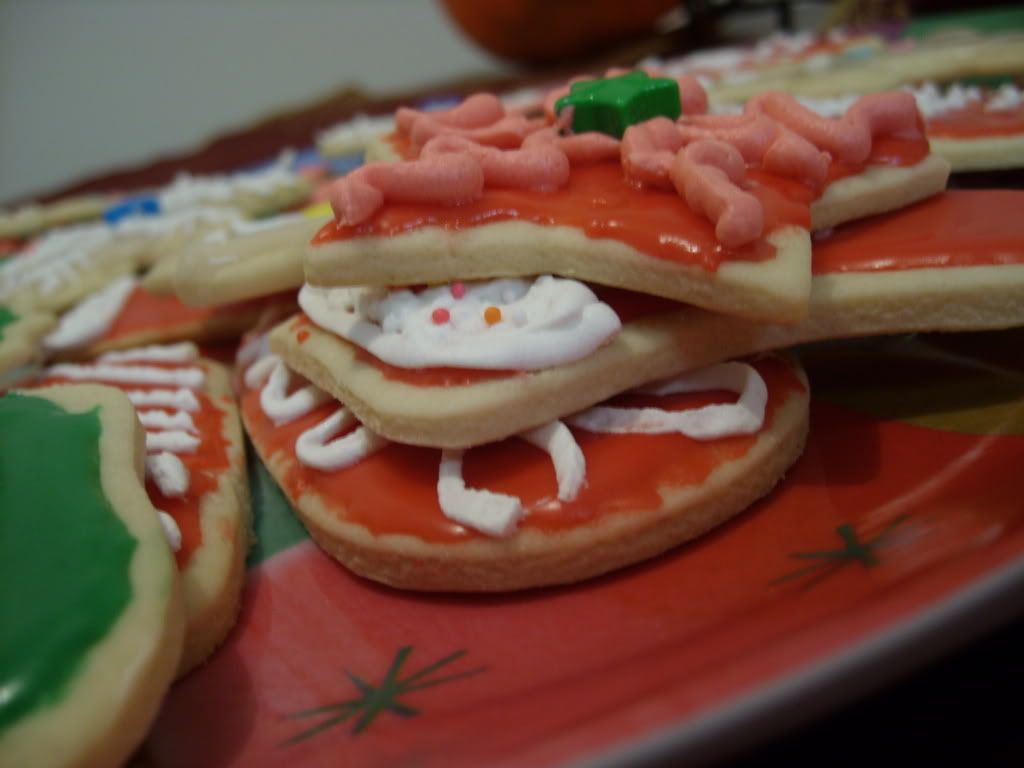
I did try the royal icing on my first "failed" attempt at cookies (with the fam recipe), and I still don't like how hard it gets. That's why I used my mom's mixture on the second round. The icing definitely has more flavor and doesn't get rock hard. (It does firm up, but still stays soft underneath the "crust" it forms.) Although I did use royal icing for the piping decor. Check out Good Eats & Sweet Treats for the recipe.

And I lowered the baking time on the cookies to about 4-5 minutes so they wouldn't get too brown on the corners.

Delicious!


Nutrition Facts
Amount per serving
Calories 99Calories from fat 38
% Daily Value
Total Fat 4.2g6%
Saturated Fat 2.5g13%
Cholesterol 19mg6%
Sodium 55mg2%
Total Carbs 13.8g5%
Sugars 6.8g
Protein 1.3g
Vitamin A 3%Vitamin C 0%
Calcium 1%Iron 3%

Wednesday, February 4, 2009

Hot Chocolate Fudge Cakes


I went to college in a small town. As in really small. As in only around 17,000 people or so. Let's just say that there weren't a ton of nice "sit-down" restaurants to choose from. There were a couple local places, and then there was Ground Round and Applebee's (oh yes, a whole TWO chain restaurants to choose from).

Before I discovered the local places, everytime my parents would come to visit we would go out to Applebee's for dinner. Let's just say that I still have a hard time going there.

The one good thing that did come from Applebee's was their awesome Triple Chocolate Meltdown. The moist chocolate cake surrounding a molten mess of chocolate in the middle. Absolutely fantastic.

I had tried replicating one of those molten chocolately cakes last April with Dorie Greenspan's Gooey Chocolate Cake, but I, of course, overcooked them, so no gooey center. Good, but not molten. When I picked up the December issue of Cooking Light, I almost immediately started drooling. Molten chocolate cakes had come back and still looked delicious as ever.


Hot Chocolate Fudge Cakes

3/4 cup all-purpose flour + 5 teaspoons
2/3 cup unsweetened cocoa
1 1/2 teaspoons baking powder
1/4 teaspoon salt
1/4 cup unsalted butter, softened
2/3 cup granulated sugar
2/3 cup packed brown sugar
1 cup egg substitute
1 1/2 teaspoons vanilla extract
2.6-ounce bar dark (71% cocoa) chocolate, finely chopped
2 tablespoons powdered sugar

Lightly spoon flour into dry measuring cups; level with a knife. Sift together flour, cocoa, baking powder, and salt.

Place butter in a large bowl; beat with a mixer at medium speed 1 minute. Add granulated and brown sugars, beating until well blended (about 5 minutes). Add egg substitute and vanilla, beating until well blended. Fold flour mixture into sugar mixture; fold in chocolate. Divide batter evenly among 10 (4-ounce) ramekins; arrange ramekins on a cookie-sheet. Cover and refrigerate 4 hours or up to 2 days.

Preheat oven to 350°.

Let ramekins stand at room temperature 10 minutes. Uncover and bake at 350° for 19 minutes or until cakes are puffy and slightly crusty on top. Sprinkle evenly with powdered sugar; serve immediately.

Serves: 10


Annnnd once again, I failed at the whole "molten center" concept. The original recipe calls for the cakes to bake for 21 minutes, but many reviews said to cook it for only 19. Knowing my sister's oven cooks hot, I went for the 19 minutes and STILL didn't have that nice gooey middle. How unfortunate.

They were still pretty good cakes though. I would definitely try this recipe again, cooking them even less than 19 minutes -- and making sure to pour a super huge glass of milk.


Nutrition Facts
Amount per serving
Calories 250Calories from fat 77
% Daily Value
Total Fat 8.5g13%
Saturated Fat 5.1g25%
Cholesterol 14mg5%
Sodium 146mg6%
Total Carbs 40.6g14%
Dietary Fiber 2.5g10%
Sugars 28.4g
Protein 5.8g
Vitamin A 5%Vitamin C 0%
Calcium 8%Iron 12%

Curried Chicken and Cashews


When I started getting into cooking, my original goal was to try a new recipe each week. I wanted to "expand my horizons" (as my parents would say) and branch out with the different types of food I was eating.

Well, this recipe definitely goes into the "not typically what I eat" category. Actually, it goes into that category for both Adam and I. Upon coming across this recipe in the September issue of Cooking Light, I thought, why not? I'd give it a try.


Curried Chicken and Cashews

Sauce:
1/3 cup fat-free, less-sodium chicken broth
3 tablespoons water
1 1/2 tablespoons fish sauce
1 teaspoon sugar
1 teaspoon rice vinegar

Remaining ingredients:
3/4 pound skinless, boneless chicken breast halves
2 tablespoons canola oil, divided
1 1/2 cups vertically sliced onion
1 tablespoon minced peeled fresh ginger
1 tablespoon minced garlic
1 teaspoon Madras curry powder (I used regular curry)
3 small dried hot red chiles, broken in half
1/3 cup chopped fresh cilantro
1/4 cup dry-roasted salted cashews, chopped
3 cups hot cooked short-grain rice

To prepare sauce, combine the first 5 ingredients; set aside.

Cut chicken across grain into 1/4-inch slices; cut slices into 1/2-inch-wide strips. Cut strips into 3-inch-long pieces.

Heat a 14-inch wok over high heat. Add 1 tablespoon oil to wok, swirling to coat. Add half of chicken to wok; stir-fry 2 minutes. Spoon cooked chicken into a bowl. Repeat procedure with 2 teaspoons oil and remaining chicken.

Add remaining 1 teaspoon oil to wok, swirling to coat. Add onion, ginger, and garlic to wok; stir-fry 1 minute or until lightly browned. Add curry powder and chiles; stir-fry 30 seconds. Add sauce and chicken to wok; stir-fry 1 minute. Spoon into a serving dish. Sprinkle with cilantro and cashews. Serve over rice.

Serves: 4


I have to admit, it wasn't our favorite meal. It wasn't bad -- it's actually rated a 4 out of 5 stars on myrecipes.com, I just think that we don't really care for food with a strong curry flavor. If that type of food is up your alley, I'd say give it a shot. As for us... I think we'll pass on another round.


Nutrition Facts
Amount per serving
Calories 736Calories from fat 126
% Daily Value
Total Fat 14.0g22%
Saturated Fat 2.0g10%
Trans Fat 0.0g
Cholesterol 49mg16%
Sodium 707mg29%
Total Carbs 121.1g40%
Dietary Fiber 3.2g13%
Sugars 3.8g
Protein 29.9g
Vitamin A 2%Vitamin C 7%
Calcium 6%Iron 39%

Friday, January 23, 2009

White Chili


Here's a secret for you... I'm not the biggest fan of chili. Shhhhh, don't tell. It's alright, but it's definitely not something I crave on a regular basis. Unless we're at Wendy's and it's super cold out. Then, I might order one (off the Value Menu of course -- gotta love Wendy's). So when I saw all the chili recipes in the September issue of Cooking Light, I pretty much skimmed the section until a recipe for White Chili caught my eye.

I'm not the biggest fan of regular chili, but white chili is a different story. First it has chicken, not beef. It's considered okay if it has beans in it. And it can still be as spicy or as mild as you want.


White Chili
Cooking Light, September 2008

2 teaspoons canola oil
1 large onion
3 garlic cloves, minced
2 cups fat-free, less-sodium chicken broth
5 teaspoons green hot pepper sauce
1/2 teaspoon kosher salt
1 1/4 pounds skinless, boneless chicken breast halves
2 tablespoons stone-ground cornmeal
1 (19-ounce) can cannellini beans or other white beans (we used Great Northern)
1/2 cup plain fat-free yogurt
2 tablespoons thinly sliced green onions

Heat oil in a Dutch oven over medium heat. Add chopped onion and garlic to pan; cook 5 minutes or until onion is tender, stirring occasionally. Add broth, hot pepper sauce, salt, and chicken to pan; bring to a boil. Cover, reduce heat to low, and simmer 15 minutes. Remove chicken from broth mixture; cool.

Add cornmeal and beans to broth mixture, stirring with a whisk; simmer 15 minutes. Mash about 1/4 cup beans against side of pan. Cut chicken into bite-sized pieces. Add chicken to pan; simmer 5 minutes or until mixture thickens, stirring frequently. Top each serving with yogurt; sprinkle with green onions.

Serves: 6

Okay, so I have to be honest here -- Adam had definitely made this chili all 3 times we've had it. It takes a little bit to make, but after all it is chili... and Adam was making it, which adds on a little bit of time. ;)

We liked it so much that we even made it for his parents after going to the zoo in 9 degree weather. (Who does that?) But they liked it too!


Nutrition Facts
Amount per serving
Calories 443Calories from fat 44
% Daily Value
Total Fat 4.9g7%
Saturated Fat 0.9g4%
Trans Fat 0.0g
Cholesterol 56mg19%
Sodium 559mg22%
Total Carbs 60.3g20%
Dietary Fiber 23.1g92%
Sugars 4.6g
Protein 42.7g
Vitamin A 2%Vitamin C 12%
Calcium 18%Iron 42%

Tuesday, January 20, 2009

Gougeres


I promise this is my last Thanksgiving recipe. Promise. And I'm so glad, I am really rather sick of still being back in November. And actually, this is from our "real" Thankgiving dinner -- you know, the one with the turkey, mashed po-taters, and all that good stuff.

I saw these on Chomping the Big Apple, and they completely reminded me of these dinner rolls we had on our honeymoon that I fell in love with. I mean, what's not to like? Cheese inside rolls? Wonderful.


Gougeres
Ruth Reichl, as seen on Chomping the Big Apple

1 c. water
1/4 lb (8 tablespoons) unsalted butter
1-1/2 tsp salt
1-1/2 c. all-purpose flour
5 eggs
1 c. diced Gruyère cheese (I used swiss)
Pepper to taste
1/2 c. grated Gruyère cheese (I used swiss)

Preheat the oven to 375°F.

Combine the water, butter and a teaspoon of the salt in a saucepan and bring it to a boil, stirring until the butter melts. Remove the pan from the heat, let cool slightly, stir in the flour, and mix well. Return pan to the heat and stir with a wooden spoon over high heat until the mixture comes away from the sides of the pan. Remove from the heat.

Stir in the eggs, one at a time until well combined. Add the diced cheese, the remaining 1/2 teaspoon salt, and pepper, stirring well.

Drop the dough by rounded tablespoons onto a well-buttered baking pan. Smooth the top and sides of each gougère with a knife, and sprinkle with grated cheese.

Bake in batches for 25 minutes, or until puffed and golden. Serve immediately.

Serves: 8


So yes, we really didn't want to have to sell baby Michael in order to pay for the Gruyère cheese, so we substituted Swiss instead. I'm not really sure how much of an effect this had on the overall taste, but I felt like we could have used a stronger cheese.

Everyone was raving about these, and thought they were really good, but I thought they were just alright. I might try making these again with a different cheese.


Nutrition Facts
Amount per serving
Calories 303Calories from fat 181
% Daily Value
Total Fat 20.1g31%
Saturated Fat 11.8g59%
Cholesterol 165mg55%
Sodium 598mg25%
Total Carbs 19.2g6%
Dietary Fiber 0.6g3%
Sugars 0.5g
Protein 11.5g
Vitamin A 13%Vitamin C 0%
Calcium 18%Iron 9%

Sunday, January 11, 2009

Broccoli with Peppered Parmesan


So for Thanksgiving, I figured I should actually put together a meal, not just an entree for once. While the Beef Tenderloin would have been just fine by itself, seeing as it was Thanksgiving I figured I needed a side -- and I figured this out ON Thanksgiving. Which doesn't really work so hot when it comes for needing ingredients.

I had frozen broccoli, I had parmesan, and I had cracked black peppercorns from the beef, so... why not? This quick and easy combo actually turned out really nice, and complemented the beef quite nicely.


Broccoli with Peppered Parmesan
Original Recipe

1/2 lb. broccoli
3 tbsp. butter
1 tsp. cracked black pepper
3/4 c. Parmesan cheese

Melt butter in a medium skillet over medium heat. Add broccoli and saute for about 6 minutes or until cooked through. Add cheese and pepper, stirring until cheese melts.

Serves: 4


We rated it (and my parents made it later and gave it this rating too):


Nutrition Facts
Amount per serving
Calories 178Calories from fat 128
% Daily Value
Total Fat 14.2g22%
Saturated Fat 8.7g44%
Cholesterol 39mg13%
Sodium 367mg15%
Total Carbs 4.9g2%
Dietary Fiber 1.6g6%
Sugars 1.1g
Protein 9.0g
Vitamin A 14%Vitamin C 84%
Calcium 24%Iron 4%

Friday, January 9, 2009

Peppercorn Beef Tenderloin with Shallot-Wine Reduction


So according to my husband, I am "unamerican" because I'm not a fan of turkey on Thankgiving. I just don't like gravy, which leaves me with typically dry plain turkey. Can you see why I might not be a fan? Well, seeing as we didn't truly have turkey on Thanksgiving (we waited until Saturday to celebrate with the family) I guess that makes him unamerican too. :-p So there.

I did feel bad though, that we weren't able to celebrate Turkey day on Thursday because I had to work the following day (thus we weren't able to travel until Friday afternoon). So instead of turkey, I decided to step out of my box the other way and go for the beef.

I had seen this in the November issue of Cooking Light, but made a few changes, as I forgot how expensive a 2 lb piece of beef tenderlion is, and I forgot to grab some port before places shut down for the holiday. If you want their recipe, click here.


Peppercorn Beef Tenderloin with Shallot-Wine Reduction
Adapted from Cooking Light, November 2008

2-pounds (4 slices) flank steak, trimmed
1 teaspoon salt
1-1/2 tablespoons cracked black peppercorns
Cooking spray

2 cups dry red wine
1-1/2 cups fat-free, less-sodium beef broth
1/4 cup finely chopped shallots
1/8 teaspoon salt
2 sprigs fresh parsley
1 sprig fresh thyme
1-1/2 tablespoons all-purpose flour
3 tablespoons water
1 tablespoon butter
1/2 teaspoon balsamic vinegar

Preheat oven to 450°.

In a small bowl, mix 1 teaspoon salt and peppercorns. Sprinkle outside of beef evenly, pressing firmly to adhere. Place beef in a loaf pan coated with cooking spray. Bake at 450° for 33 minutes or until a thermometer registers 135° or until desired degree of doneness. Let rest 10 minutes.

For reduction, combine wine and next 5 ingredients (through thyme) in a medium saucepan; bring to a boil. Cook about 15 minutes until reduced to 1-1/4 cups. Strain wine mixture through a sieve over a bowl; discard solids. Combine flour and 3 tablespoons water. Return wine mixture to pan; add flour mixture to pan, stirring with a whisk. Bring to a boil; cook 1 minute or until thickened, stirring constantly with a whisk. Remove from heat; stir in butter and vinegar.

This was fairly good, although cooking it when it was already pre-sliced kind of dried out the edges a bit.

Overall, we were pretty happy with it, and it made a good special occasion meal.


Nutrition Facts
Amount per serving
Calories 293Calories from fat 99
% Daily Value
Total Fat 11.0g17%
Saturated Fat 4.8g24%
Trans Fat 0.0g
Cholesterol 66mg22%
Sodium 460mg19%
Total Carbs 3.8g1%
Protein 32.1g
Vitamin A 3%Vitamin C 2%
Calcium 3%Iron 16%

LinkWithin

Related Posts with Thumbnails
 
Pin It button on image hover